Tech Tip: Extracellular Vesicle Isolation and Analysis
This tech tip provides practical guidance for isolating and fluorescently staining extracellular vesicles (EVs) for optimal detection by flow cytometry, fluorescent nanoparticle tracking analysis (fNTA), and western blot. It includes key considerations when working with EVs, recommended best practices, and step-by-step protocols. For background on EV biology, see our blog post on the subject.
1. Challenges of Working with EVs
Extracellular vesicles present unique analytical challenges that must be carefully considered when designing a detection workflow. Their small size makes them difficult to differentiate from background particles or debris in a sample, and limits the number of binding sites available for antibodies or dyes. It can also make it difficult to collect enough material for analysis, requiring more sensitive methods and reagents. Therefore, EV probes need to have bright fluorescence to reach the limit of detection, and at the same time, little to no aggregation to reduce non-specific particles. Here, we cover the main challenges of fluorescence staining and detection of EVs, and approaches on solving them.
Difficulty differentiating EVs from debris and aggregates
Tip: Choose an isolation method that does a good job of separating EVs from other particles (see Isolation Methods section below).
Tip: Use an antibody or dye at the lowest useful concentration to decrease background.
Tip: Choose a stain that is not prone to aggregation (see Fluorescent Labeling of EVs section below).
Low signal over background
Tip: Choose a bright and validated probe (see recommendations for fluorescent antibodies and surface stains in Fluorescent Labeling of EVs section below).
Tip: Titrate the probe to find the concentration that yields the best signal-to-noise ratio.
2. EV Isolation
Obtaining a clean and well-enriched EV preparation is critical for successful staining and detection. When attempting to detect EVs stained with fluorescent dyes or antibodies, one of the biggest challenges is that the dye or antibody may bind non-specifically to contaminants in the preparation, such as aggregated proteins and membranous cellular debris. The following tips are suggestions to help reduce these contaminants in an EV prep.
2.1. Sample Source
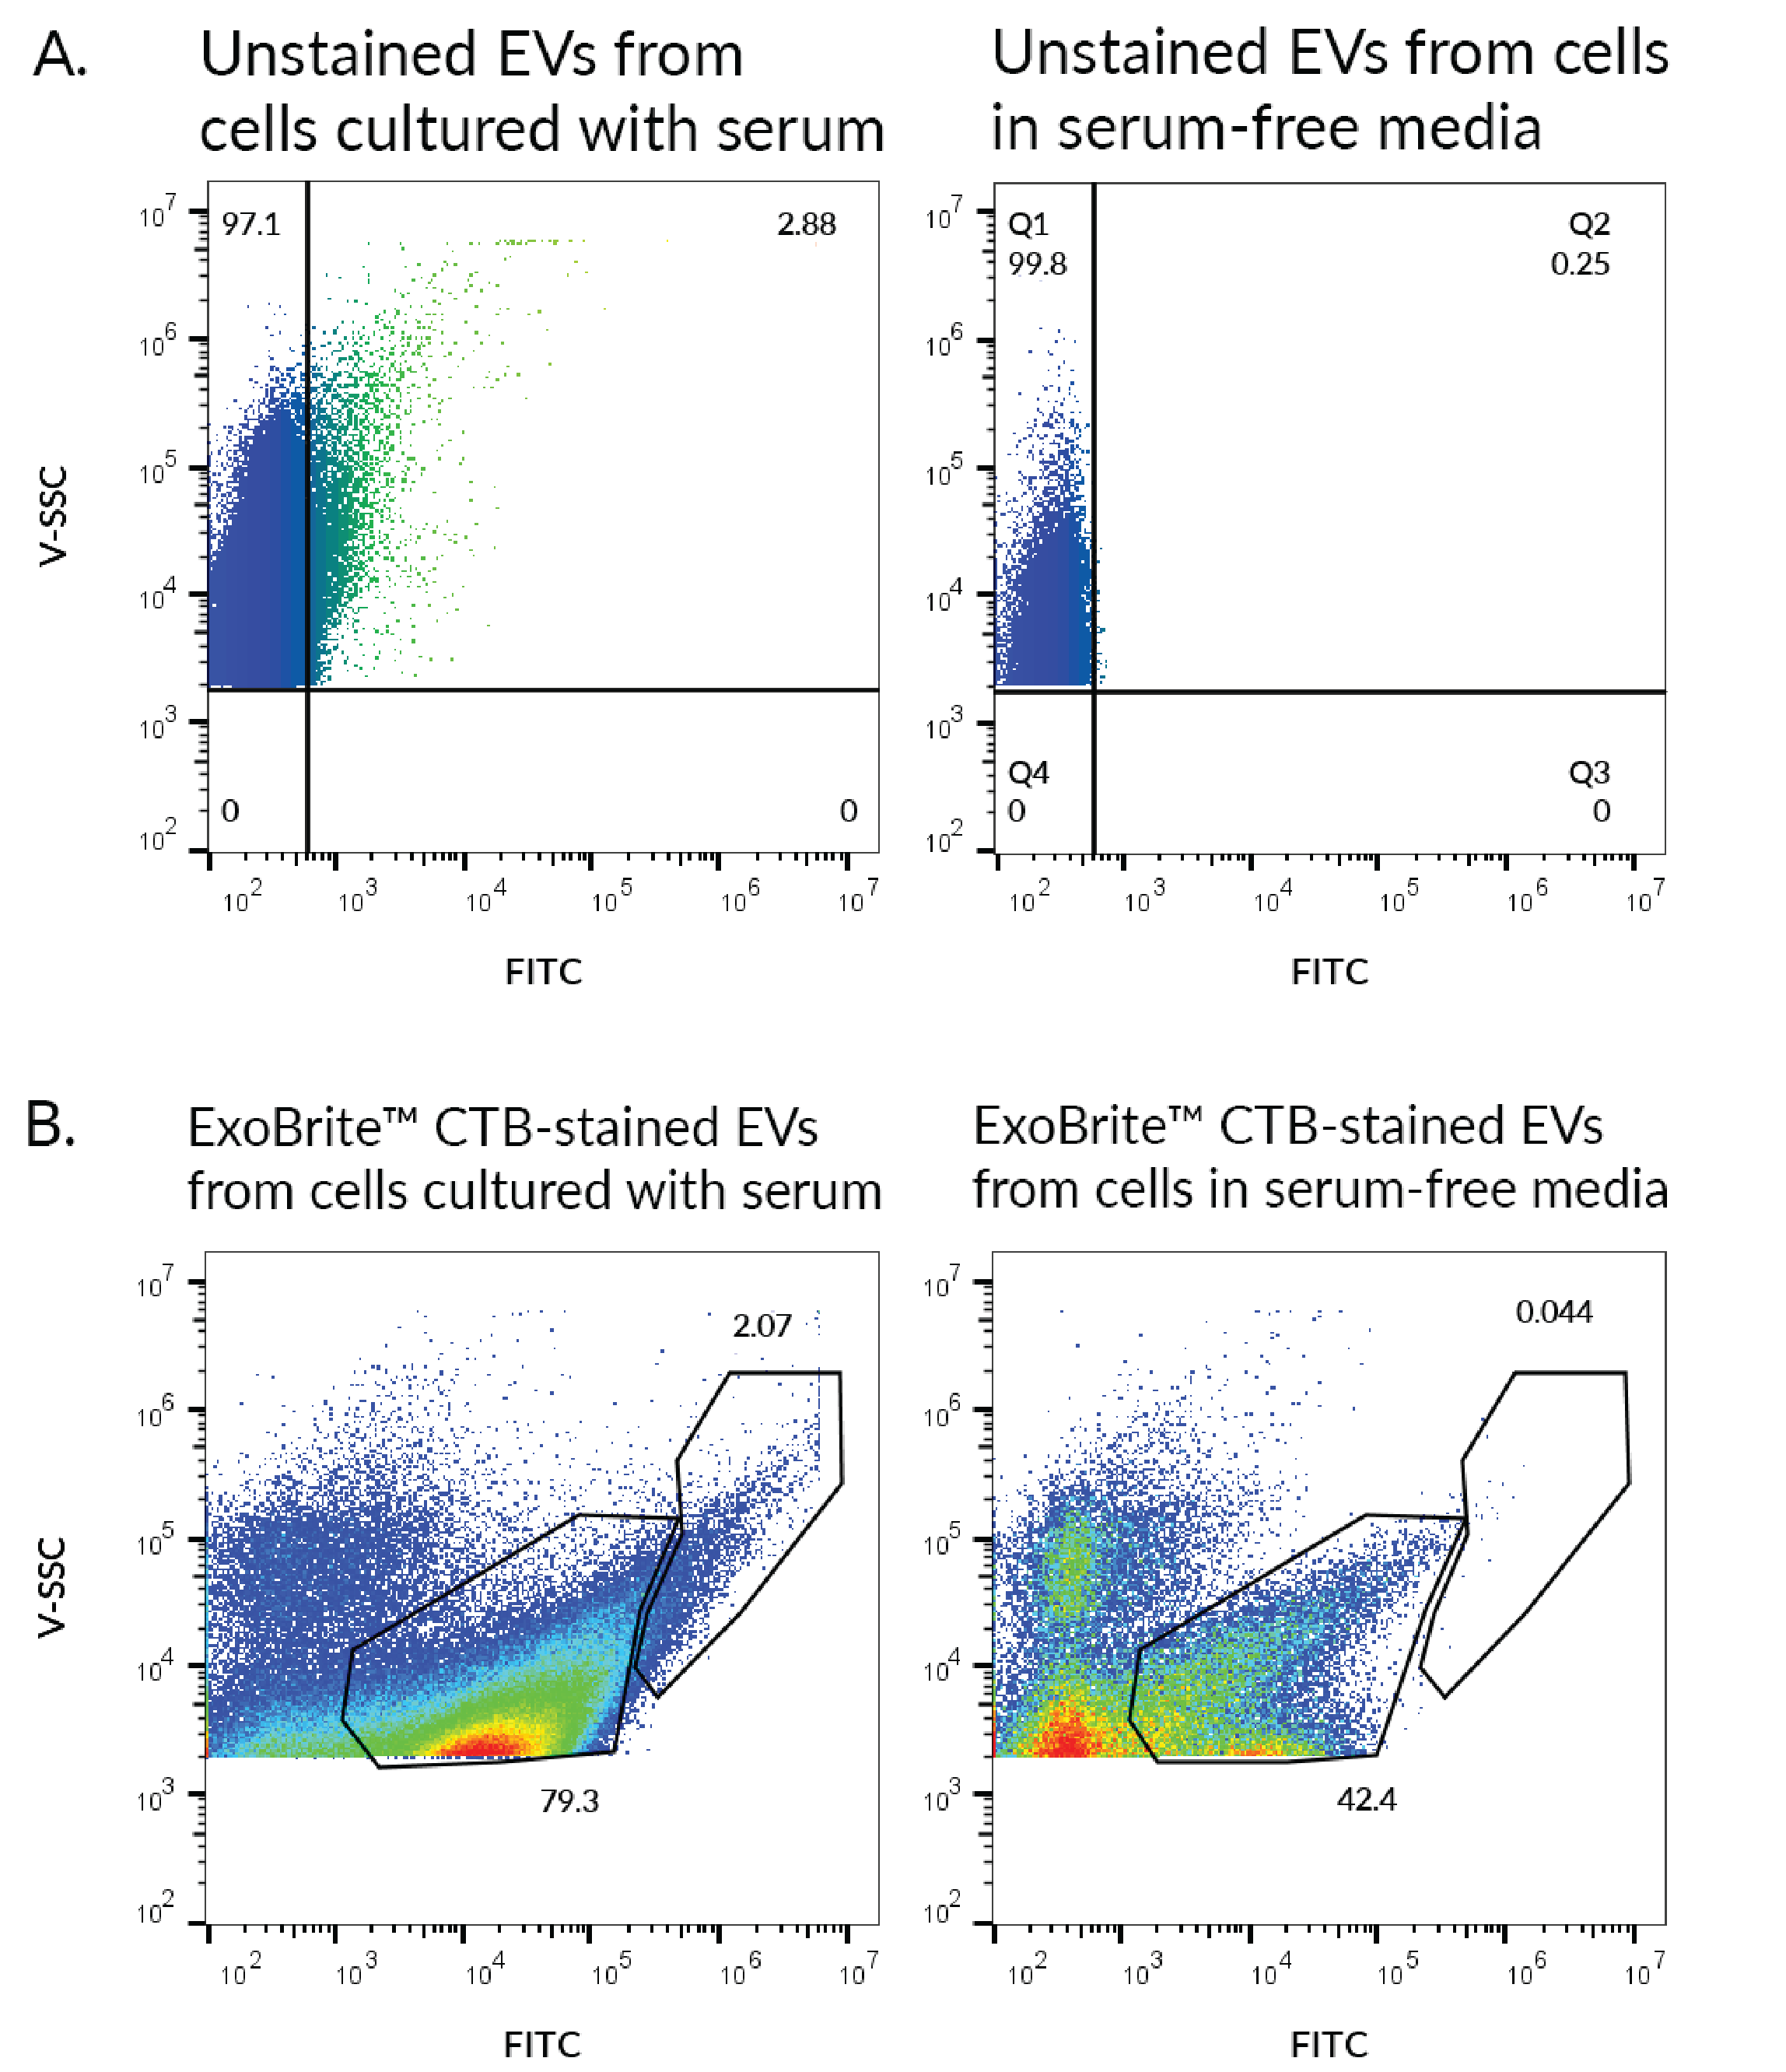
The abundance and quality of the EVs in your prep will largely depend on the source material. Some researchers may have limited flexibility in their choice of source material, for example, those who are using a specific biological fluid (e.g., blood or urine) for diagnostics. For researchers purifying EVs from cultured cells, the choice of growth medium is important. Bovine serum, commonly used for cell culture, contains bovine EVs, as well as aggregated protein components like fibrinogen that will confound downstream detection. We recommend growing cells using either EV-depleted FBS, or in serum-free medium, depending on the needs of your cells of interest. For immortalized cell lines that can tolerate serum-free conditions, one approach we have found effective is to grow cells to the desired confluency in serum-containing medium, then switch to serum-free medium for 48-72 hours before collecting the conditioned medium for EV isolation (Figure 1).
Figure 1: A) EVs were enriched using PEG precipitation from MCF-7 conditioned medium, and then analyzed by flow cytometry without any staining. EVs from cells that were grown in complete medium containing FBS (left) show more particles with false-positive signal in the FITC channel compared to EVs from cells grown for 2 days in serum-free medium (right). B) EVs were enriched using PEG precipitation from MCF-7 conditioned medium, stained with Biotium’s ExoBrite™ 490/515 CTB EV Stain (Cat. No. 30112), and then analyzed by flow cytometry. EVs from cells grown for 2 days in serum-free medium (right) are a more homogeneous population, with fewer high molecular weight species, compared to EVs from cells grown in medium with FBS (left).
2.2. Protocol: Cell Plating and Conditioned Medium Collection
The exact culture conditions will vary depending on the cell type, but these conditions, which we have tested with a variety of immortalized cell lines, are provided as a guideline.
Materials needed:
Complete growth medium
Serum-free growth medium
Procedure:
Culture cells:
For adherent cells, culture the cells in a flask of at minimum T75 size, with 20 mL complete cell culture medium. Allow the cells to become as confluent as they can tolerate.
For suspension cells, culture the cells in a minimum volume of 20 mL complete cell culture medium, until they reach a high density (e.g., for Jurkat cells, around 2 x 10⁶ cells/mL).
Two to four days before EV isolation, replace the medium in the flask with serum-free medium. For suspension cells, do this by pelleting the cells and resuspending in serum-free medium.
Incubate the cells in serum-free medium for 2-4 days (choose a time when you don’t get a lot of cell death), and then collect at least 20 mL of cell supernatant. For suspension cells, pellet the cells and collect the supernatant.
Centrifuge the cell supernatant at 2,000 x g for 10 minutes at room temperature to remove residual cells and large debris. Transfer the clarified supernatant to a clean tube.
The cleared culture supernatant, now referred to as conditioned medium, is ready to use for EV isolation.
2.3. Isolation Methods
Multiple methods are available for EV isolation:
Differential ultracentrifugation: Sequential centrifugation steps to enrich EVs.
Size exclusion chromatography (SEC): Column matrix for separation based on particle size.
Tangential flow filtration (TFF): Filter-utilizing method based on particle size.
Table 1 below summarizes these common EV isolation methods, including advantages and limitations based on our own internal testing as well as published review articles (References 1, 2).
Tip: Our preferred and recommended method is SEC with 70 nm columns. This easy-to-use method does not require an ultracentrifuge and yields enriched EVs at concentrations suitable for flow cytometry and fNTA. See protocols below for PEG isolation, SEC isolation, and immuno-capture bead isolation.
Table 1: Comparison of Isolation Methods
Isolation method
Pros
Cons
Differential ultracentrifugation
The traditional isolation method
Sequential steps allow removal of larger vesicles
Does not remove particles smaller than EVs
Requires a high-speed ultracentrifuge
May result in damaged EVs
Size exclusion chromatography (SEC)
Columns select particles by size
Large and small contaminants are excluded
No special equipment required
May use a wide range of sample volumes if concentrated first
Our preferred method for isolating EVs
EV sample may be dilute
Tangential flow filtration (TFF)
Scalable and well suited for processing large input volumes
Can process continuously
Removes small contaminants
Does not remove larger particles
Requires specialized equipment and membranes
Membrane clogging can occur with highly concentrated samples
Downstream purification step typically needed to obtain high-purity EVs
Polyethylene glycol (PEG) precipitation
Inexpensive method
Utilized by several commercial kits
No special equipment required
Does not select for EVs by size
Co-precipitates many non-specific particles
Requires an overnight incubation
Resulting EV prep contains residual PEG
Immuno-capture beads
Selecting for tetraspanins should enrich for EVs
Capture enables washing before or after staining, difficult with other methods
Bead-bound EVs can be stained with antibodies and some other probes for detection
Bead-bound EVs easily detected as bright, dense population in flow
Capturing based on specific proteins may bias analysis
Cannot analyze individual EVs
Hydrophobic dyes will stick directly to beads
Spin column kits (e.g., ExoQuick, Exo-spin™)
Sold by several companies
Simple procedures
No special equipment required
Poor purity, many non-EV contaminants
2.4. Protocol: SEC Isolation Method (SEC EVs)
There are a number of different Size Exclusion Chromatography (SEC) columns specifically designed for EV isolation, which work comparably. For simplicity, we have included a protocol for a specific column that we have found to work well. This procedure can be adapted for columns from other manufacturers or other sizes, but volumes will need to be adjusted.
The typical yield for this method is 2 mL of ~1-5 x 10¹⁰ EVs/mL from 20 mL of conditioned medium, depending on cell type and confluency.
0.2 um syringe-filtered 1X PBS (filter on the day of use)
0.2 um syringe-filtered 1X PBS + 2 mM sodium azide (filter on the day of use)
1-day procedure:
Bring the SEC column to room temperature.
Retrieve conditioned medium.
Concentrate the conditioned medium from 20 mL to 500 uL using an Amicon® filter, following the manufacturer’s instructions.
Note: For applications that require highly concentrated EVs, such as western blot or RNA isolation, you can increase the amount of supernatant (up to 400 mL to concentrate to 2 mL). It is more efficient to concentrate conditioned medium before SEC than to concentrate purified EVs after SEC.
Set up the SEC column in a rack such that buffer and sample can flow through the column by gravity and be collected.
Apply 10 mL of filtered PBS to the column. Let it flow out into a waste tube. Discard this flow-through.
Apply 0.5 mL of concentrated conditioned medium to the column. Discard this flow-through.
Add an additional 1.5 mL of filtered PBS, and discard the flow-through.
Place a fresh collection vessel under the column and apply 2 mL of filtered PBS. Collect 2 mL of sample; this will contain your EVs.
Once the 2 mL EV sample has been collected, put the waste container back underneath the column and wash the column with 8 mL of 0.5 M NaOH and then 17 mL of 1X PBS + 2 mM azide. Store the column at 4°C to be used again if desired.
EVs can be stored at 4°C, or frozen at -20°C or -80°C. EVs are sensitive to multiple freeze-thaws so we recommend storing in single-use aliquots at -20°C or -80°C, or placing them at 4°C after the first thaw.
2.5. Protocol: 30% PEG Isolation Method (PEG EVs)
Materials needed:
0.2 um syringe-filtered 1X PBS (filter on the day of use)
Polyethylene glycol (PEG) 6000. Prepare a 30% solution in fresh sterile-filtered PBS or dH2O.
Day 1:
Retrieve fresh conditioned medium.
Add 0.5 volumes of 30% PEG 6000 to the conditioned medium (i.e., 10 mL of 30% PEG to 20 mL of conditioned medium).
Mix the solution well by inverting the tube until the solution is homogeneous.
Incubate the mixture at 4°C overnight without rocking.
Day 2:
Centrifuge the mixture at 10,000 x g for 1 hour at 4°C. The EV pellet will be translucent. Note or mark the side of the tube that is facing the outside of the centrifuge, where you expect the pellet to form.
Carefully pour off the supernatant, being careful to avoid pouring out the translucent EV pellet. You can carefully remove the remaining PEG with a pipette and/or by leaving the tube upside down on an absorbent towel to remove as much as possible of the remaining supernatant.
Resuspend the pellet in filtered 1X PBS (1 mL per 20 mL of starting sample).
Magnetic immunoaffinity isolation beads (e.g., beads coupled to tetraspanin antibodies)
Note: Use the EV capture beads of your choice, such as Biotium’s ExoBrite™ Streptavidin Magnetic Beads (Cat. No. 28000), coupled to your biotinylated capture antibody of choice (see antibody-bead binding procedure below).
Add 2 ug biotinylated antibody of interest and incubate for 1 hour at room temperature, rotating.
Place on a magnet, remove the supernatant, and resuspend in 500 uL bead wash buffer. Repeat this wash one more time, and resuspend in 500 uL bead wash buffer. The beads are now ready to be used for EV isolation. The beads with bound antibody can be stored at 4°C, with the addition of 0.02% azide.
Isolation procedure
Obtain fresh conditioned medium and concentrate it with an Amicon® filter according to the SEC Isolation Method instructions above in section 2.4. For conditioned medium we recommend concentrating 20 mL to 500 uL and then adding 100 uL of that to beads. Alternatively, you can use PEG EVs or SEC EVs, though we have found that these pre-enrichment steps are not necessary.
Resuspend beads by vortexing for 30 seconds.
Transfer 20 uL of beads per microcentrifuge tube, one tube for each antibody or stain, plus controls. We recommend including a negative control with beads only (no EVs) for each antibody or dye you will use for staining.
Place tubes on the magnet for 1 minute and discard the supernatant with a pipette. If you’re having trouble seeing the beads, try briefly centrifuging the tubes and then place them back on the magnet.
Remove the tubes and add 100 uL of the concentrated conditioned medium (or enriched EVs) to each tube (add 100 uL bead wash buffer to the no-EV bead tube). Mix gently.
Incubate the tubes for 1 hour at room temperature, rotating.
Briefly centrifuge the tubes to collect beads in the bottom of the tube, then place on the magnet for 1 minute and discard the supernatant with a pipette.
Wash the beads with 300 uL bead wash buffer.
Repeat step 7.
Remove the tubes from the magnet and resuspend the bead-bound EVs in 300 uL bead wash buffer.
The bead-bound EVs can be stained according to section 3.5 or 3.6, or stored at 4°C. Do not freeze.
3. EV Staining
After isolation, EVs can be fluorescently labeled using antibodies or other stains. However, not all labeling strategies perform well due to EV size and susceptibility to dye aggregation.
3.1. Fluorescent Labeling of EVs
The most well-established EV markers are the tetraspanin proteins CD9, CD63, and CD81 found in the membranes of EVs. Using fluorescently labeled antibodies against one or more of these proteins is an effective way to label EVs for detection by flow cytometry or other methods. Compared to membrane stains, antibodies offer greater specificity for their target, but they have fewer targets to bind on EVs, which can result in dimmer staining. Staining efficiency can also vary by EV source as tetraspanin expression differs across cell types and biological fluids. Our ExoBrite™ Flow Antibody Cocktails were designed to address these challenges: Single Color Antibody Cocktails provide an optimized mixture of antibodies against CD9, CD63, and CD81 for high-coverage EV staining, while 3-Color Antibody Cocktails enable tetraspanin profiling to phenotype EVs.
Another way to fluorescently label EVs for detection is to stain them with probes that bind to molecules on the EV surface. Being surrounded by a single lipid bilayer, EVs are able to bind to membrane-intercalating dyes. However, not all membrane dyes work equally well for EV staining. Some membrane dyes, like the PKH dyes or the classic carbocyanine dyes, such as DiO and DiI, have poor solubility in aqueous solutions and can thus form aggregates that can be confused with EVs (References 3-5). Other membrane dyes that have been used for EV staining, such as di–8-ANEPPS, simply don’t offer EV staining that is robust or bright enough for efficient detection (Reference 6). These limitations highlight the importance of validating dyes specifically for EV applications.
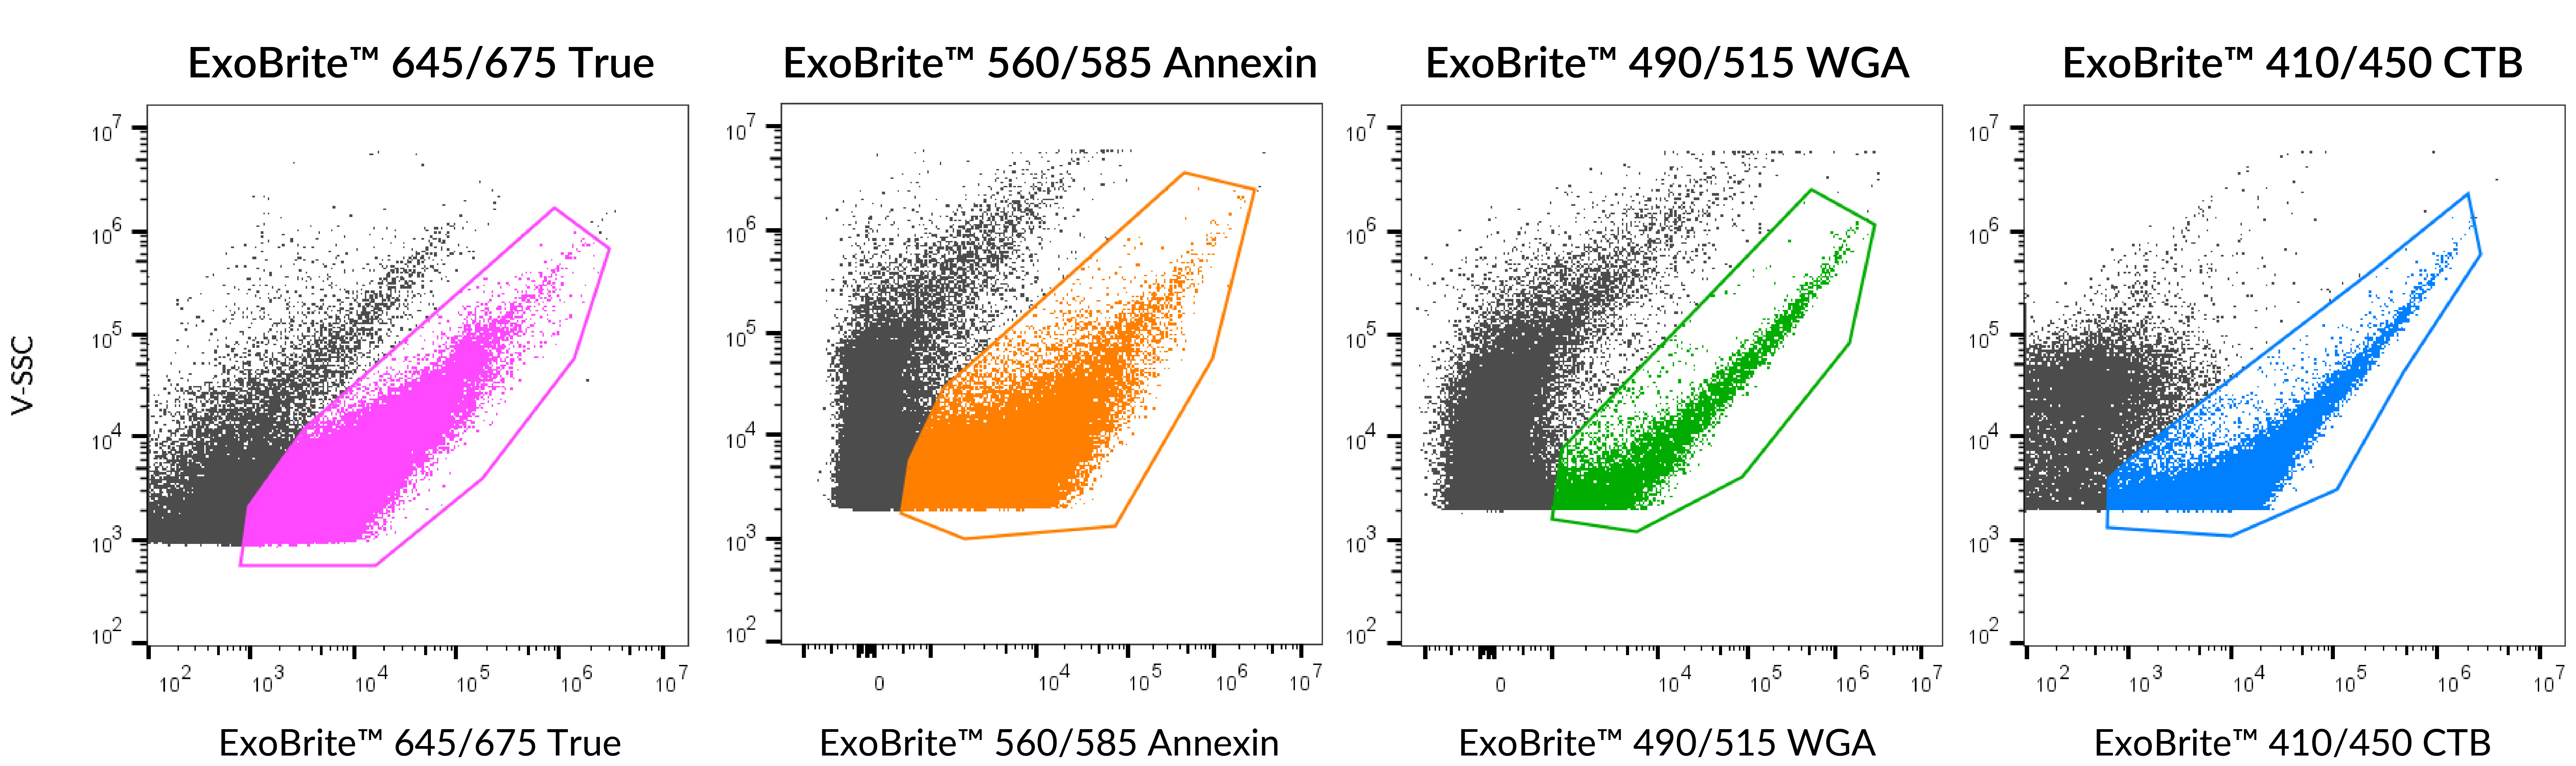
Biotium has tested more than 40 different surface stains by flow cytometry and selected those that offer the best detection of EVs. This work led us to develop the ExoBrite™ line of EV stains. Our ExoBrite™ True EV Membrane Stains are bright lipophilic dyes designed for pan-EV labeling and provide near-complete EV coverage with broad sample compatibility. We also offer ExoBrite™ Annexin, ExoBrite™ WGA, and ExoBrite™ CTB EV Stains, which are based on fluorescent protein ligands for cell surface targets (Figure 2). We continue to develop and evaluate other types of dyes and products for EV research.
Figure 2: SEC EVs stained with ExoBrite™ 645/675 True (Cat. No. 30137), ExoBrite™ 560/585 Annexin (Cat. No. 30121), ExoBrite™ 490/515 WGA (Cat. No. 30124), and ExoBrite™ 410/450 CTB (Cat. No. 30111) EV Membrane Staining Kits and analyzed by flow cytometry, demonstrating the range of probe types and colors of the kits.
Table 2: Comparison of Various EV Stains
Stain
Color selection
Purified EV staining
Bead-bound EV staining
EV source ubiquity
Aggregation
Staining validated for EVs derived from the following cell lines and sources4
1Lipophilic dyes, such as PKH dyes and the DiO/DiI/DiR/DiD/DiB dye family. 2Aggregation is gateable in flow cytometry and is better than other EV membrane dyes. 3Due to high aggregation, we do not recommend using these dyes for EV staining or supply protocols for their use as EV stains. 4Check the product pages for up-to-date information on validated cell lines and sources. 5Poor due to non-specific sticking of dye to beads. 6Customer-reported data.
3.2. Tips for EV Staining
Use validated probes. Not all antibodies or membrane dyes that work for cell staining perform well with EVs.
For antibodies, it is important to use clones that have been validated specifically for EV detection, such as the ExoBrite™ line of antibodies, which are provided in a proprietary buffer for lower aggregation and higher signal-to-noise than other antibodies.
Choose bright fluorophores for antibody conjugates–since EVs carry far fewer copies of each target protein than cells do, signal per EV is inherently low.
When staining EVs for fNTA, use dyes that are photostable. Blue dyes are more challenging to detect via fNTA because they are less photostable.
For surface stains, very few commonly used cell membrane dyes translate well to EVs, usually due to aggregation or poor coverage. Look for stains that have validation data for EVs, including controls for aggregation.
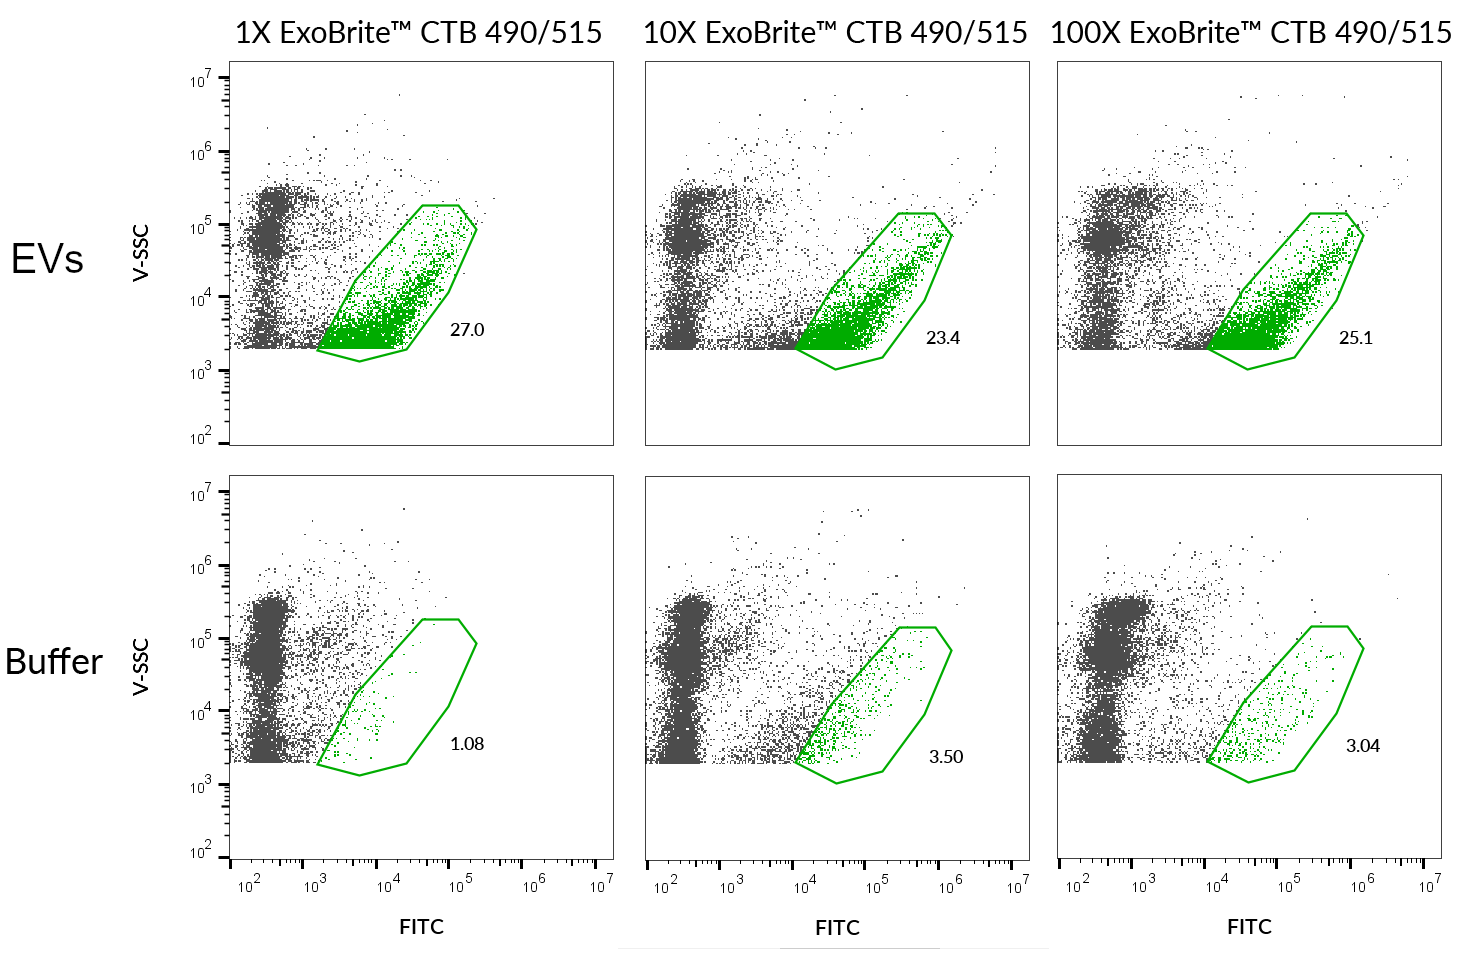
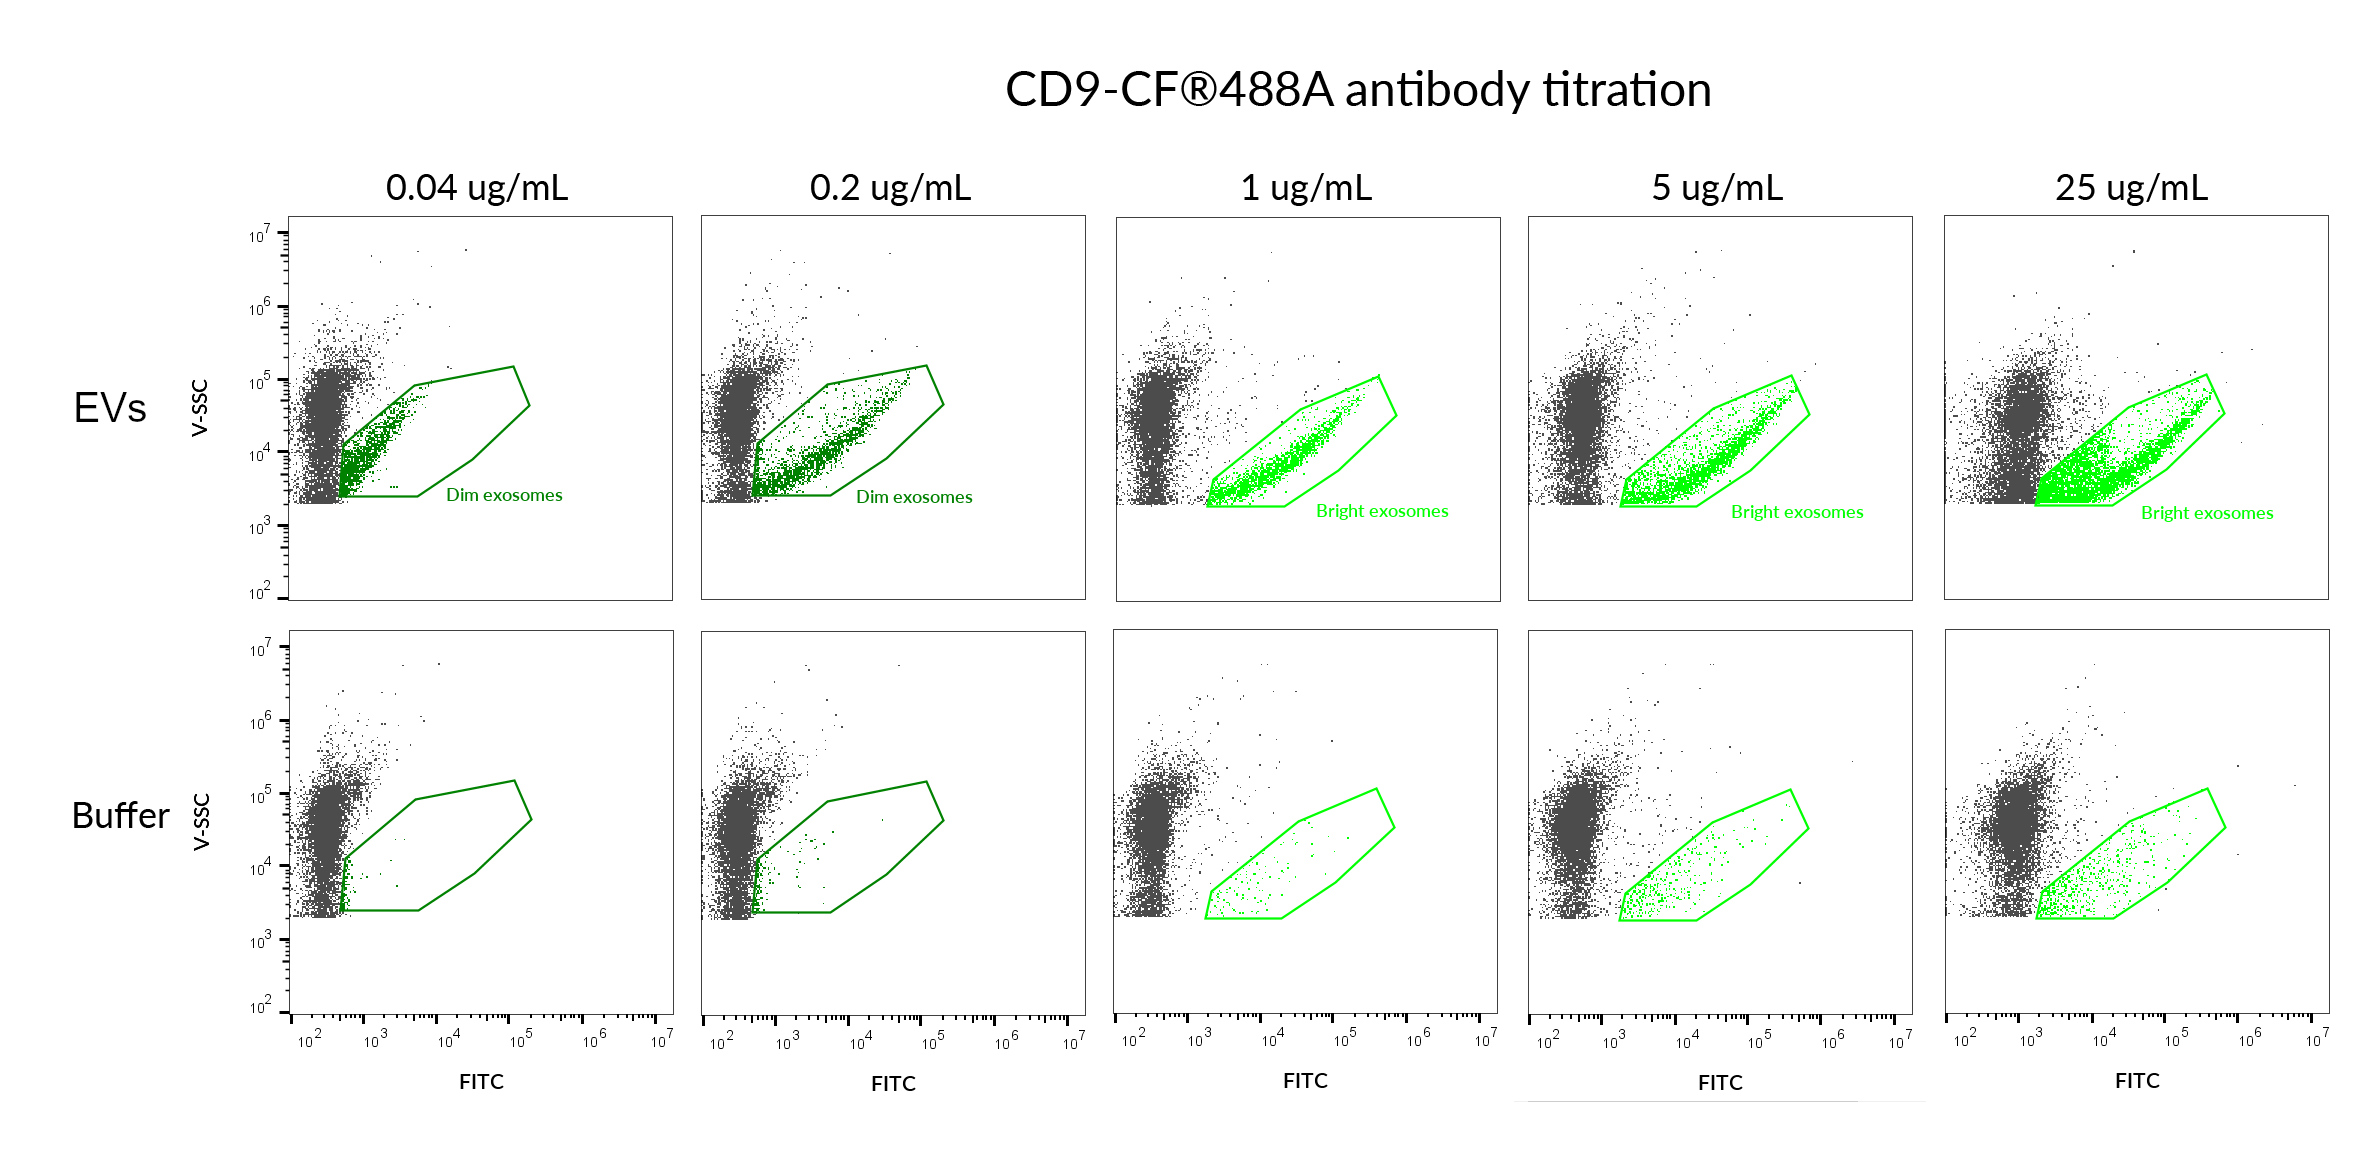
Titrate your probe and include aggregation controls. EVs have fewer target proteins than cells and samples are often dilute, so lower probe concentrations than you would use for cell staining are typically sufficient. More importantly, both antibodies and dyes can form fluorescent aggregates that generate false-positive signals, and this effect worsens at higher concentrations. Titrate to find the lowest concentration that gives good signal (Figures 3 and 4). Always include a control of stain or antibody in buffer alone (without EVs) to assess aggregation.
Use frozen EVs for antibody staining. We have found that frozen EVs typically yield brighter antibody staining than fresh EVs, though some EVs may be lost during freezing. After EV isolation, freeze at least overnight before staining. After thawing, the previously-frozen EVs can be stored at 4°C.
Perform all staining at room temperature. Staining EVs at 4°C may lead to an increased amount of aggregates.
Use enough EVs. A common issue is dilute EV preps: If your EVs are not concentrated enough, you may not get robust signal on flow. For flow and fNTA we recommend an EV concentration of >1 x 10¹⁰ particles/mL as measured by nanoparticle tracking analysis (NTA). If your sample is less concentrated, you can try concentrating the EVs using concentrator columns. We typically get better EV recovery by concentrating conditioned medium before isolation to increase input material, rather than concentrating diluted EVs after isolation. If your EVs are more concentrated than 1011, you can dilute them before staining. For ExoBrite™ stains, you do not need to adjust the stain concentration depending on the EV concentration.
Syringe filter solutions to avoid contaminating particles. For applications such as flow or fNTA, contaminating particles commonly found in buffers and other solutions can appear as the same size as EVs, and may bind non-specifically to dyes or antibodies. We recommend using the cleanest buffers and solutions possible, and passing them through a 0.2 um syringe filter on the day of the experiment. We have found that using syringe filters gives cleaner results than using filter units.
3.3. Protocol: Staining Enriched or Purified EVs with ExoBrite™ Surface Stains
Materials needed:
0.2 um syringe-filtered 1X PBS (filter on the day of use)
ExoBrite™ True, CTB, WGA, or Annexin EV Staining Kits. See Table 2 and Figure 2 for comparisons of our 4 EV surface stain options.
Procedure:
Thaw EVs if they have been stored at -80°C.
Prepare 1X ExoBrite™ Staining Solution, making enough for 500 uL per sample. Note that each ExoBrite™ stain has a different procedure for preparing the staining solution, so follow the instructions in the appropriate product information sheet. ExoBrite™ Annexin staining must be performed in the provided Annexin buffer.
Aliquot 50 uL of EVs into flow tubes. Always prepare a control tube without EVs (e.g., with 50 uL fresh syringe-filtered 1X PBS) as a background control for each stain being used.
Add 450 uL of 1X ExoBrite™ Staining Solution to the EV and control tubes and vortex.
Incubate for 30 minutes at room temperature in the dark.
The stained EVs can be run directly on flow (See section 4. EV Detection by Flow Cytometry) or diluted and run in fNTA (see section 5. EV Detection by fNTA).
Figure 3: MCF-7-derived SEC-purified EVs were stained with 1X, 10X, or 100X ExoBrite™ 490/515 CTB EV Stain (Cat. No. 30112). Increasing the concentration of stain only slightly increased the brightness of the stained EVs, but increased the frequency of non-specific aggregates (bottom row). We recommend titrating stains to achieve good signal-to-noise.
3.4. Protocol: Staining Enriched or Purified EVs with Antibodies
Materials needed:
0.2 um syringe-filtered 1X PBS (filter on the day of use)
Aliquot 100 uL of EVs into flow tubes. Prepare a control tube without EVs (e.g., with 100 uL fresh syringe-filtered 1X PBS) as a background control for each antibody being used.
Add the desired amount of labeled antibody to each tube and mix well by vortexing. We suggest setting up the following control tubes: buffer alone (no EVs, no antibodies), buffer + stains (i.e., no EVs, and each antibody), and EVs stained with an isotype control antibody labeled with the same dye. Protocols on product pages can be used for further guidance.
Note about antibody amount: For individual ExoBrite™ Flow Antibodies, we suggest using 1 uL, but you may want to titrate from 1-5 uL. ExoBrite™ Flow Antibody Cocktails should be used at 5 uL. For other primary antibodies, we suggest 0.1 ug as a starting point and titrating to optimize.
Incubate for 30 minutes at room temperature in the dark.
Add 900 uL PBS before running the samples on flow.
Figure 4: MCF-7-derived SEC-purified EVs were stained with a 5-fold dilution series of ExoBrite™ 490/515 CD9 Flow Antibody (Cat. No. P003-490). The two lowest antibody concentrations gave dim EV staining (dark green dim gate), while the other concentrations gave bright EV staining (light green gate). However, increasing the concentration of antibody increased the frequency of non-specific aggregates (bottom row, far right). The middle concentration, 1 ug/mL, showed both bright staining and low background. We recommend titrating antibodies to achieve good signal-to-noise.
3.5. Protocol: Staining Bead-Bound EVs with ExoBrite™ Surface Stains
Materials needed:
Bead wash buffer (e.g., 1X PBS + 0.1% BSA)
ExoBrite™ CTB or WGA EV Staining Kits. See Table 2 and Figure 2 for comparisons of our 4 EV surface stain options.
Note: We do not recommend lipophilic membrane dyes (i.e., ExoBrite™ True, PKH or DiI), as they will stick directly to the beads.
A magnet stand for use with microcentrifuge tubes
Procedure
Place the tubes on the magnet for 1 minute and discard the supernatant with a pipette.*
Add the desired EV surface stain. We suggest setting up the following control tubes: beads alone (no EVs, and no stains), and beads + stains (i.e., no EVs, and each dye). Protocols on product pages can be used for further guidance.
Note: We recommend using 10X ExoBrite™ WGA or ExoBrite™ CTB EV Stains for bead-bound EVs.
Incubate tubes for 30 minutes at 4°C on a rocker, in the dark.
Place the tubes on the magnet for 1 minute and discard the supernatant using a pipette.*
Remove the tubes from the magnet and wash the bead-bound EVs by adding 300 uL of bead wash buffer. Mix gently by pipetting.
Place the tube on the magnet for 1 minute and discard supernatant using a pipette.*
Resuspend the beads in 500 uL of bead wash buffer and transfer to flow tubes.
Run samples on the flow cytometer at slow speed, collecting at least 2,000 events per sample.
*Note: If you’re having trouble seeing the beads, try centrifuging the tubes briefly and then place them back on the magnet.
3.6. Protocol: Staining Bead-Bound EVs with Antibodies
Materials needed:
Bead wash buffer (e.g., 1X PBS + 0.1% BSA)
Primary antibodies (i.e., ExoBrite™ Flow Antibodies)
Note: In our testing, we have found that ExoBrite™ 490/515 dye may bind to streptavidin coated surfaces or beads if free biotin binding sites are not blocked. We recommend performing a biotin blocking step after binding your biotinylated capture antibody to streptavidin beads or surfaces when using ExoBrite™ 490/515 conjugates. Alternatively, consider using a different ExoBrite™ dye for staining EVs captured on streptavidin beads or surfaces.
Fixation buffer or 4% paraformaldehyde (for intra-EV staining)
0.01% saponin in 1X PBS (for intra-EV staining)
A magnet stand for use with microcentrifuge tubes
Procedure
Place the tubes on the magnet for 1 minute and discard the supernatant with a pipette.*
Resuspend the bead-bound EVs (and no-EV control beads) in 100 uL of bead wash buffer.
To stain a surface protein, skip to step 5. To stain an intra-EV protein, proceed to step 4.
Fix and permeabilize the bead-bound EVs:
Place the tubes on the magnet for 1 minute and discard the supernatant with a pipette.*
Resuspend the beads in 100 uL of fixation buffer (or 4% paraformaldehyde). Mix well.
Incubate the tubes for 15 minutes at room temperature, rotating.
Place the tubes on the magnet for 1 minute and discard the supernatant with a pipette.*
Remove the tubes from the magnet and resuspend the beads in 200 uL bead wash buffer. Mix well.
Place the tubes on the magnet for 1 minute and discard supernatant with a pipette.*
Resuspend the beads in 100 uL of 0.01% saponin in 1X PBS. Mix gently.
Add the desired antibody. We suggest setting up the following control tubes: beads alone (no EVs, no antibodies), beads + stains (i.e., no EVs, and each antibody), and bead-bound EVs stained with an isotype control antibody labeled with the same dye. Protocols on product pages can be used for further guidance.
Note: For antibodies, 1 ug/mL is a good starting point. We recommend titrating your antibody of interest.
Incubate tubes at room temperature for 30 minutes, protected from light and rotating.
Place the tubes on the magnet for 1 minute and discard the supernatant using a pipette.*
Remove the tubes from the magnet and wash the bead-bound EVs by adding 300 uL of bead wash buffer. Mix gently by pipetting.
Place the tube on the magnet for 1 minute and discard supernatant using a pipette.*
Resuspend the beads in 500 uL of bead wash buffer and transfer to flow tubes.
Run samples on the flow cytometer at slow speed, collecting at least 2,000 events per sample.
*Note: If you’re having trouble seeing the beads, try centrifuging the tubes briefly and then place them back on the magnet.
4. EV Detection by Flow Cytometry
Successful detection of EVs by flow cytometry depends on both instrument sensitivity and optimized experimental conditions. The following best practices and tips can significantly improve signal quality and reproducibility.
4.1. Best Practices for Flow Cytometry Detection of EVs
The ability to detect EVs by flow cytometry is dependent upon the capabilities of the instrument itself, but there are experimental procedures that can help reduce background and achieve optimal detection. We have adopted the practices below for improved EV detection on the Beckman Coulter CytoFLEX® flow cytometer (also see Reference 7), but the principles are the same for other instruments.
Move the side scatter (SSC) filter to the violet laser (i.e., V-SSC), for improved small particle sensitivity (Reference 8).
Use fluorescent sizing beads to determine the limit of size detection for your instrument, and set the V-SSC threshold accordingly.
Dilute all samples in 0.2 um syringe-filtered PBS or other buffer.
Use bright, validated antibody conjugates or dyes (see Tips for EV Staining section above).
Use the lowest antibody or stain concentration that gives a bright signal to reduce background from fluorescent aggregates.
Run the samples at a slow rate, adjusting the flow and sample concentrations to achieve low abort rate (see Reference 7).
Always run controls without EVs by analyzing the same stain or antibody in buffer alone to check for aggregation.
Instead of collecting a specific number of events, collect for a set amount of time for each sample, including the dye-in-buffer controls. We collect each sample for 2 minutes on slow flow rate.
4.2. Protocol: Analyzing Enriched or Purified EVs by Flow Cytometry
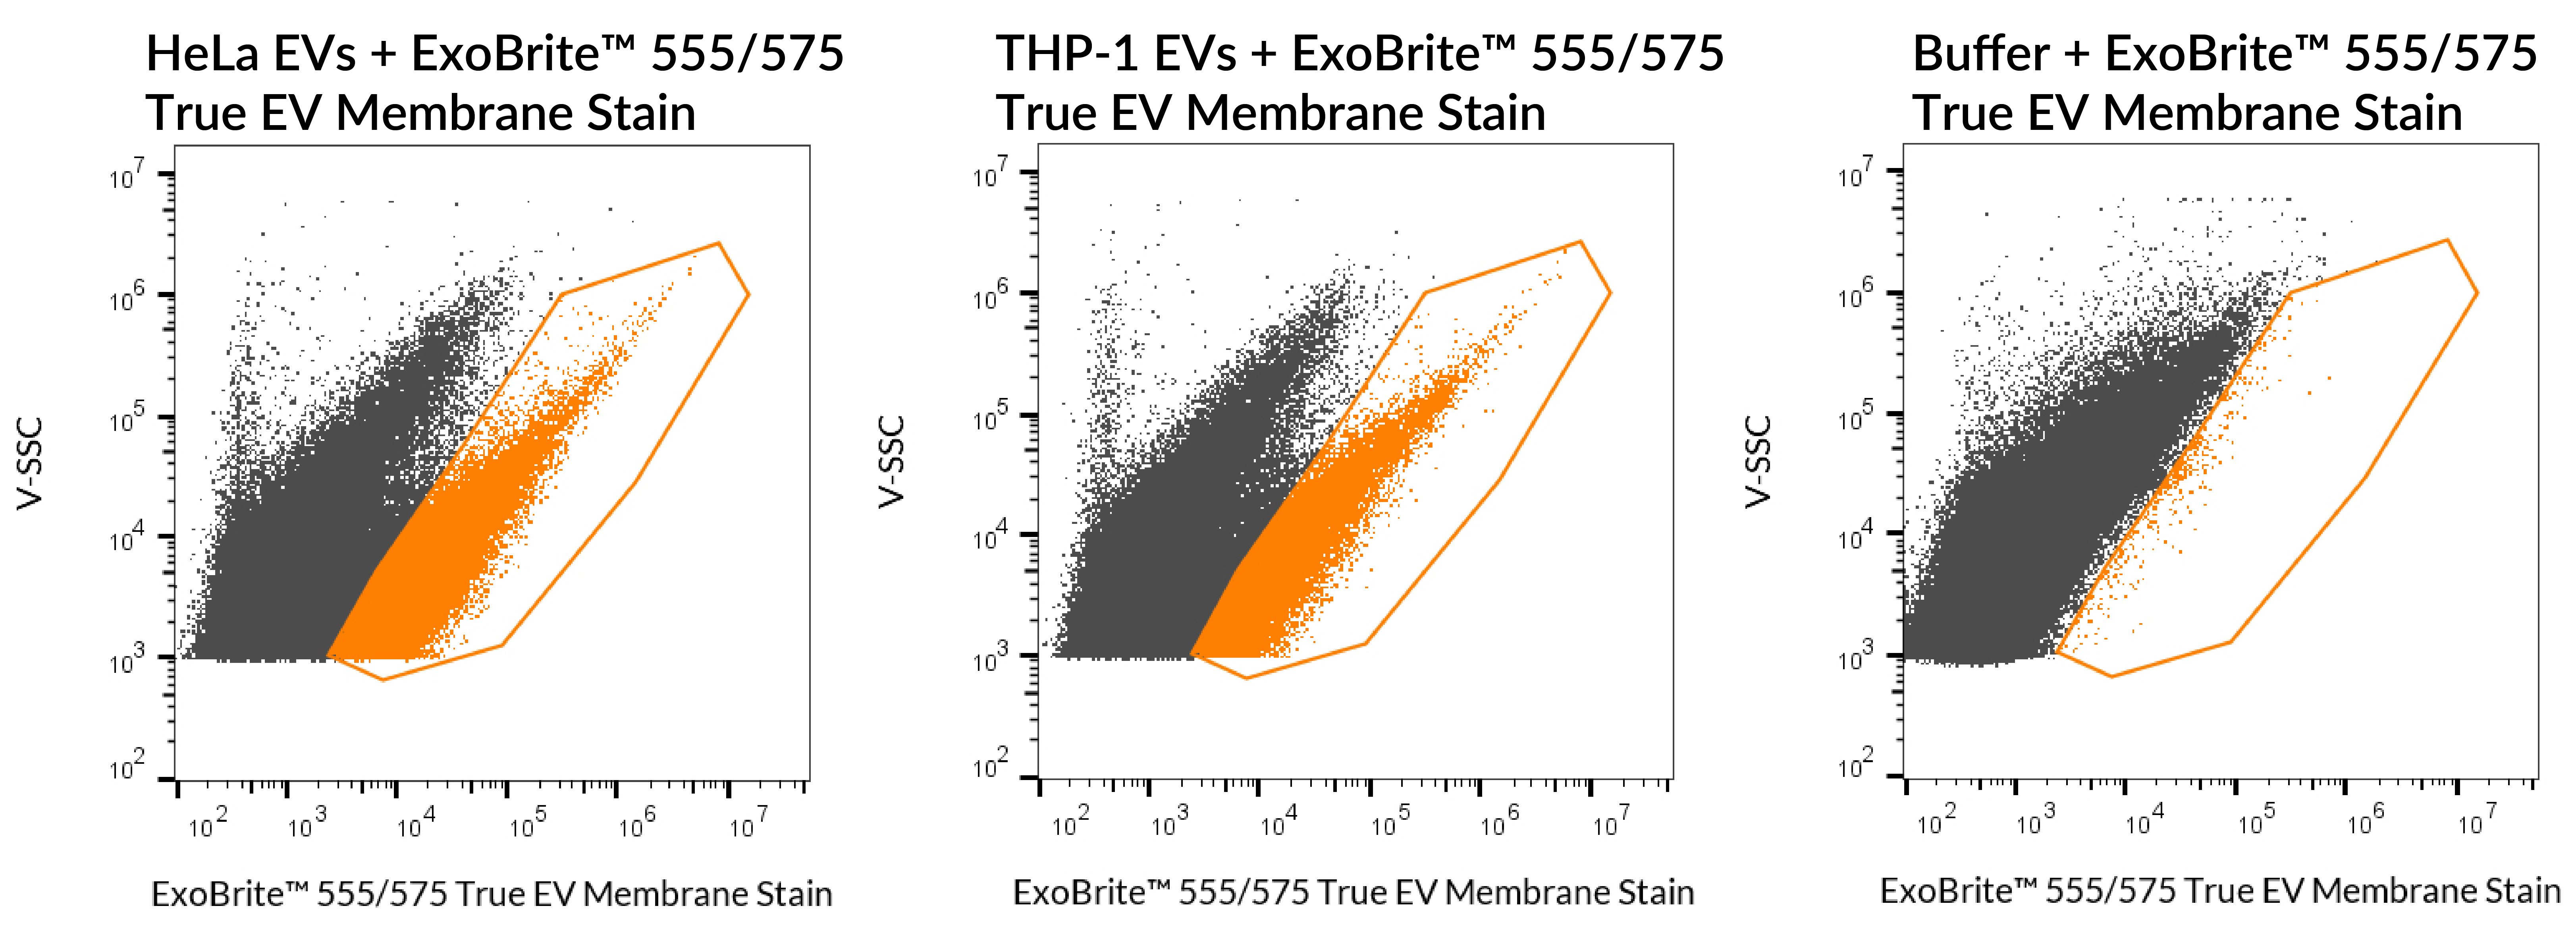
To analyze the EV staining, create a plot with the fluorescent dye channel on the x-axis and V-SSC on the y-axis. Stained EVs will usually appear as a diagonal population, with the larger particles (i.e., higher V-SSC signal) staining more brightly with the dye (Figure 5).
Note: If you are staining EVs that have never been frozen, the population will not appear as diagonal as in Figure 5.
Draw a gate around this population and copy the same gate to the “dye alone” or “antibody alone” plots. The number of particles present inside the stained EV gate can give you a relative idea of the concentration of EVs in your sample. The number of particles inside the gate in the “dye alone” sample should be low, indicating that the dye is not forming aggregates of similar size to EVs, which can complicate analysis.
Figure 5: ExoBrite™ 555/575 True EV Membrane Stain (Cat. No. 30130) was used to stain SEC EVs isolated from HeLa cells (left) or THP-1 cells (middle). The samples were run on a CytoFLEX® LX flow cytometer in the Y585 (PE) channel. The gated population shows that stained EVs are easily distinguished from background, compared to the dye in buffer alone (right).
5. EV Detection by fNTA
Fluorescent nanoparticle tracking analysis (fNTA) is a commonly used method for accurate sizing, counting, and phenotyping of fluorescently labeled EVs. A major challenge with fNTA is photobleaching, which can compromise data quality and must be carefully considered when selecting fluorescent reagents. Biotium’s ExoBrite™ True EV Membrane Stains have been validated for use on both the ZetaView® and the ARC™ platforms, and ExoBrite™ Flow Antibodies have been validated on the ZetaView®. Note that ExoBrite™ True 400/460 and ExoBrite™ 410/450 Flow Antibody Conjugates are not recommended for fNTA due to the susceptibility to photobleaching.
5.1. Protocol: Analyzing EVs by fNTA
Prepare dilutions of the stained EVs and dye-only control in 5-10 mL 0.2 um syringe-filtered water. Choose a dilution factor that falls within the recommended particle concentration range of the instrument. We recommend starting with a 1:100 dilution in water, but depending on your sample, the optimum dilution could be anywhere from 1:50-1:1000. For reliable fluorescence measurements, the dye-only control should ideally contain fewer than 10% of the fluorescent particle counts observed in the stained EV samples at the same dilution. Instrument settings should be adjusted as needed depending on sample brightness and experimental conditions.
Recommendations:
For analysis on the ZetaView®, EVs should be diluted in 0.2 um syringe-filtered water immediately prior to acquisition.
We typically stain the EVs using the same workflow as for flow cytometry, followed by dilution into 0.2 um syringe-filtered water prior to acquisition on the ZetaView®. The final dilution is typically ~1:500 to 1:10,000; make sure you take into account any dilution factors that were introduced during the staining process (usually 10-fold).
We recommend using the low bleach acquisition setting to minimize fluorophore photobleaching during measurement.
6. EV Analysis by Western Blot
While particle-level analyses, such as flow cytometry and fNTA, are popular methods for EV detection, western blotting remains a useful method to characterize EVs due to its accessibility and compatibility with a broader range of antibodies. Below are key considerations and best practices for western blot detection of EVs.
6.1. Tips for EV Detection via Western
Load appropriate amounts of protein. There is no universal standard; the optimal protein loading amount will depend on the expression level of the target, which varies between cell type and sample type. As a starting point for optimization, we recommend loading 10-30 ug per lane of total protein from cell lysates. We recommend testing 1-10 ug of protein from purified EVs as a starting point for optimization. You may be able to load just 1 ug of EV lysate if you are detecting one of the tetraspanins, because they are enriched in EVs. Higher EV protein amounts may be required for other targets.
Include a negative EV marker. Antibodies against intracellular components (i.e., endoplasmic reticulum proteins, Golgi proteins, lipoproteins) that are not present in EVs are important negative controls that are used to assess the purity of isolated EV extracts by confirming the absence of intracellular contaminants based on source material. Our ExoBrite™ Calnexin Western Antibody (Cat. No. P007-770) is a validated negative control antibody that targets an endoplasmic reticulum protein.
Include positive controls. Positive controls like cell lysate should be included if you want to demonstrate specific enrichment.
6.2. Protocol: Analyzing EV Proteins by Fluorescent Western Blot
Measure the protein concentration of the lysate with a protein quantitation assay. The AccuOrange™ (Cat. No. 30071) assay can be used to quantify the protein in EVs prior to lysis, whereas the BCA assay can be used to quantify the protein in an EV lysate.
Prepare EV lysates by adding an equal volume of a lysis buffer such as RIPA buffer.
Optional: To fluorescently label total protein for transfer confirmation and normalization, use a total protein stain kit, such as our VersaBlot™ Total Protein Normalization Kit (Cat. No. 33025, 33026).
Perform SDS-PAGE and western transfer using standard protocols.
Notes:
Check the antibody information to determine whether reducing agents should be used in the SDS-PAGE loading buffer. Some of the ExoBrite™ Western Antibodies will not bind to the proteins when reduced, but other proteins’ detection is not affected by reducing agents.
We recommend using low-fluorescence PVDF for fluorescent western blot detection. Nitrocellulose membranes may be used and in our experience have shown similar background fluorescence to low-fluorescence PVDF.
After transfer, membranes can be rinsed in water, dried, and stored between sheets of filter paper at room temperature for months or longer.
Optional: If using VersaBlot™ Total Protein Prestain, image the prestaining signal at this step. If you will be detecting other targets in the same channel used for total protein staining, perform the reversal steps as described in the VersaBlot™ product information sheet.
If using PVDF membranes, re-wet the membrane in methanol, then rinse with water. For nitrocellulose membranes, proceed to step 7.
Place membrane in a clean dish containing blocking buffer of your choice. Use enough buffer to completely cover the blot and allow it to move freely in the dish. For optimal blocking, we recommend the TrueBlack® WB Blocking Buffer Kit.
Block membrane for 30-60 minutes at room temperature with gentle rocking.
Dilute fluorescent antibody in fresh blocking buffer. Pour off the blocking buffer and add enough diluted antibody solution to allow the membrane to move freely with no stationary bubbles or dry spots.
Note: If using ExoBrite™ Western Antibodies, dilute 1:1000 (if you are using the TrueBlack® WB Blocking Buffer Kit, use the Antibody Diluent at this step). If using other primary antibodies, perform a titration to find the optimal concentration.
Incubate membrane with gentle rocking for 1-2 hours at room temperature or overnight at 4°C, protected from light.
Wash membrane 3 times for 5 minutes each with rocking in PBS or TBS with 0.1% Tween® 20. Use a generous amount of wash buffer so blots move freely during washes.
If only using fluorescently labeled primary antibodies, skip to step 15. If using labeled secondary antibody conjugates with unlabeled primary antibodies, continue to step 13.
Dilute secondary antibody in fresh blocking buffer at the concentration recommended by the supplier for western blot (usually in the range of 50-100 ng/mL). Add to blot as in step 9. Incubate membrane for 30 minutes to 2 hours with rocking.
Wash membrane as in step 11.
Rinse blot once in buffer without detergent and dry before imaging using a compatible fluorescence imaging system.
Notes:
Dried blots can be stored between sheets of filter paper at room temperature in the dark and re-scanned after months or even years.
Keep blots wet at all times and store in buffer if they are to be stripped and probed with additional antibodies.
6.3. Protocol: Analyzing EV Proteins by Chemiluminescent Western Blot
Blocking buffer
Note: Blocking buffer and wash buffers with HRP-conjugated antibodies must be free of sodium azide. TrueBlack® WB Blocking Buffer (Cat. No. 23013A-500ML) is not compatible with HRP-conjugated antibodies.
Measure the protein concentration of the lysate with a protein quantitation assay. The AccuOrange™ (Cat. No. 30071) assay can be used to quantify the protein in EVs prior to lysis, whereas the BCA assay can be used to quantify the protein in an EV lysate.
Prepare EV lysates by adding an equal volume of a lysis buffer such as RIPA buffer.
Perform SDS-PAGE and western transfer using standard protocols.
Notes:
Check the antibody information to determine whether reducing agents should be used in the SDS-PAGE loading buffer. Some of the ExoBrite™ Western Antibodies will not bind to the proteins when reduced, but other proteins’ detection is not affected by reducing agents.
After transfer, membranes can be rinsed in water, dried, and stored between sheets of filter paper at room temperature for months or longer.
If using PVDF membranes, re-wet the membrane in methanol, then rinse with water. For nitrocellulose membranes, proceed to step 5.
Place membrane in a clean dish containing azide-free blocking buffer of your choice. Use enough buffer to completely cover the blot and allow it to move freely in the dish.
Block membrane for 30-60 minutes at room temperature with gentle rocking.
Dilute HRP antibody in fresh blocking buffer. Pour off the blocking buffer and add enough diluted antibody solution to allow the membrane to move freely with no stationary bubbles or dry spots.
Note: If using ExoBrite™ HRP Western Antibodies, dilute 1:1000. If using other primary antibodies, perform a titration to find the optimal concentration.
Incubate membrane with gentle rocking for 1-2 hours at room temperature or overnight at 4°C, protected from light.
Wash membrane 3 times for 5 minutes each with rocking in PBS or TBS with 0.1% Tween® 20. Use a generous amount of wash buffer so blots move freely during washes.
If only using HRP-labeled primary antibodies, skip to step 13. If combining HRP conjugates with unlabeled primary antibodies and fluorescent secondary antibodies, continue to step 11.
Dilute secondary antibody in fresh blocking buffer at the concentration recommended by the supplier for western blot (usually in the range of 50-100 ng/mL). Add to blot as in step 7. Incubate membrane for 30 minutes to 2 hours with rocking.
Wash membrane as in step 9.
Prepare a working solution of ECL substrate based on the manufacturer’s protocol. Incubate the blot with the working solution for 1-5 minutes, depending on the ECL substrate used.
Remove the blot from the ECL substrate working solution. For detection, use x-ray film or a chemiluminescence imager, or a multimode imager for combining HRP and fluorescent conjugates.
Notes:
Dried blots can be stored between sheets of filter paper at room temperature in the dark and re-scanned after months or even years.
Keep blots wet at all times and store in buffer if they are to be stripped and probed with additional antibodies.
7. EV RNA Isolation
EVs are often harvested to study the RNA cargo they carry, though their small size and low RNA content make isolating sufficient quantities of RNA challenging. Therefore, EV RNA isolation requires a reliable and optimized method tailored to these unique constraints.
The ExoBrite™ RNA Isolation Kit (Cat. No. 28001) was specifically developed for high-yield total RNA isolation from EVs. Two protocols using this kit are provided below: A standard protocol and an optimized protocol that removes externally bound DNA prior to EV lysis and RNA isolation. While both methods include a DNase step that efficiently removes DNA from the EV sample, the RNA yield is reproducibly higher when the DNase treatment is performed before the RNA isolation procedure. However, the DNase pre-treatment requires the EVs to be captured onto beads and is not compatible with EVs in solution.
7.1. Protocol: RNA Isolation from EVs
Materials needed:
Ethanol (200 proof, molecular biology grade)
RNase-free water
Procedure:
Prepare Column Wash Buffer by adding 46 mL of 200 proof ethanol to the bottle and mix well.
Reconstitute lyophilized DNase I by adding 60 uL of RNase-free water and gently mix by pipetting. Store aliquots at -20°C and avoid freeze/thaw cycles.
Add EV Lysis Buffer to EVs:
For EVs in solution, add an equal volume of EV Lysis Buffer to up to 400 uL EVs.
Note: For best results, use as many EVs as you can. Typical yield from 1x10¹⁰ SEC-isolated EVs from cultured cells is ~10-20 ng RNA. Yields from different EV sources may vary.
If using bead-bound EVs, remove the solution from the beads (i.e., by a magnet or centrifugation, as appropriate). Resuspend the beads in 100 uL EV Lysis Buffer and vortex. Remove the beads (by magnet or centrifugation as appropriate) and transfer the lysate to a fresh tube.
Add ethanol to the lysate to 55% final concentration and vortex to mix. Immediately proceed to the following step.
Transfer up to 700 uL of the sample, including any precipitate, to a spin column. Centrifuge for 30 seconds at 16,000 x g. Discard flow-through.
Repeat step 5 until the entire sample volume has passed through the spin column.
Mix 240 uL of Column Binding Buffer and 360 uL of ethanol in a separate tube for a total volume of 600 uL.
Add 300 uL of the mixture from step 7 to the spin column. Centrifuge for 30 seconds at 16,000 x g. Discard flow-through.
Mix 70 uL of DNase Buffer with 2 uL of reconstituted DNase I, and add this directly to the center of the membrane of the spin column. Let stand for 15 minutes at room temperature.
Add the remaining 300 uL of the mixture from step 7 to the column. Centrifuge for 30 seconds at 16,000 x g. Discard flow-through.
Add 500 uL of Column Wash Buffer to the spin column. Close the tube lid, and centrifuge for 30 seconds at 16,000 x g. Discard flow-through.
Wash again by repeating step 11.
Dry the spin column by placing it back into an emptied collection tube and centrifuging again for 3 minutes at 16,000 x g. Discard flow-through. Place the spin column in a clean microcentrifuge tube.
Elute the pure RNA by adding 50 uL of nuclease-free water to the center of the membrane of the spin column. Let stand for 1 minute. Centrifuge for 1 minute at 16,000 x g. Collect the eluted RNA from the centrifuge tube.
Note: RNA can be eluted in volumes as low as 30 uL. The concentration will be higher but total yield may be lower.
Optional: Repeat step 14 for a higher RNA yield but at a lower concentration.
Store eluted RNA at -80°C.
7.2. Protocol: RNA Isolation from EVs with DNase Pre-Treatment
Materials needed:
Magnetic immunoaffinity isolation beads (e.g., beads coupled to tetraspanin antibodies)
Note: Use the EV capture beads of your choice, such as Biotium’s ExoBrite™ Streptavidin Magnetic Beads (Cat. No. 28000), coupled to your biotinylated capture antibody of choice (see antibody-bead binding procedure above in section 2.6: Protocol: Bead-Based EV Isolation).
0.2 um syringe-filtered 1X PBS (filter on the day of use)
Ethanol (200 proof, molecular biology grade)
RNase-free water
Procedure:
Prepare Column Wash Buffer by adding 46 mL of ethanol to the bottle and mix well.
Reconstitute lyophilized DNase I by adding 60 uL of RNase-free water and gently mix by pipetting. Store aliquots at -20°C and avoid freeze/thaw cycles.
Prepare EV capture beads coupled to an antibody that is compatible with the EV source.
Combine purified EVs with antibody-bound capture beads and incubate for 1 hour, rotating.
Wash the beads and resuspend in 70 uL DNase Buffer. Add 2 uL DNase I and incubate for 15 minutes, rotating.
Wash the beads three times with PBS.
Resuspend the beads in 100 uL EV Lysis Buffer and vortex. Remove the beads (by magnet or centrifugation as appropriate) and transfer the lysate to a fresh tube.
Add ethanol to the lysate to 55% final concentration and vortex to mix. Immediately proceed to the following step.
Transfer up to 700 uL of the sample, including any precipitate, to a spin column. Centrifuge for 30 seconds at 16,000 x g. Discard flow-through.
Repeat step 9 until the entire sample volume has passed through the spin column.
Mix 240 uL of Column Binding Buffer and 360 uL of ethanol in a separate tube for a total volume of 600 uL.
Add 300 uL of the mixture from step 11 to the spin column. Centrifuge for 30 seconds at 16,000 x g. Discard flow-through.
Mix 70 uL of DNase Buffer with 2 uL of reconstituted DNase I, and add this directly to the center of the membrane of the spin column. Let stand for 15 minutes at room temperature.
Add the remaining 300 uL of the mixture from step 11 to the column. Centrifuge for 30 seconds at 16,000 x g. Discard flow-through.
Add 500 uL of Column Wash Buffer to the spin column. Close the tube lid, and centrifuge for 30 seconds at 16,000 x g. Discard flow-through.
Wash again by repeating step 15.
Dry the spin column by placing it back into an emptied collection tube and centrifuging again for 3 minutes at 16,000 x g. Discard flow-through. Place the spin column in a clean microcentrifuge tube.
Elute the pure RNA by adding 50 uL of nuclease-free water to the center of the membrane of the spin column. Let stand for 1 minute. Centrifuge for 1 minute at 16,000 x g. Collect the eluted RNA from the centrifuge tube.
Note: RNA can be eluted in volumes as low as 30 uL. The concentration will be higher but total yield may be lower.
Optional: Repeat step 18 for a higher RNA yield but at a lower concentration.
Exo-spin is a trademark of Cell Guidance Systems; CytoFLEX is a registered trademark of Beckman Coulter, Inc.; Amicon is a registered trademark of Millipore Corporation; qEV is a trademark of Izon Science; ZetaView is a registered trademark of Particle Metrix; ARC is a trademark of Spectradyne.
Marissa Glover earned her PhD in Molecular, Cellular, and Developmental Biology from the University of California, Santa Cruz, where she studied the translational surveillance pathways Non-Stop Decay and No-Go-Decay. She also brings experience in assay development for a multiomic tumor test and research in early cancer detection via liquid biopsy. She is currently a Support Scientist and Technical Writer at Biotium.

 New Products
 Earth-Friendly Products
 Biotium Choice Antibodies
 Special Offers
 Quick Order Tool