Introduction
Biotium’s Tyramide Amplification Kits are powerful tools to achieve immunofluorescence staining of cells or tissues with exceptional sensitivity and signal-to-noise. After binding to primary antibodies or biotinylated primary antibodies, an HRP-conjugated secondary antibody or streptavidin mediates covalent coupling of CF® Dye tyramide to tyrosine-containing proteins in the vicinity of the reaction site. This enzymatic coupling reaction allows the target proteins to be labeled with large number of dye molecules, creating stronger fluorescence signal compared to using dye-labeled secondary antibodies. Therefore Tyramide Amplification Kits offer benefits of high sensitivity and signal-to-background ratio, enabling the visualization of low-abundance targets that cannot be efficiently labeled using traditional immunostaining methods.
Our Tyramide Amplification Kits feature Biotium’s next-generation CF® dyes spanning the entire visible to far-red spectrum in combination with our high-performance HRP-conjugated secondary antibodies and streptavidin. The superior brightness and photostability of CF® dyes ensure that our kits perform equally well or better compared to competitors’ products.
We offer Tyramide Amplification Kits with HRP goat anti-mouse, HRP goat anti-rabbit, or HRP streptavidin, with your choice of biotin tyramide or a selection of CF® dye tyramides. See our CF® Dye Tyramide Amplification Kits and stand-alone tyramide reagents.
Also, see below a list of unique products that have been validated for tyramide signal amplification workflows:
- Tyramide Amplification Buffer Plus has enhanced sensitivity for tyramide signal amplification. It has improved brightness, specificity, and sensitivity over our original buffer below.
- Ready-to-Use Tyramide Amplification Buffer was our original buffer formulation, and has been replaced with the above buffer. The one advantage of this buffer is that there is no need to add hydrogen peroxide.
- AntiFix™ Universal Antigen Retrieval Buffer is designed for heat-induced epitope retrieval (HIER) of formalin-fixed, paraffin embedded (FFPE) tissues. The buffer has been validated in HRP-mediated tyramide signal amplification using our CF® dyes.
Multi-color labeling using Tyramide Amplification Kits
There are three common strategies for using the Tyramide Amplification Kits in multi-color fluorescence imaging:
- Use a Tyramide Amplification Kit in combination with dye-conjugated antibodies or other immunostaining reagents.
- Use multiple (up to 3) Tyramide Amplification Kits sequentially, pairing with primary antibodies from different host species. A peroxidase quenching step is performed after each round of labeling to inactivate the secondary antibody from the previous labeling step.
- Use multiple Tyramide Amplification Kits sequentially, performing an antigen retrieval step after each round of labeling to remove all antibodies, while the CF® Dye that is covalently attached to the sample is retained. In this way there’s no limitation on choice of antibodies. Up to 10 different CF® Dyes can be used on one sample as long as the imaging device is capable of separating the colors.
In the next 3 sections we will discuss each of these strategies, followed by some general advice for multi-color imaging.
Using Tyramide Amplification Kits in Combination with Conventional Immunostaining Methods
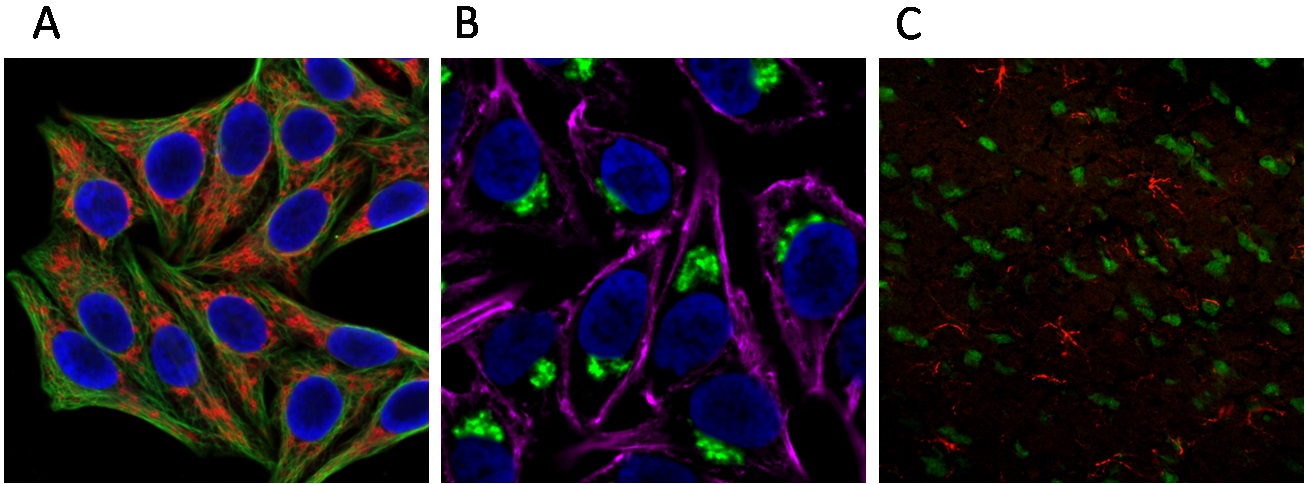
Our Tyramide Amplification Kits have been demonstrated to be robust and versatile for multi-color fluorescence imaging, compatible with dye-labeled antibodies and various cell staining methods (see Figure 1). When using one Tyramide Amplification Kit in addition to one or more dye-labeled antibodies, follow the kit protocol to fix and block samples; label with primary antibodies; then detect primary antibodies using multiple secondary antibodies simultaneously, including the HRP-conjugated secondary antibodies or HRP-streptavidin from the kits and the dye-labeled antibodies. After incubation and washing the samples can be labeled with CF® Dye tyramides according to the kit protocol. The HRP-mediated dye labeling reaction does not interfere with the binding of dye-labeled antibodies or other fluorescent staining reagents.
Multiplexing with Tyramide Amplification Kits – the Peroxidase Quenching Method
Two or three different kits can also be used sequentially to label different targets on one sample using primary antibodies (including biotinylated primary antibodies) from different host species. In general, after primary antibody labeling, the sample needs to be detected and labeled with the first Tyramide Amplification Kit, followed by a quenching step to deactivate the HRP, and then detected and labeled with the next Tyramide Amplification Kit. In this section we provide a sample protocol and expected results for using (1) a Tyramide Amplification Kit with HRP Goat anti-Rabbit IgG, and then (2) a Tyramide Amplification Kit with HRP Goat anti-Mouse IgG. The same guidelines can also be applied to other kit combinations.
- Choose two kits with different CF® Make sure your microscope is capable of separating the fluorescence signals of the two colors.
- Follow the kit protocol (part A through D) of the Tyramide Amplification Kit with HRP Goat Anti-Rabbit IgG to prepare all reagents, fix and permeabilize samples, block with BSA and if necessary, quench the endogenous peroxidase activity.
- Perform primary antibody labeling according to your preferred protocol and/or instructions from the primary antibody suppliers. Multiple primary antibodies from different hosts can be applied simultaneously.
- Follow the kit protocol (part E) of the Tyramide Amplification kit with HRP Goat Anti-Rabbit IgG to wash the samples, detect with HRP Goat Anti-Rabbit IgG, and then label with CF® Dye tyramide.
- Prepare peroxidase quenching buffer: 0.3% (w/w) H2O2 and 0.1% (w/w) NaN3 in PBS. We recommend preparing this buffer immediately before using. For cell samples in 96-well plates, prepare no less than 100 µL of peroxidase quenching buffer for each well. For tissue sections, make sufficient amount of peroxidase quenching buffer so that the slides can be soaked in a container that is filled with this buffer.
- Quench the peroxidase activity by incubating the samples with peroxidase quenching buffer for 15 minutes at room temperature. Then rinse 3 times with PBS.
- Follow the kit protocol (step 3 – 8 in part E) of the Tyramide Amplification Kit with HRP Goat Anti-Mouse IgG to detect with HRP Goat Anti-Mouse IgG, and then label with CF® Dye tyramide.
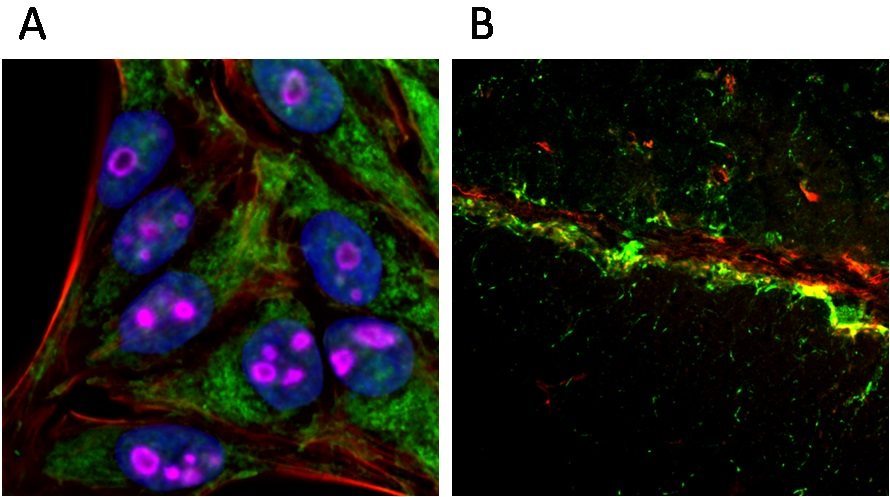
Figure 2 shows multi-color images of cells and a tissue section that were sequentially labeled with two Tyramide Amplification kits, following the protocol described above. Both kits provide strong fluorescence signal with minimal background. No visible crosstalk was detected. The protocol can be further combined with other cell staining methods to achieve 4-color imaging (Figure 2A).
Multiplexing with Tyramide Amplification Kits – the Antigen Retrieval Method
Antigen retrieval is a technique commonly used to treat paraffin-embedded tissue sections in order to expose the epitopes that are crossed-linked during fixation. It also strips away all antibodies and other reagents that bind to the sample via non-covalent interactions. By performing an antigen retrieval step after tyramide labeling, all antibodies (including primary antibodies and HRP-conjugated secondary antibodies) from the previous detection are removed, leaving only the covalently coupled dye-tyramides. As a result, there’s no chance of cross-reactivity even when using multiple primary antibodies from the same host species. After sequential labeling, all targets can be visualized simultaneously. With our abundant collection of CF® Dye tyramides, the choice of colors is only limited by the imaging device.
Various devices and protocols can be used for antigen retrieval, and sometimes they need to be specially optimized for certain tissue sections and/or targets. Here we describe a technique based on microwave treatment which is easy, fast and working well for most of our samples. We found this protocol compatible with both paraffin-embedded and frozen tissue sections.
Below is a sample protocol and expected results for two-color imaging using two Tyramide Amplification Kits with HRP Goat Anti-Mouse IgG in tandem. The same guideline can also be applied to other combination of the kits.
- Choose the two kits with different CF® Make sure your microscope is capable of separating the fluorescence signals of the two colors. We found that the order of labeling usually does not affect performance. Either kit can be used first.
- Follow the kit protocol (part A through E) of the Tyramide Amplification Kit with HRP Goat Anti-Mouse IgG to perform the first tyramide-dye labeling.
- Choose an antigen retrieval buffer (also known as heat induced epitope retrieval buffer, or HIER buffer) that works well for the primary antibody used for the second round of detection. Most primary antibody suppliers provide information about proper antigen retrieval conditions. We recommend the AR6 and AR9 buffers from PerkinElmer Inc.
- Place the tissue slides in a microwave-safe container and fill with the antigen retrieval buffer to cover the samples. Slides can be placed vertically or horizontally, as long as the tissue sections are fully immersed in the buffer without any overlapping. We recommend using a generous amount of buffer (>50 mL) to prevent drying out during the microwave treatment. Do not cover the container.
- Microwave the samples for 10 minutes, keeping the buffer at sub-boiling temperature. The power setting varies from one microwave oven to another, but in general is kept low to medium. Watch closely to make sure the buffer does not boil off. If it does, pause the microwave and supplement antigen retrieval buffer.
- After microwave treatment, transfer the container (be careful of hot liquid) to bench top and let it cool down to room temperature (30 – 60 minutes).
- Rinse the samples with PBS.
- Re-block the samples by incubating in blocking buffer (see the kit protocol, step 3 in Reagent Preparation) for 1 hour at room temperature.
- Follow the kit protocol (part E) of the Tyramide Amplification Kit with HRP Goat Anti-Mouse IgG to perform the second tyramide-dye labeling.
Figure 3 shows multi-color images of tissue sections that were sequentially labeled with 2 or 3 Tyramide Amplification Kits.

Technical Tips
Among the three strategies discussed above, the antigen retrieval method features the best signal-to-noise and flexible choice of antibodies without any cross-talking issue. However, the microwave treatment or other antigen retrieval techniques may or may not be compatible with any specific application. For example, the chambered cover glass which is commonly used in cell imaging may be damaged during the microwave treatment.
Which multiplexing strategy to use should be determined experimentally based on the nature of samples and targets.
In addition to the Technical Notes listed in the kit protocol, we also recommend the following tips for multi-color immunofluorescence imaging using the Tyramide Amplification Kits.
- Always begin by labeling each target individually before starting the multiplexing. If necessary, troubleshoot and optimize the protocol according to the guidelines provided in the Technical Notes section of the kit protocol. Run multiple labeling experiments after each labeling method is optimized.
- Make sure the sample preparation method is compatible with all targets. For instance, we found that tubulin is better detected when the samples are fixed with methanol; while the formaldehyde fixation protocol works better for actin, nucleolin, and cyclin B1 detection. Caution must be taken when working with targets that need special treatment.
- When working with tissue sections, the batch-to-batch variations of the sections must be evaluated. We have found that tissue sections from different suppliers or different batches from the same supplier showed dramatically different staining efficiency. We recommend running a positive control experiment for each new batch of tissue samples.
- For multi-color imaging, try to optimize the system so that labels with different colors give comparable fluorescence intensity under your microscope. For example, if the fluorescence signal in the green channel is far stronger than that of the red channel, there may be a risk of the green fluorescence bleeding into the red channel.
- When doing sequential labeling using the HRP quenching method, it is crucial to completely quench the HRP activity after detection and labeling with the first kit. We recommend to use generous amount of quenching buffer so that the sample is well-covered by the buffer, and the buffer should be freshly prepared. If possible, gently shake the samples during incubation.
- For sequential labeling using the HRP quenching method, we also recommend to try different orders of applying the two kits. If using kit 1 followed by kit 2 results in crosstalk (which means the target to be detected by kit 1 is also stained by kit 2), try switching them and use kit 2 first. We have found that staining the less abundant target first; then staining the more abundant target usually gives better results.
Tyramide Signal Amplification Kits
| Tyramide Label | Ex/Em | Secondary conjugate | Catalog no. |
|---|---|---|---|
| CF®488A | 490/515 nm | Goat anti-mouse HRP | 33000 |
| Goat anti-rabbit HRP | 33001 | ||
| Streptavidin HRP | 33002 | ||
| CF®543 | 541/560 nm | Goat anti-mouse HRP | 33003 |
| Goat anti-rabbit HRP | 33004 | ||
| Streptavidin HRP | 33005 | ||
| CF®568 | 562/583 nm | Goat anti-mouse HRP | 33006 |
| Goat anti-rabbit HRP | 33007 | ||
| Streptavidin HRP | 33008 | ||
| CF®594 | 593/614 nm | Goat anti-mouse HRP | 33009 |
| Goat anti-rabbit HRP | 33010 | ||
| Streptavidin HRP | 33011 | ||
| CF®640R | 642/662 nm | Goat anti-mouse HRP | 33012 |
| Goat anti-rabbit HRP | 33013 | ||
| Streptavidin HRP | 33014 | ||
| CF®680R | 680/701 nm | Goat anti-mouse HRP | 33015 |
| Goat anti-rabbit HRP | 33016 | ||
| Streptavidin HRP | 33017 | ||
| Biotin-XX | N/A | Goat anti-mouse HRP | 33018 |
| Goat anti-rabbit HRP | 33019 | ||
| Streptavidin HRP | 33020 |
Standalone Dye and Hapten Labeled Tyramides
| Tyramide label | Ex/Em | Size | Catalog no. |
|---|---|---|---|
| CF®350 | 347/448 nm | 0.5 mg | 92170 |
| CF®405L | 395/545 nm | 0.5 mg | 92198 |
| CF®405S | 404/431 nm | 0.5 mg | 92197 |
| CF®405M | 408/452 nm | 0.5 mg | 96057 |
| CF®430 | 426/498 nm | 0.5 mg | 96053 |
| CF®488A | 490/515 nm | 0.5 mg | 92171 |
| FITC | 492/514 nm | 0.5 mg | 96018 |
| CF®514 | 516/548 nm | 0.5 mg | 92199 |
| CF®532 | 527/558 nm | 0.5 mg | 96066 |
| CF®543 | 541/560 nm | 0.5 mg | 92172 |
| CF®550R | 551/577 nm | 0.5 mg | 96077 |
| CF®555 | 555/565 nm | 0.5 mg | 96021 |
| Cyanine 555 | 555/565 nm | 0.5 mg | 96020 |
| CF®568 | 562/583 nm | 0.5 mg | 92173 |
| CF®583R | 586/609 nm | 0.5 mg | 96085 |
| CF®594 | 593/614 nm | 0.5 mg | 92174 |
| CF®620R | 617/639 nm | 0.5 mg | 92194 |
| CF®640R | 642/662 nm | 0.5 mg | 92175 |
| CF®647 | 650/665 nm | 0.5 mg | 96022 |
| CF®660R | 663/682 nm | 0.5 mg | 92195 |
| CF®680R | 680/701 nm | 0.5 mg | 92196 |
| CF®710 | 712/736 nm | 0.5 mg | 96127 |
| CF®725 | 729/755 nm | 0.5 mg | 96128 |
| CF®740 | 742/767 nm | 0.5 mg | 96124 |
| CF®750 | 755/779 nm | 0.5 mg | 96052 |
| CF®754 | 748/793 nm | 0.5 mg | 96090 |
| Biotin-XX | N/A | 0.5 mg | 92176 |
| DNP | N/A | 0.5 mg | 96019 |