New Products
 Earth-Friendly Products
 Biotium Choice Antibodies
 Special Offers


Content #1
Content #1
Content #1

Fluorescence bleed-through and cross-talk are major sources of error in multicolor fluorescence microscopy, particularly as experiments increase in multiplexing complexity.
This app note explains the physical basis of these phenomena, outlines experimental and instrumentation factors that exacerbate signal interference, and provides practical strategies to ensure accurate, reproducible fluorescence imaging results.
Fluorescence microscopy is a fundamental technique in modern cell biology and clinical diagnostics, enabling researchers to visualize specific molecular components within complex biological specimens. It is routine to stain a sample with multiple fluorescent conjugates simultaneously to detect multiple targets; however, the increasing sophistication of multicolor fluorescence experiments brings significant technical challenges that one must carefully consider. Among these, fluorescence signal interference represents a critical limitation that can lead to misinterpretation of data and false conclusions if not properly addressed.
Bleed-through and cross-talk refer to two phenomena that result in the unwanted detection of fluorescence from one fluorophore in a channel intended for another. Bleed-through is when emission of a fluorophore extends into the detection range set for another fluorophore, while cross-talk refers more broadly to any unwanted signal interference between fluorophores and includes excitation and emission cross-talk. Both events can create artifacts that can be mistaken for genuine colocalization or expression patterns and, therefore, must be minimized. With the appropriate controls, experimental design, instrumentation settings, and post-acquisition processing, researchers can maximize signal specificity while minimizing confounding spectral interference.
Bleed-through and cross-talk can significantly compromise the accuracy and reliability of fluorescence-based experiments. Understanding and mitigating sources that contribute to cross-talk is essential for producing reliable, reproducible fluorescence data.
The fundamental challenge of fluorescence cross-talk arises from the physical properties of fluorophores. While we typically focus on peak excitation and peak emission for a given fluorophore, the spectra are usually much broader than the peak. For example, while FITC has peak excitation at 495 nm and peak emission at 519 nm, its actual excitation and emission curves span dozens of nanometers on each side of these peaks. This characteristic creates inevitable overlap zones when multiple fluorophores are used simultaneously, which can lead to cross-talk (Figure 1). In addition to spectral overlap, the relative brightness of each fluorophore plays a critical role as bright fluorophores are more likely to bleed into channels intended for dimmer fluorophores.
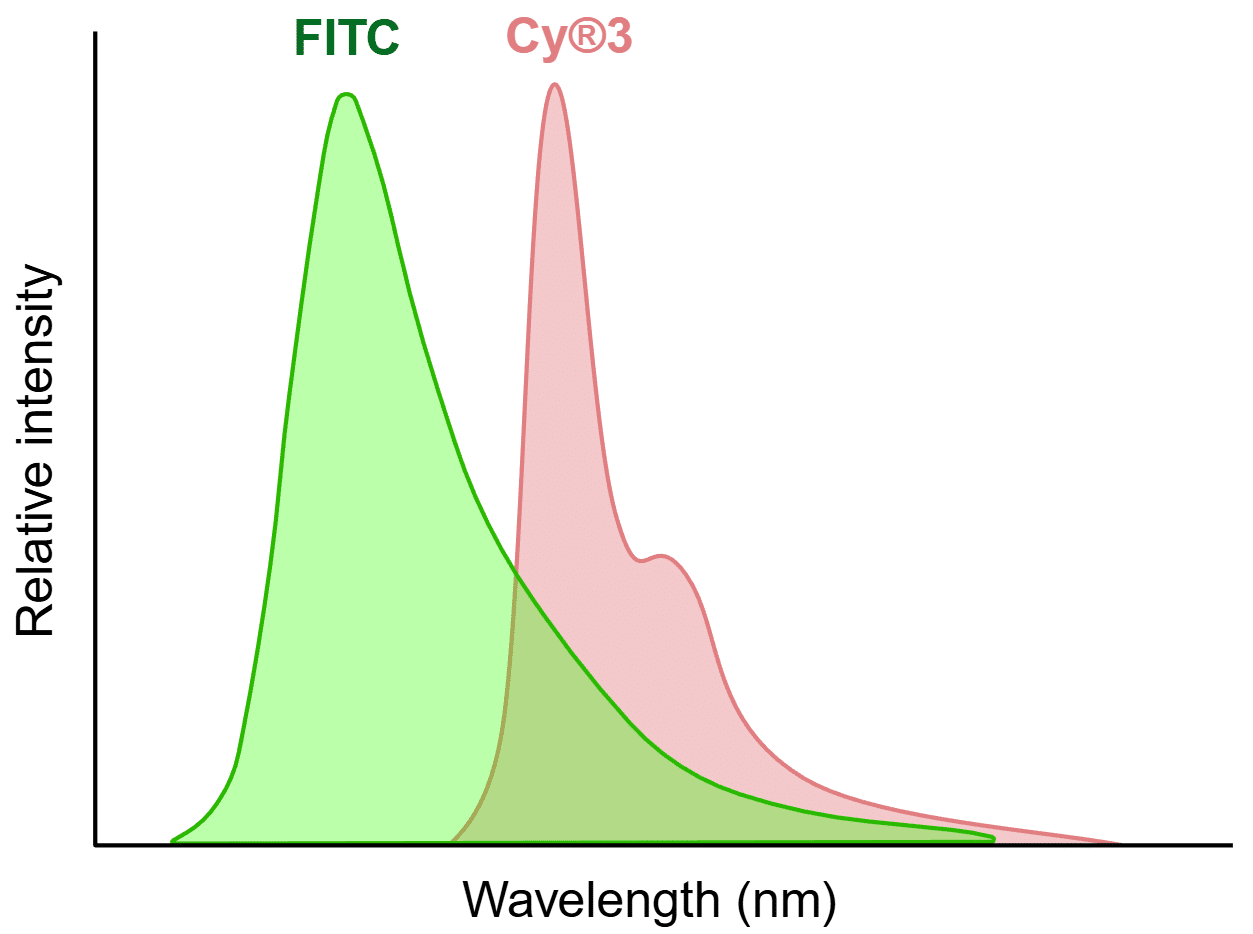
Figure 1. Example of spectral overlap that can lead to cross-talk. The FITC and Cy®3 emission peaks are well separated, but there is still an overlapping area that presents a potential for cross-talk. Created in https://BioRender.com
Signal intensity imbalance across multiplexed fluorescent probes is another key contributor to cross-talk. For example, the signal from fluorescent conjugates targeting highly expressed proteins can bleed into adjacent channels for fluorescent conjugates targeting less abundant proteins, particularly when imaging parameters are optimized to detect low-abundance targets. (Figure 2). If the signal intensities from all probes used are not carefully balanced, there is an increased likelihood of cross-talk.
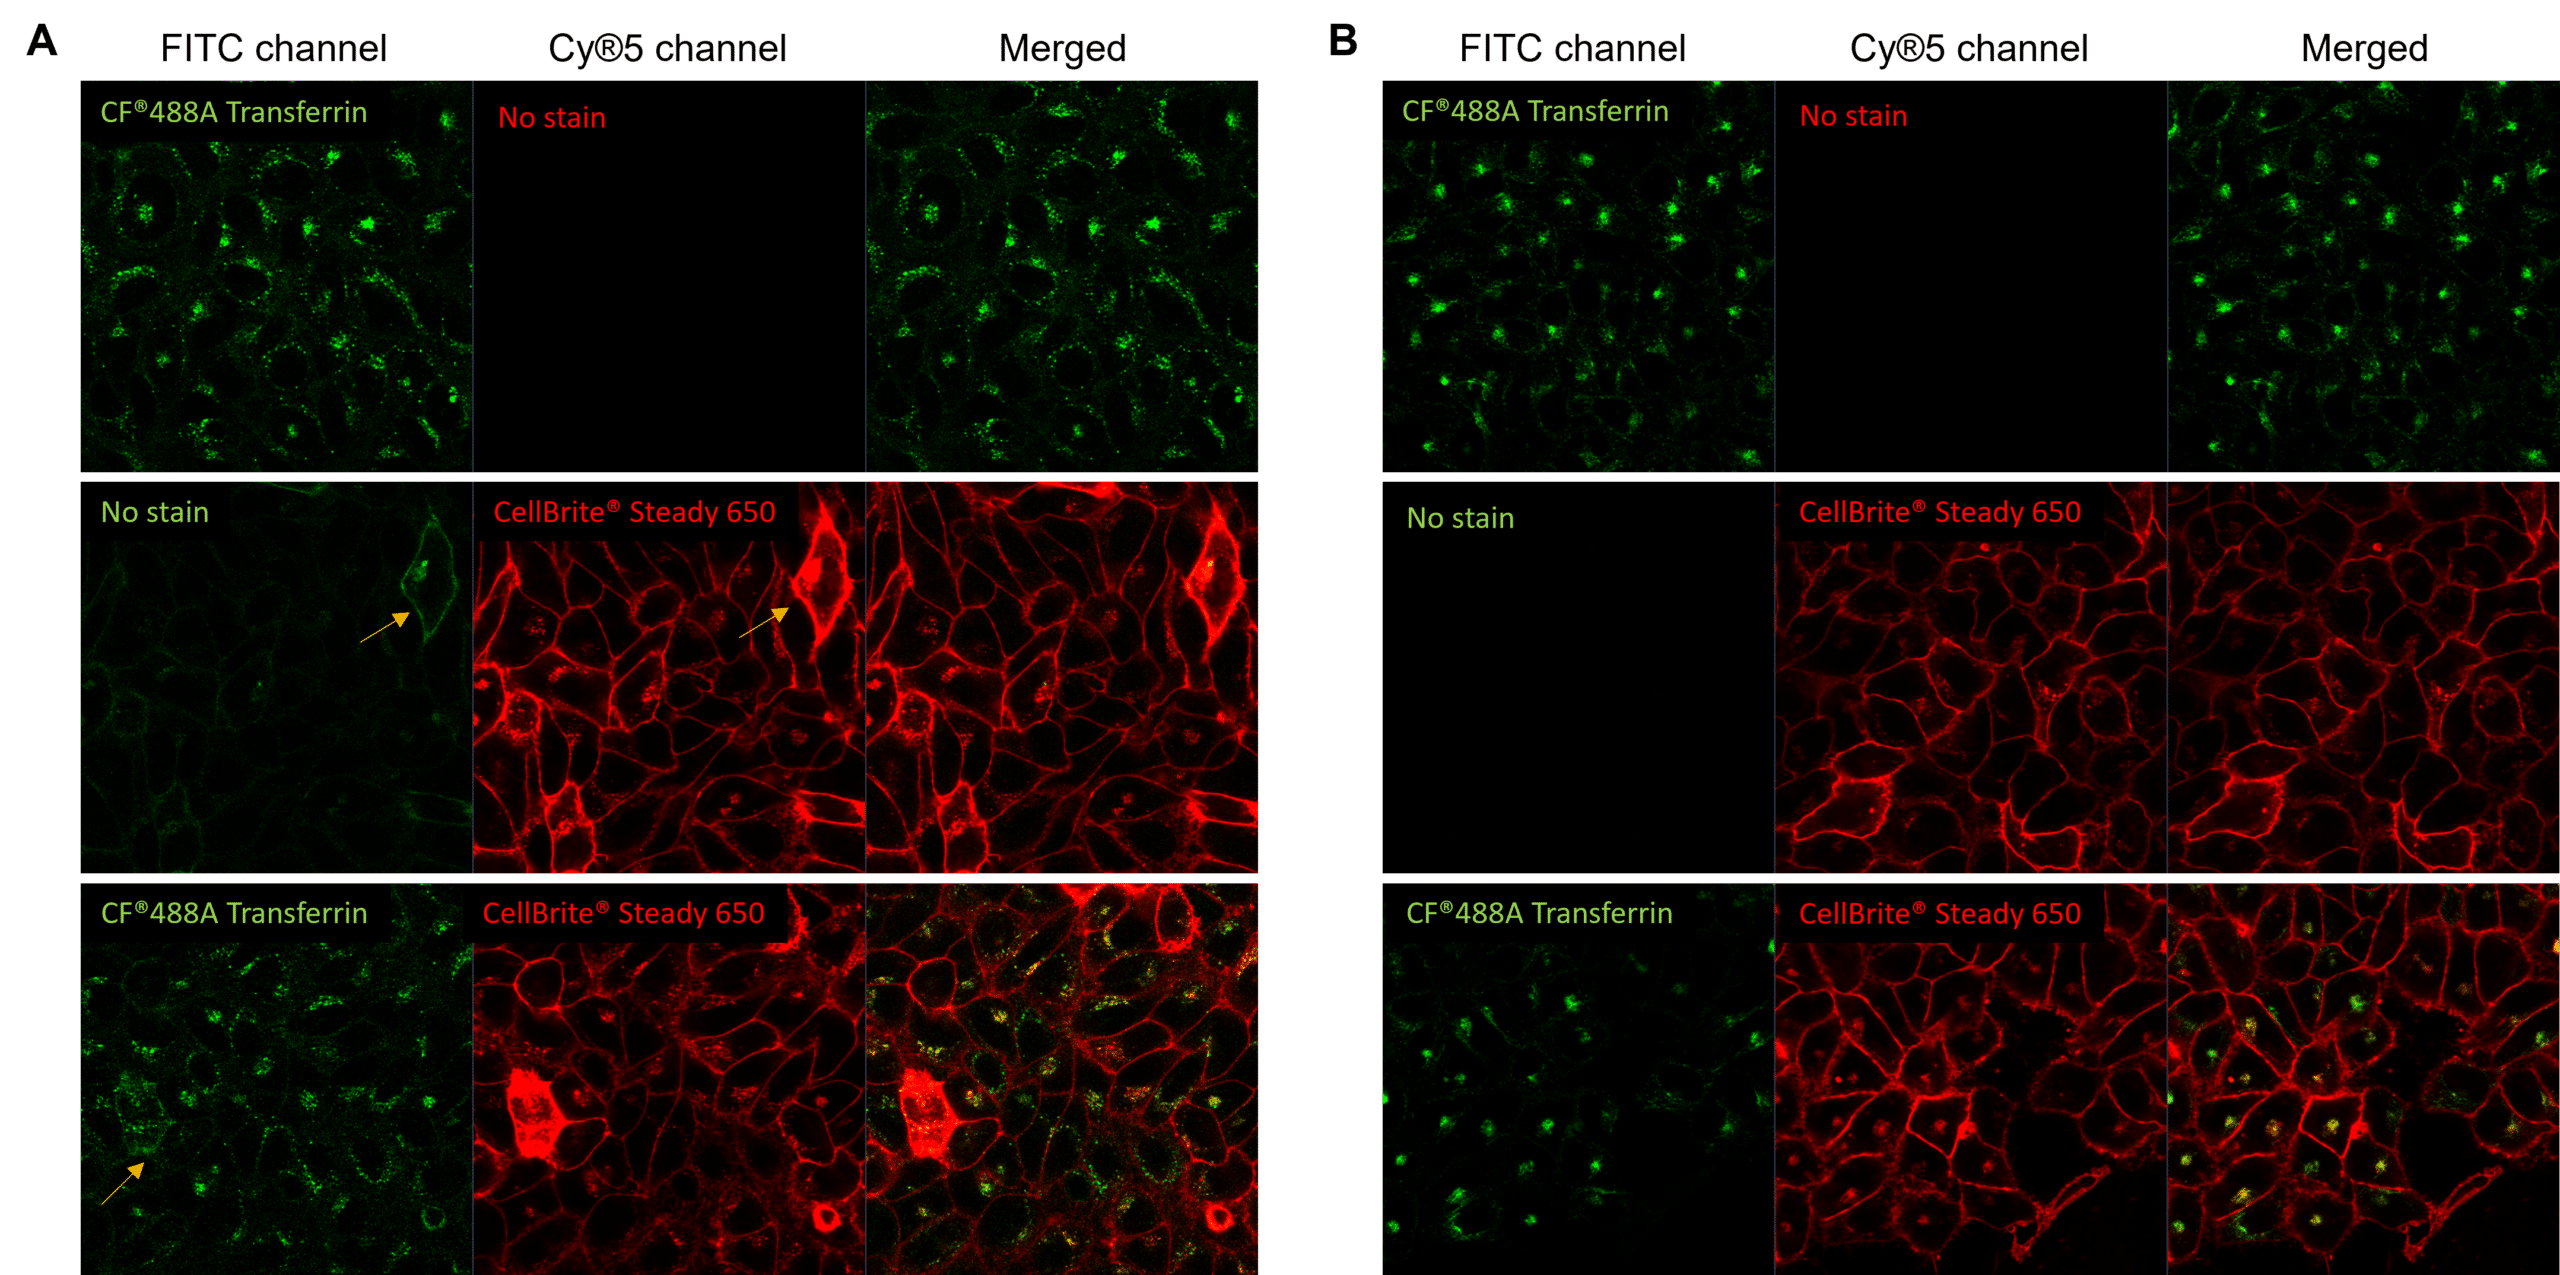
Figure 2. Unbalanced fluorophore signal intensities lead to cross-talk during simultaneous excitement. Live HeLa cells were labeled with CF®488A-transferrin receptor (TfR; green) and CellBrite® Steady 650 (red), then imaged with the 488 nm and 639 nm lasers simultaneously. (A) CF®488A-TfR produces a dim signal, requiring increased detector sensitivity in the FITC channel. Under these conditions, the much brighter CellBrite® Steady 650 signal bleeds into the FITC channel. Areas of colocalization (yellow in merged image) may be artifacts of bleed-through. (B) After titration to balance signal intensities, CF®488A-TfR and CellBrite® Steady 650 are cleanly detected in their respective channels with minimal cross-talk, enabling more confident assessment of colocalization.
Hardware configuration dictates how the signal is captured and instrument configuration is another important consideration for signal separation.
Bandpass filters play an important role in spectral separation. These filters act as gates that selectively pass a narrow range of wavelengths while blocking others, which allows only specific excitation or emission light to be isolated (Figure 3A). The bandpass filter’s width, or bandwidth, dictates the range of wavelengths it transmits, where narrower bandwidths provide better contrast and broader bandwidths capture more wavelengths. Longpass filters and shortpass filters are similar to bandpass filters, but they only transmit wavelengths longer than or shorter than a specific cutoff wavelength, respectively (Figure 3B). Users should always ensure that they choose fluorophores that are compatible with their instrument’s filters.
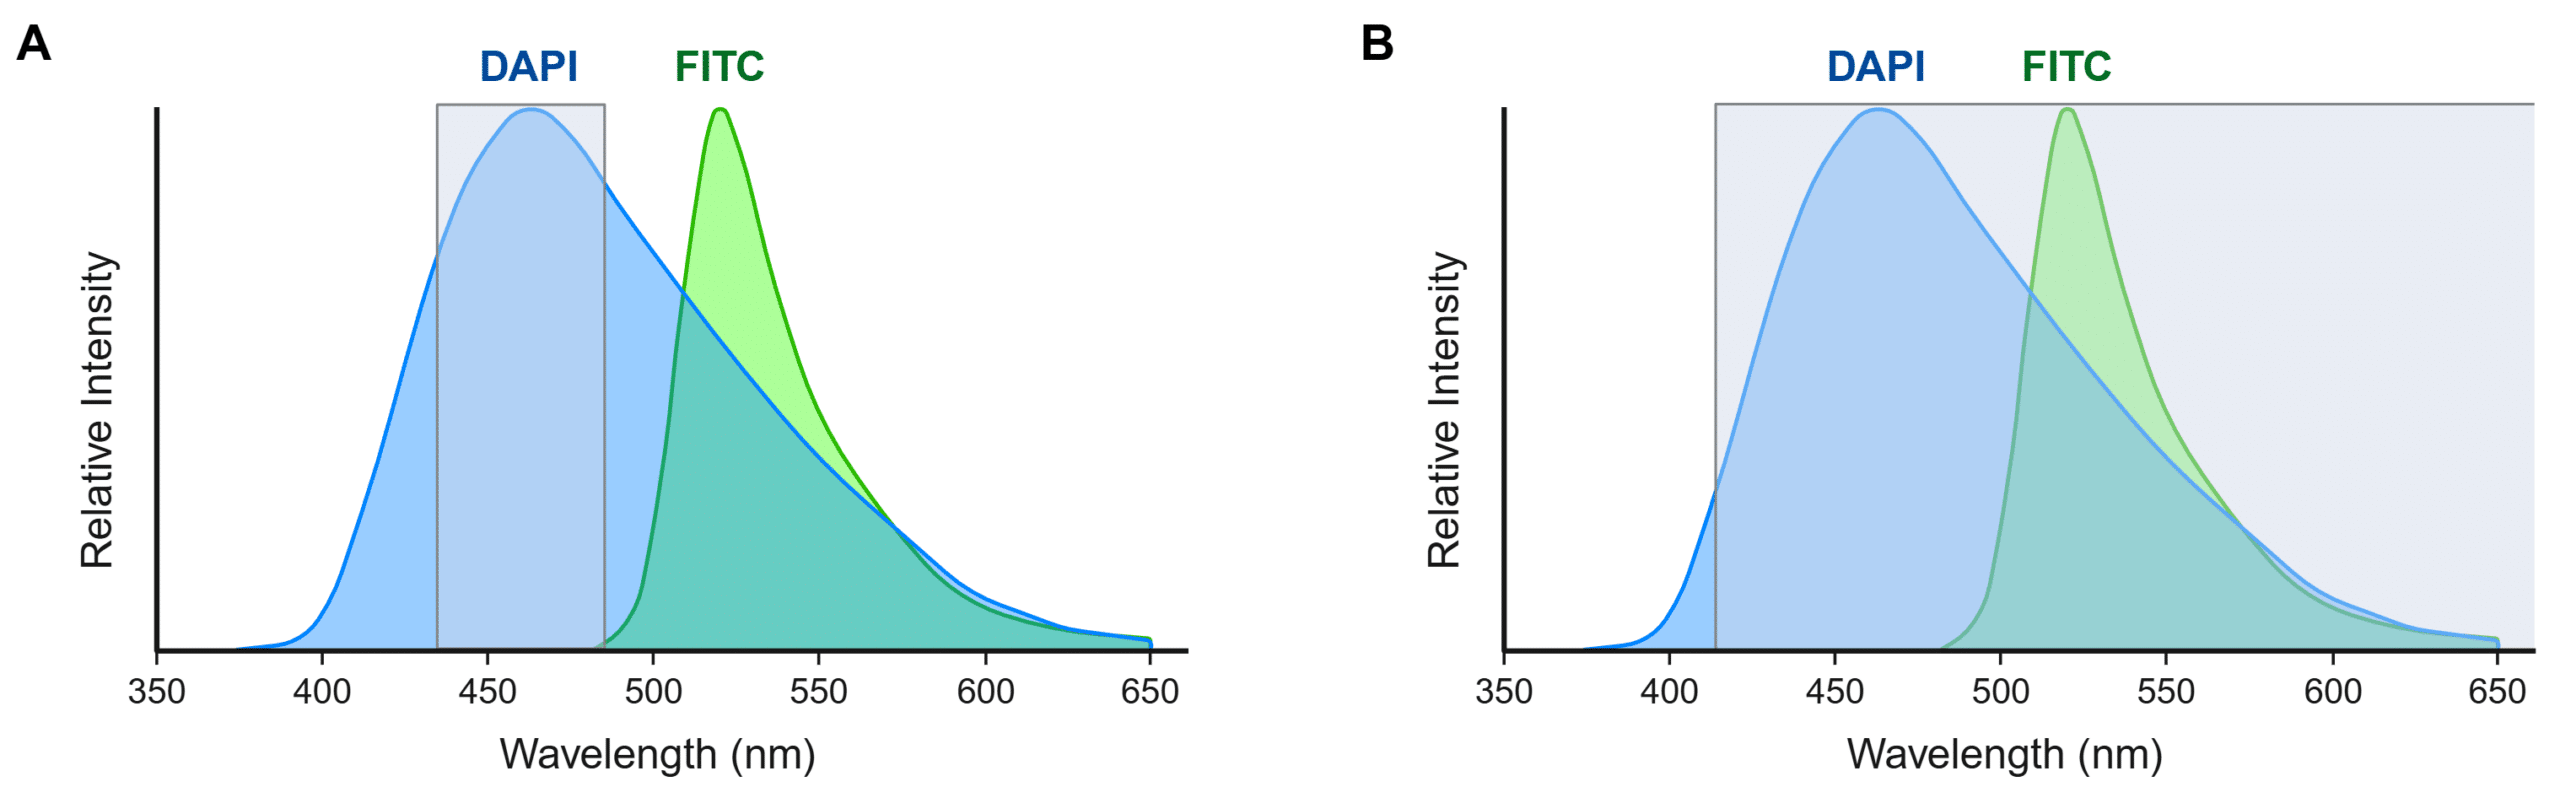
Figure 3. Effect of emission filter selection on spectral overlap in multiplex fluorescence imaging. Emission spectra of DAPI (blue) and FITC (green) are shown with wavelengths that will be detected with a 460/50 bandpass filter (A) or a 415 longpass filter (B) overlaid (gray). (A) A 460/50 bandpass filter will restrict detection to DAPI emission wavelengths and avoid cross-talk. (B) A 415 longpass filter will capture emission wavelengths from both DAPI and FITC. Created in https://BioRender.com
Confocal systems generally provide better spectral separation compared to widefield epifluorescence microscopes due to narrowband laser excitation and more customizable detection settings. While simpler epifluorescence systems and older confocal systems have fixed wavelength filters to isolate specific portions of emission spectra and prevent bleed-through from fluorophores in the adjacent channels, newer confocal systems use tunable dichroic mirrors that can be optimized for the emission wavelengths of the fluorophores used. However, because tunable systems offer more flexibility for the user to set a wider or narrower emission window, the user must take care to use settings appropriate for their experiment. A wider emission window can result in brighter signal for a single fluorophore, but may lead to cross-talk in a multicolor experiment.
Unrecognized cross-talk can have severe consequences, including false colocalization, inaccurate signal quantification, and misidentified cellular features. To minimize these risks, researchers should implement experimental design strategies and instrument-based considerations.
First and foremost, it is critical to use strategic fluorophore selection when designing a multiplex experiment to ensure fluorophores have maximal spectral separation. Biotium’s Spectra Viewer enables simultaneous visualization of multiple fluorophore spectra alongside instrument-specific excitation sources and emission filters, facilitating informed fluorophore selection and instrument compatibility. Additionally, consider the relative brightness of each fluorophore–conjugates with brighter fluorophores should be used for less abundant targets, and probes should be titrated to balance signal intensities (see Antibody Optimization and Signal Balancing below).
Even when best practices are followed, dyes with broader excitation/emission peaks are more likely to show cross-talk than those with narrower peaks. For example, some environmentally sensitive cellular stains, such as membrane dyes, nerve terminal dyes, or organelle stains, have broader emission spectra than small molecule dyes for antibody labeling, like CF® Dyes. Users should always visualize the spectra of dyes when designing experiments with a tool like our Spectra Viewer to minimize cross-talk risk.
Optimized sample preparation is essential for high-quality fluorescence imaging. There are numerous fixation and permeabilization methods commonly used during immunofluorescence, and each method should be optimized to preserve the fluorescent signal while minimizing autofluorescence. If autofluorescence is an issue, consider using autofluorescence quenching treatments such as TrueBlack® Lipofuscin Autofluorescence Quenchers, and perform unstained controls to determine the level of autofluorescence to help correct for it. Also, be sure to include appropriate blocking steps to reduce nonspecific antibody binding because nonoptimal blocking methods can lead to an increase in background and exacerbate the effects of cross-talk.
Each antibody chosen for an immunofluorescence experiment should be carefully optimized individually. Titrate each antibody to determine the minimum concentration needed for specific detection of each target with high signal-to-noise and validate antibody specificity with the appropriate positive and negative controls. This is especially important for colocalization studies which rely on balanced signals from each probe to prevent one signal overwhelming the other (see Figure 2). In addition, antibodies should be selected and validated to avoid cross-reactivity artifacts. Highly cross-adsorbed secondary antibodies should be used for multiplexing and to avoid direct binding of secondary antibodies to endogenous IgG in tissues. The appropriate controls with secondary antibody alone and different combinations of primary and secondary antibodies should be done to rule out antibody cross-reactivity as a source of cross-talk.
Sequential imaging should always be performed for adjacent channels when imaging a multi-stained sample, meaning you should excite with one laser and image one fluorophore at a time, then computationally combine images. It generally is possible to image spectrally distinct dyes in well-separated channels simultaneously (with more than one laser on), but the appropriate controls should always be included. It is recommended to use the lowest laser power possible to image each fluorophore to limit cross-excitation of fluorophores intended for other channels. Using excessively high laser power leads to excited-state saturation, where the fluorophore selected to be excited does not increase in signal intensity, and unintended fluorophores are also excited. Furthermore, when using DAPI or Hoechst nuclear stains, be aware that UV light from mercury arc lamp illumination can cause artifacts from DAPI/Hoechst photoconversion. For more information, read our Tech Tip: Avoiding Artifacts from UV Photoconversion of DAPI and Hoechst.
Filters and dichroic mirrors must be carefully selected to minimize bleed-through between channels because fluorophores in multiplex panels often have partially overlapping spectra, Optimizing these parameters ensures that each probe is detected within a well-defined, non-overlapping range of emission wavelengths.
Single-stain are samples prepared identically to the multicolor experimental samples but stained with only one fluorophore at a time to provide direct measurement of actual bleed-through for each fluorophore under the same experimental conditions. Single-stain controls allow one to account for sample-specific optical properties and instrument settings, unlike using theoretical spectral data or previous experimental data. These controls are the foundation of proper cross-talk management.
The preparation of single-stain controls should match that of the experimental samples, meaning the user utilizes the same tissue or cell type as well as identical fixation, permeabilization, labeling, and mounting methods. Ideally, the controls are processed alongside the experimental samples to reduce variability. Similarly, the controls should be imaged during the same session as the experimental samples, using the same exposure times, laser powers, and detector gains for each channel to be imaged in the multiplexed sample. It is important to remember that bleed-through is very likely to occur at high laser power and gain/exposure settings, even for well-separated fluorophores. Therefore, users should disable settings such as auto-exposure and auto-gain that will maximize signal in each channel, to ensure that the single-stain controls replicate the settings for the multiplexed sample, and thus reflect the true intensity relationships between fluorophores.
Many newer imaging systems have spectral unmixing capabilities that can be used to separate overlapping signals after imaging is complete. These instruments can measure a spectral signature for discrete regions of interest and then use computational algorithms to distinguish overlapping fluorophores. Spectral unmixing is increasingly used to expand the options for multicolor panels beyond what’s possible using conventional imaging. However, generally it is advisable to minimize cross-talk/bleed-through between fluorophores as much as possible using the methods discussed here before attempting to separate overlapping signals using spectral unmixing software.
Fluorescence cross-talk and bleed-through represent fundamental challenges in immunofluorescence microscopy that can significantly impact data interpretation if not properly addressed. Effective cross-talk management starts with the implementation of comprehensive single-stain controls, imaged under identical conditions as experimental samples. As imaging technology continues to advance toward higher multiplexing capabilities, the importance of rigorous cross-talk control only increases. By incorporating the best practices outlined in this guide, researchers can ensure their immunofluorescence data accurately represents biological reality rather than technical artifacts.
Below is a sample workflow for an immunofluorescence experiment to demonstrate how to effectively incorporate single-stain controls.
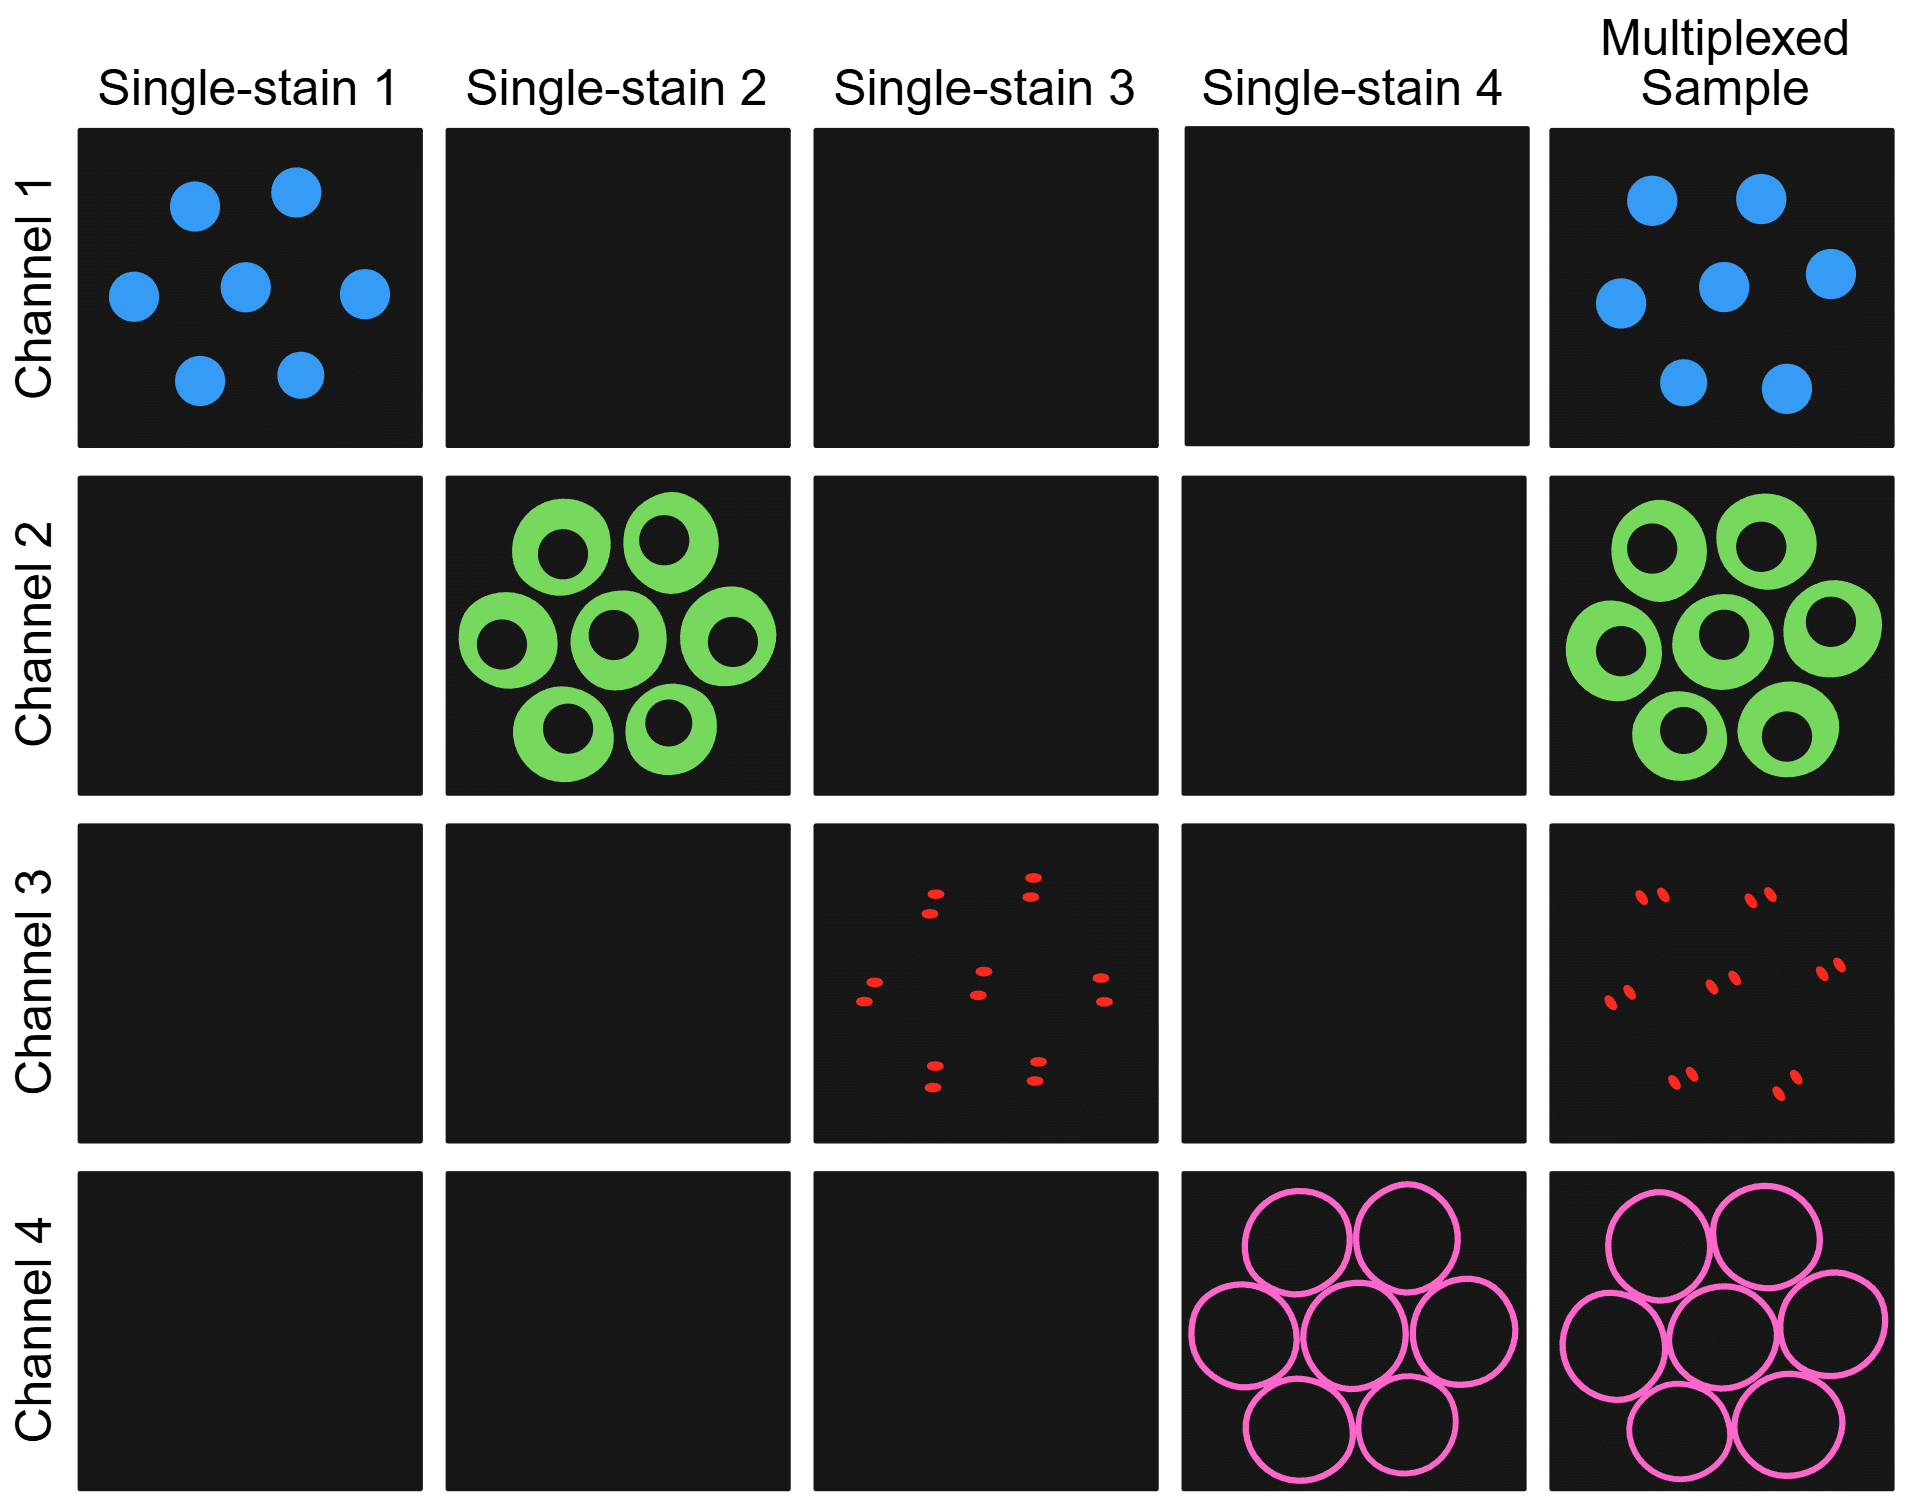
Figure 4. Sample and channel matrix illustrating how single-stain controls should only show signal in the on-target channel while multiplexed samples should only show specific signal in each on-target channel. Created in https://BioRender.com
CY DYE is a registered trademark of Cytiva.
Extracellular vesicles (EVs) are known to contain RNA, including microRNA (miRNA) and mRNA, derived from the cell of origin. Studying EV RNA can be useful for many purposes: determining the cellular source of the EVs, for disease diagnostics (Ref. 1), and for identifying oncogenic RNAs (Ref. 2). Since EVs are very small (~30-200 nm in diameter), the amount of RNA cargo that can be isolated and analyzed may be limited. Therefore it is desirable to have robust methods to efficiently purify RNA from the smallest possible number of EVs. Biotium developed the ExoBrite™ EV Total RNA Isolation Kit to isolate RNA of all sizes from EVs with high yield.
In addition to RNA, it has sometimes been reported that EVs also contain DNA. However, most recent publications suggest that the DNA isolated from EVs is external to the EV, and not inside the EV lumen (Ref. 3). During the course of our work developing an RNA isolation kit, we were surprised by the large quantity of DNA that was co-isolated along with the RNA in cell culture-derived EVs, particularly if no DNase treatment was performed. We wondered if this DNA was external to the EVs, and if so, whether it could be removed from the EVs prior to RNA isolation.
To test the hypothesis that the DNA isolated from our EV preparations was external to the EVs (e.g., cell free DNA), we performed a DNase treatment of EVs captured on Biotium's ExoBrite™ Streptavidin Magnetic Beads coupled to biotinylated tetraspanin antibodies prior to EV lysis for RNA isolation. We compared the yield of recovered RNA to that of EVs that were not treated with DNase, and to samples that underwent the usual on-column DNase treatment after EV lysis. We then quantified the RNA and DNA amounts isolated with these methods using Biotium's AccuBlue® RNA Quantitation Kit and AccuClear® dsDNA Quantitation Kit, respectively.
We found that treating the EVs with DNase prior to EV lysis removed almost all of the DNA from the EV sample, about as efficiently as the on-column DNase treatment in the usual kit protocol. Interestingly, we found that when the EV DNase treatment was performed prior to the RNA isolation procedure, the RNA yield reproducibly increased. These results suggest that most if not all of the DNA in our EV samples derived from cultured cells is not within the EV, because it can be removed by DNase treatment prior to EV lysis.
EV isolation: EVs were prepared from Jurkat or MCF-7 cells grown for 3 days in serum-free medium. Cell conditioned medium (40 mL) was collected, centrifuged to remove cells and debris, and then the supernatant was concentrated to 2 mL with an Amicon Ultra 10K MWCO ultrafiltration spin column. This concentrated conditioned medium was loaded on an IZON qEV2 size exclusion column and eluted in 8 mL PBS. The isolated EVs were then concentrated to 1 mL with an Amicon Ultra 10K MWCO ultrafiltration spin column. EV concentration was quantified on the ZetaView® QUATT nanoparticle tracking analysis instrument.
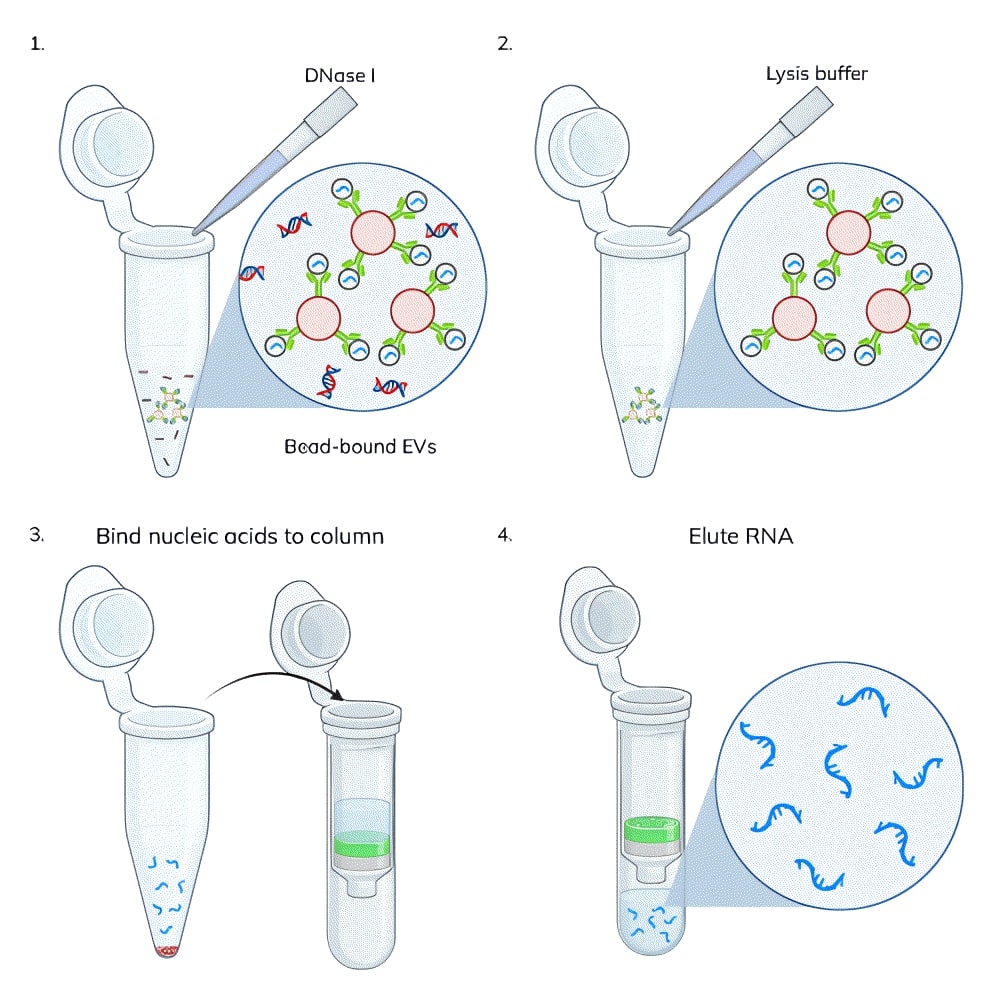
On-bead DNase treatment: EV capture beads were prepared by binding 1 ug of biotinylated tetraspanin antibody (CD81-biotin for Jurkat EVs and CD9-biotin for MCF-7 EVs) to 250 uL of streptavidin beads according to the ExoBrite™ Streptavidin Magnetic Beads protocol. Jurkat cell-derived or MCF-7 cell-derived SEC-purified EVs (3 x 10¹⁰ EVs per sample) were added to the capture beads and incubated for 1 hour, rotating. The beads were washed and resuspended in DNase Buffer. The EV/bead samples were each split into two tubes, and DNase I was added to one tube (Figure 1). All of the samples were incubated for 15 minutes, rotating, then washed 3 times with sterile PBS.
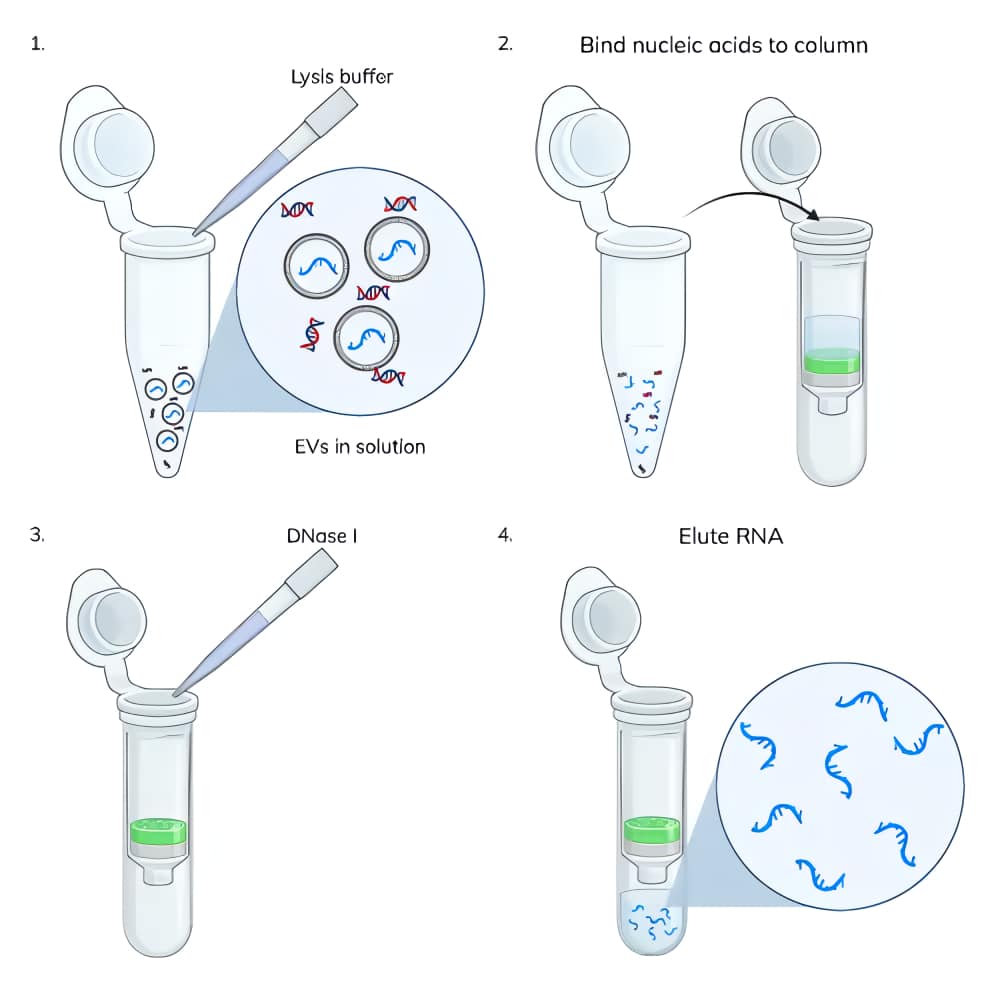
Nucleic acid extraction from EVs: Nucleic acids were extracted from 3 x 10¹⁰ EVs using the ExoBrite™ EV Total RNA Isolation Kit following the protocol in the product information sheet. Some samples had the typical on-column DNase treatment performed and others did not (Figure 2). Nucleic acids were eluted in 40 uL.
Nucleic acid quantitation: dsDNA was quantified using the AccuClear® Ultra High Sensitivity dsDNA Quantification Kit, using 10 uL of the elution per assay well. ssRNA was quantified using the AccuBlue® Broad Range RNA Quantitation Kit, using 10 uL of the elution per assay well.
While optimizing the amount of DNase I required to remove DNA during EV RNA extraction, we performed the ExoBrite™ EV Total RNA Isolation Kit protocol with and without on-column DNase I treatment. We were surprised at the relatively large amount of DNA that was co-isolated with RNA (Fig. 3). In two replicate experiments, we found that the amount of RNA isolated from 3 x 10¹⁰ EVs was fairly consistent at 40 ng and 50 ng, however the amount of DNA isolated varied more widely at 45 ng and 190 ng. Additionally, the amount of DNA was equal to or greater than the amount of RNA, which we did not expect.
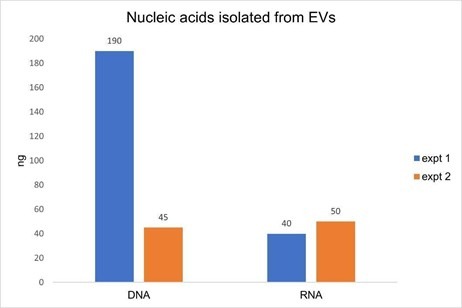
Figure 3. Two replicate experiments were performed in which nucleic acids were isolated from 3 x 10¹⁰ Jurkat-derived SEC-purified EVs. In each test, duplicate samples of EVs were processed using the ExoBrite™ EV Total RNA Extraction Kit with the on-column DNase step either omitted or included. DNA was quantified in the no DNase sample using the AccuClear® dsDNA Quantitation Kit, while RNA was quantified in the DNase-treated sample using the AccuBlue® Broad Range RNA Quantitation Kit. The amount of DNA measured was as high or higher than the amount of RNA, in addition to varying widely between experiments, indicative of unexpectedly high levels of DNA in the EV samples.
We hypothesized that the DNA being isolated was external to the EVs (e.g., cell-free DNA) as opposed to being contained within them. To test this, we captured EVs onto magnetic streptavidin beads using biotinylated tetraspanin antibodies (CD81-biotin for Jurkat EVs and CD9-biotin for MCF-7 EVs). Having the EVs captured onto magnetic beads allows the EVs to be treated and washed more easily than purified EVs in solution, because the magnetic beads are easily immobilized on a magnet for buffer exchange and washing. The bead-bound EVs were either untreated or treated with DNase I for 15 minutes using the same buffer and DNase amount as specified for on-column treatment in the extraction kit. The EVs were then washed three times and lysed with the EV Lysis Buffer from the ExoBrite™ EV Total RNA Isolation Kit. The kit protocol was followed for isolation of RNA from the lysate, either with and without the on-column DNase step.
We found that the DNase pre-treatment of bead-bound EVs was as effective as the on-column DNase at removing DNA from an EV-derived nucleic acid sample, removing 90% and 92% of the DNA, respectively (Fig. 4, orange bars). In samples where both bead and column DNase treatments were performed, there was no detectable DNA remaining (there may be some residual DNA below the detection limit of the DNA quantitation assay). We suspect that this additive effect is more likely due to a single DNase treatment not being 100% effective, rather than the residual DNA is inside of the EV lumen, however, we can't rule that out without further testing.
In examining this data, we noticed an interesting phenomenon: in both of the samples where the EVs were treated with external DNase prior to lysis (i.e., "Bead DNase" and "Col+bead DNase") the yield of isolated RNA was higher than the no-DNase sample, by 28-38% (Fig. 2, blue bars). This experiment was performed twice with EVs isolated from two different cell lines (Jurkat and MCF-7), and the yield improvement with pre-DNase treatment was observed in both instances.
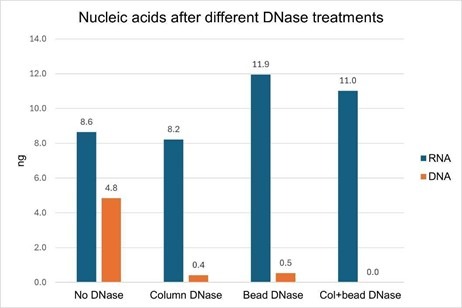
Figure 4. Jurkat-derived SEC-purified EVs (3 x 10¹⁰) were captured onto magnetic streptavidin beads with a CD81-biotin antibody. Two of the EV samples ("Bead DNase" and "Col+bead DNase") were treated with DNase I for 15 minutes at room temperature and two samples ("No DNase" and "Column DNase") were untreated. All of the samples were washed 3 times and then lysed. Nucleic acids were isolated with or without on-column DNase I treatment. Both DNase treatments (on beads and on column) removed nearly all of the DNA from the isolated nucleic acid, and no DNA was detectable when both DNase treatments were performed. When bead-bound EVs were treated with DNase, the RNA yield was increased.
This is not the first report indicating that most or all DNA in an EV sample is external to the vesicles (Ref. 3), and our data adds to that mounting evidence. While we did see an additive reduction in DNA when both DNase treatments were performed, we did not perform controls where two on-bead or two on-column treatments were done. Nevertheless, it is likely that a single DNase treatment is not sufficient to remove all of the DNA in a sample, and two sequential DNase treatments appear to be more effective; we have seen this to be true in other applications (data not shown). More testing would be needed to clarify this.
DNase-treating the surface of EVs and thus removing most of the DNA in the sample prior to EV lysis resulted in an increase in the RNA yield from those EV samples (Figure 1). We hypothesize that there is competitive binding to the spin column between DNA and RNA in the lysate. It is known that DNA binds to silica membranes with higher affinity than RNA because it is more highly charged so this competition is not unexpected.
These results suggest that one way to generate high yield and high purity RNA from EVs is to perform a DNase treatment of the EVs prior to lysis and nucleic acid purification. However, there are some caveats. This procedure is currently only practical for EVs that are captured onto beads or in some other manner that allows washing, and since a capture molecule such as an antibody may not capture every EV in a sample, some EVs will likely be lost, and the remaining EV population may display a bias based on the capture molecule. However, as more efficient EV capture technologies are developed, this process will become more practical for broad use.
CytoLinerTM Fixed Cell Membrane Stains are unique lipophilic fluorescent dyes that provide selective and uniform plasma membrane staining in formaldehyde-fixed cells, ensuring consistent results. Unlike other lipophilic dyes, such as DiO, Dil, Vybrant® dyes, or CellMaskTM Deep Red, CytoLinerTM Dyes have optimized chemical structures that balance solubility with lipophilicity, which permits more homogenous and reliable cell surface membrane staining.
While our original CellBrite® Cytoplasmic Membrane Dyes can be used to stain formaldehyde-fixed cells, they are challenging to work with and display high variability. Instead, we recommend using CytoLinerTM Dyes as they are easier to use and offer superior uniformity for staining fixed cells (Figure 1). CytoLinerTM is compatible with mild detergent permeabilization before staining and with blocking agents used during immunofluorescence protocols, allowing subsequent staining with antibodies or other probes. However, these stains cannot be used with cells fixed by solvents or with samples that require deparaffinization (e.g., FFPE tissue), because these treatments remove lipids required for CytoLinerTM staining.
CytoLinerTM staining can be performed on adherent cells or cells in suspension, and is compatible with poly-L-lysine coated cultureware or Transwell® filters. We do not recommend using the dyes to stain cryosections, since they will stain intracellular structures and may not stain all cell membranes uniformly. In addition, CytoLinerTM staining does not tolerate mounting medium or clearing agents, and cells should be imaged in PBS. General protocols for CytoLinerTM are outlined below, and the complete CytoLinerTM Fixed Cell Membrane Stains Product Information Sheet is available for download.
Note: Staining with CytoLinerTM after antibody staining will work, however, the background may be higher.
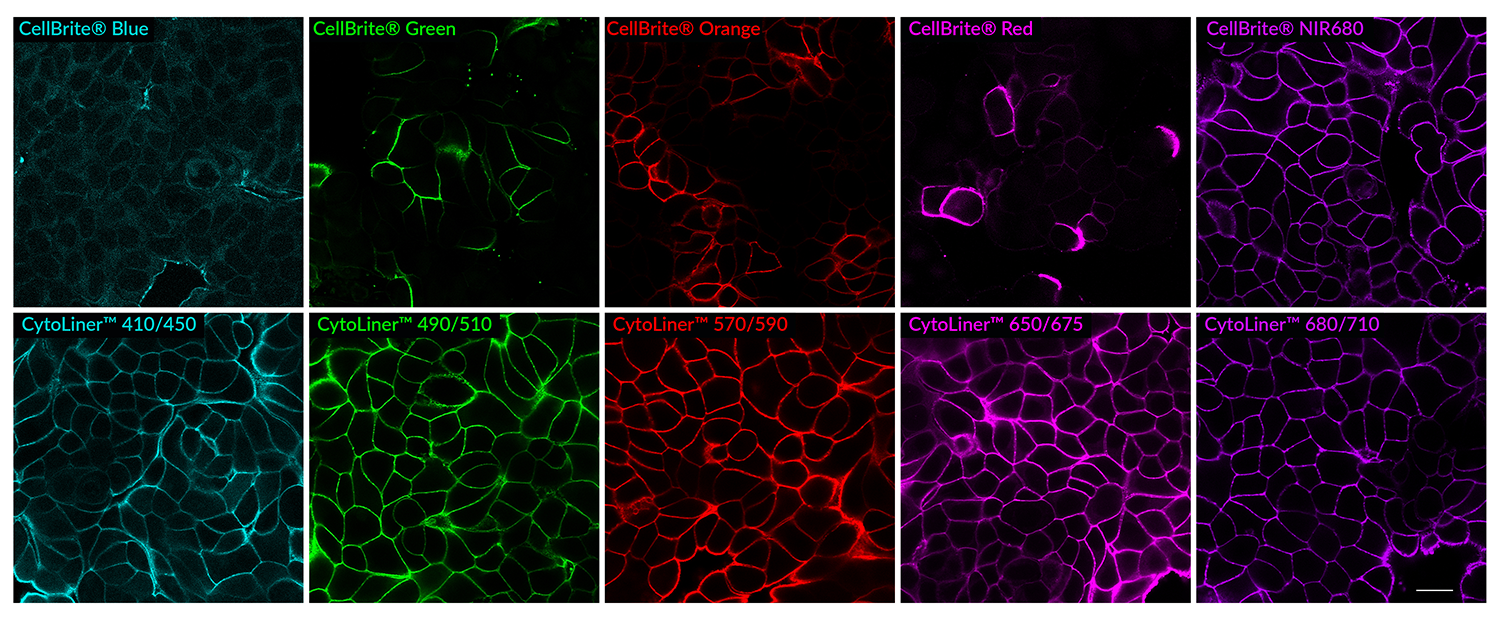
Figure 1. Comparison of fixed cell staining with CytoLinerTM Fixed Cell Membrane Stains versus the classic CellBrite® Cytoplasmic Membrane Dyes. In comparison to the CellBrite® lipophilic carbocyanine dyes, CytoLinerTM Dyes show more uniform and reliable staining of paraformaldehyde-fixed, mildly-permeabilized cell membranes. Paraformaldehyde-fixed cells were permeabilized for 10 minutes at room temperature with 0.1% Triton® X-100 in PBS, then rinsed with PBS and stained with CellBrite® Dyes in PBS or CytoLinerTM Stains in 1X CytoLinerTM Buffer for 10 minutes at room temperature, then rinsed with PBS. Imaged by confocal microscopy; scale bar: 20 um.
VyBrant is a registered trademark of Thermo Fisher Scientific; CellMask is a trademark of Thermo Fisher Scientific; Transwell is a registered trademark of Corning Incorporated; Triton is a registered trademark of The Dow Chemical Company.
Working with RNA can be challenging and intimidating compared to working with DNA. While DNA is known to be quite stable and hardy (geneticists have been sequencing genomes that are thousands of years old), the chemical structure of RNA makes it prone to hydrolysis and, therefore, much less stable. And while nucleases can degrade both DNA and RNA, RNase enzymes are highly stable and readily refold after denaturation, making them difficult to inactivate permanently. Additionally, contamination is a very real concern when working with RNA. For this reason, it is crucial to use clean gloves and a clean lab coat, keep tubes and bottles closed, use a clean (RNase-free) work area, and ensure you use RNase-free supplies, solutions, and reagents. Finally, while there are many fluorescence-based reagents to quantify and visualize DNA, few are optimal for RNA due to low sensitivity or a lack of specificity in the presence of contaminating DNA.
In this Tech Tip, we will simplify and demystify RNA work, and recommend tools that will help you to confidently isolate and analyze your RNA samples with ease.
Good RNA hygiene starts with PPE (personal protective equipment). When working with RNA, it is important to always be aware of what you are touching with your gloves. Avoid touching your face or hair since that could allow transfer of RNase from your skin to your gloves. Change gloves if you have touched unclean equipment or surfaces. We particularly recommend always putting on fresh gloves before handling pure RNA samples.
Decontamination of surfaces and tools
Before beginning RNA work, it is a good idea to decontaminate your workspace, including the benchtop, your pipettes, and other equipment that you will be using. We recommend cleaning these surfaces by spraying them with RNase-X™ Decontamination Solution, wiping them down, then spraying them with either dH2O or 70% ethanol and wiping again. RNase-X™ is very efficient at removing RNases from surfaces (Fig. 1).
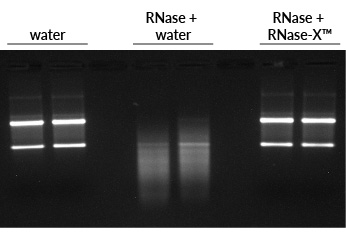
Figure 1. RNase-X™ eliminates RNase from surfaces. To simulate RNase-contaminated surfaces, the insides of microfuge tubes were coated with RNase A, then rinsed with either water or RNase-X™, followed by water washes. The final water sample was incubated with total human RNA, then run on an agarose gel with EMBER500™ RNA Prestain Loading Dye. First two lanes: RNA incubated with water alone shows bright ribosomal RNA bands. Middle two lanes: RNA incubated with the water from RNase-treated, water-rinsed tube is degraded. Last two lanes: RNA incubated with the water from RNase-treated, RNase-X™-rinsed tube is intact, like the control.
Tubes, tips, water, buffers, and reagents that will be used for RNA work must be RNase-free. Certified RNase-free products (such as Water, Ultrapure Molecular Biology Grade) can be purchased from many companies. Homemade solutions made with high-grade ingredients and ultrapure water are often RNase-free; this can be verified using RNase testing assays such as RNaseRevealTM Activity Assay Kit (see RNase testing section below). Another common method is to treat solutions with DEPC (diethyl pyrocarbonate) to inactivate RNases. However, DEPC treatment has several drawbacks: it can't be used with Tris-containing or other amino-containing solutions, it requires autoclaving, it may not fully inactivate RNases, it leaves the solution slightly acidic, and the DEPC by-products may inhibit downstream processes. So, we prefer to skip the DEPC and use solutions that have been verified as RNase-free.
Apart from enzymatic degradation caused by RNases, RNA is also susceptible to hydrolysis, which is an intramolecular reaction that causes breakage of the phosphodiester backbone. EDTA has a protective effect because divalent cations like Mg2+ increase hydrolysis. RNA hydrolysis is worse in alkaline solutions, so RNA should not be stored in a solution with pH higher than 7.5. We have seen good stability of RNA stored in either citrate buffer pH 6 or TE buffer pH 7.5 (Fig. 2). Temperature is the most important factor in RNA stability during storage: for best stability and for long-term storage, RNA should be kept at -70°C. For short-term storage, we have found RNA to be stable at 4°C or -20°C for at least 3 weeks (Fig. 2).
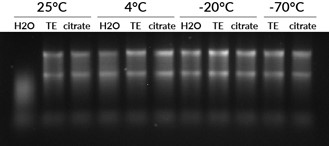
Figure 2. RNA stability depends on buffer and temperature. Total human RNA was suspended in either RNase-free water, TE (pH 7.5), or sodium citrate (pH 6). The samples were stored for 3 weeks at 25°C, 4°C, -20°C, or -70°C. The RNA stored at 25°C in water was degraded while the RNA stored at 25°C in TE or citrate buffer was still largely intact, showing the importance of storing RNA in buffer. However, RNA stored in water at 4°C or colder was still intact after 3 weeks, showing the importance of low temperature on RNA stability.
To keep RNA stabilized during handling or storage, products like RNAlaterTM can be added to tissues, cells, or lysates. Flash freezing or homogenization in TRIzol and freezing at -80°C are alternatives to products like RNAlaterTM. These stabilizing methods can offer flexibility to a researcher so that samples can be handled at room temperature, shipped, or treated to multiple freeze-thaw cycles without the RNA becoming degraded. However, any stabilization reagent added to a sample must be removed and the RNA purified before any downstream work is done.
RNase inhibitors, such as RiboGuardTM, may be helpful in some situations. These are proteins that inhibit specific types of RNases by binding to them in a 1:1 ratio. Their effectiveness depends on the amount of RNase contamination in a sample. Trace amounts of RNase may be effectively inhibited, but samples containing larger amounts of RNase (e.g., RNase-treated DNA samples) may not show full RNase inhibition. Some other caveats to using these RNase inhibitors are that they can be expensive, and their effects are non-covalent and reversible. Also, they contain glycerol and DTT, which may affect downstream applications. After attempting unsuccessfully to use RNase inhibitors to inactivate RNases in RNase-treated DNA, Biotium developed a proprietary method to permanently inactivate RNases in a solution, which we use to make RNase-Free Calf Thymus DNA.
When preparing solutions to use for RNA work (see Materials section above), it is useful to verify that the solution is free of RNase. With this in mind, Biotium developed the RNaseRevealTM Activity Assay Kit. This fluorescent assay was designed for the sensitive detection of RNase activity in liquid samples and is ideal for detecting RNase contamination in quality control workflows. The kit utilizes RNaseRevealTM Substrate, which is an RNA probe tagged with a green fluorophore and a quencher so that the intact probe is non-fluorescent. In the presence of RNase, the probe is cleaved, and the fluorophore is detached from the quencher, releasing a green fluorescent signal. Biotium also offers RNase A as a separate product that is recommended for use with this kit.
However, be aware that samples with extreme pH, high salt, or detergent can inhibit fluorescence-based RNase assays by directly affecting the fluorogenic RNase substrate or the RNase enzyme. This is easy to test for by adding RNase to your solution and ensuring that it registers fluorescence in the assay comparable to water plus RNase.
Isolation from fresh cells or tissues
For cultured cells and fresh tissues, total cellular RNA can be isolated by several different methods. The original method of extracting nucleic acids uses phenol and chloroform to separate proteins and lipids into an organic phase and nucleic acids into an aqueous phase. This process can be done under acidic conditions to selectively extract RNA from samples. A related method is to use TRI ReagentTM (also called TRIzolTM), which uses guanidinium salt in combination with phenol and chloroform to selectively isolate RNA.
These days, many researchers prefer to use column-based RNA isolation kits to avoid the use of phenol-based methods that involve hazardous chemicals and tricky techniques required to separate organic and aqueous phases. For those looking for a simpler purification solution, there are easy-to-use kits available such as the CELLDATA RNAstormTM Fresh Cell and Tissue RNA Isolation Kit. Many such kits use guanidinium salt and silica membrane columns to selectively isolate RNA, while others use magnetic beads.
Total RNA isolated from these methods consists of ~95% ribosomal RNA. For some applications, it may be desirable to purify mRNA from the total RNA. However, because mRNA makes up a small percentage of cellular RNA, it can be difficult to obtain high yields of mRNA, and to remove all of the ribosomal RNA. Methods involving beads coated with oligo dT that bind to the poly A tails of mRNA are most commonly used to enrich mRNA from a sample.
Isolation from FFPE tissue sections
With the advent of next-generation sequencing methods, researchers increasingly wish to isolate RNA from formalin-fixed paraffin-embedded (FFPE) tissues since patient samples are often preserved in this way. Purifying high quality RNA from FFPE tissues is more challenging than from fresh cells because formaldehyde chemically crosslinks the RNA to proteins and to itself. Some methods to reverse this cross-linking, such as high heat, can result in fragmented or poor-quality RNA.
The CELLDATA RNAstormTM 2.0 FFPE RNA Extraction Kit uses proprietary technology to chemically reverse formaldehyde cross-linking while avoiding the use of high temperatures and hazardous solvents. This leads to RNA with less fragmentation and greater amplifiability compared to other FFPE isolation kits, as measured by RIN score or by DV200 (Fig. 3). For high-throughput applications, we recommend the CELLDATA RNAstormTM 2.0 MagBead FFPE RNA Extraction Kit. This kit uses magnetic beads for RNA isolation and may be adapted for a multiwell plate format.
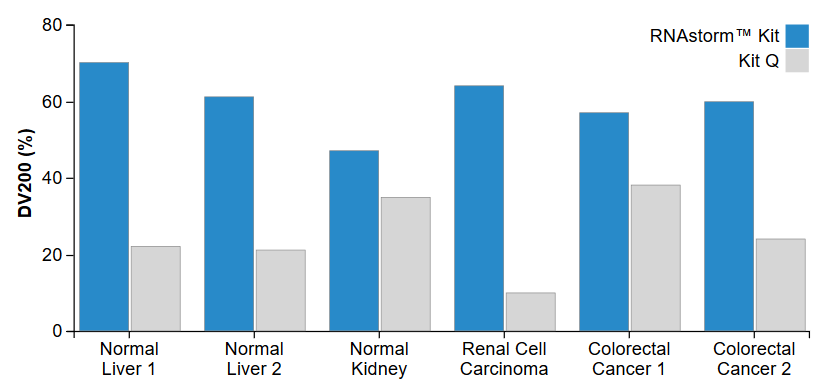
Figure 3. Increased DV200 values are observed for RNA extracted using the RNAstorm™ kit relative to a popular commercial kit. The DV200 represents percentage of RNA with length greater than 200 nucleotides, as measured using an Agilent Bioanalyzer RNA 6000 Nano Kit.
Isolation from extracellular vesicles
The contents of exosomes and other extracellular vesicles (EVs) have garnered increasing attention over recent years for their potential applications in both diagnostics and therapeutics. This includes RNA and its potential role as a key biomarker for cancer and other diseases. However, obtaining high yields of quality RNA from EVs is a challenge due to the dilute nature of EV samples and low RNA content within EVs. Additionally, short non-coding RNAs within EVs, such as miRNAs, often require specialized methods for efficient extraction.
The scientists at Biotium developed the ExoBriteTM EV Total RNA Isolation Kit with these challenges in mind, creating an easy-to-use kit for total RNA isolation (including mRNA and miRNA) from purified EVs. The RNA isolation procedure is a simple column purification method that takes as little as 20 minutes and requires no phenol/chloroform or ethanol precipitation steps. The recovery is estimated to be ~10-20 ng of RNA from 1×10¹⁰ SEC-enriched EVs. Please note that this amount is primarily dependent on the number and quality of EVs, which may be affected by purification methods, storage conditions, and the number of freeze-thaws. The isolated EV RNA can then be used for downstream analysis such as qPCR or RNAseq.
The classic method of quantifying nucleic acids is by measuring UV absorbance at 260 nm (A260). Although A260 nm will not distinguish between RNA and DNA, it can be a useful way to quantify your RNA if you are certain that it is very pure (i.e., that there are no free nucleotides or DNA in your sample). For RNA, multiplying the A260 nm by 40 gives the concentration in ng/uL. It is typical to also take the absorbance at 280 nm to look for contaminants like protein that absorb strongly at 280 nm; a 260/280 ratio of 2.0 or higher is generally considered to be pure RNA. However, be aware that the 260/280 ratio can vary depending on pH. We recommend always using the same solvent, if possible, to make your absorbance readings consistent between experiments (we always use TE pH 7.5 to control pH for consistency).
Fluorescent dye-based RNA quantitation assays are the most accurate way to quantify RNA because they have much greater sensitivity and linearity than A260 measurement. In addition, some (but not all) assays also have the advantage of being selective for ssRNA over dsDNA so that you can achieve an accurate RNA concentration even in the presence of contaminating DNA. The AccuBlue® Broad Range RNA Quantitation Kit is highly selective for RNA over dsDNA (Fig. 4) and is accurate over a wide range of RNA concentrations. Be aware that some other companies fluorescent RNA detection dyes, such as RiboGreen®, while sensitive, are not RNA-specific and will also detect dsDNA present in the sample.
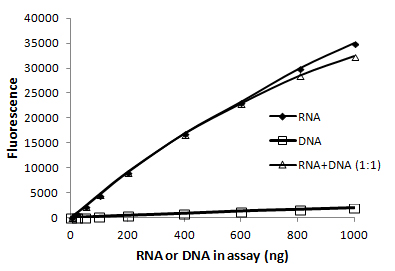
Figure 4. The AccuBlue® Broad Range RNA quantitation assay is highly selective for RNA over dsDNA. The presence of an equal amount of dsDNA in the sample has a negligible effect.
You may want to perform gel electrophoresis to determine the integrity or size of your RNA. Researchers often use the TapeStation system, Bioanalyzer RNA Analysis, or Fragment Analyzer systems to look at integrity and get a size profile instead of gels, especially for high-throughput experiments. It is often assumed that RNA electrophoresis always requires toxic, complicated formaldehyde or glyoxal gels to denature the RNA so that secondary structure doesnt affect the migration through the gel. However, we find that adding denaturants to the agarose gel is not necessary for evaluating RNA integrity. If your aim is just to visually evaluate your RNA, a regular agarose gel can be used as long as a denaturation agent is included in the loading buffer.
For increased sensitivity, convenience, and ease, Biotium created the EMBERTM Ultra RNA Gel Kit, a highly sensitive RNA gel stain available in a convenient pre-coated agarose format that includes formamide-containing RNA loading dye (Fig. 5). In addition to being far more sensitive than other fluorescent RNA gel stains currently available, EMBERTM Ultra does not require a post-electrophoresis staining step. This allows for a streamlined process of simply casting the agarose gel using the EMBERTM Ultra Precoated Agarose and then preparing the samples in the denaturing EMBERTM Ultra RNA Loading Dye. Bands can be imaged immediately after electrophoresis. RNA gel electrophoresis can also be done using polyacrylamide (PAGE) gels if you are looking at miRNA or other RNA up to 200 nucleotides long. Please note that EMBERTM Ultra is not compatible with PAGE gels. These gels require the use of a denaturing loading buffer that does not contain fluorescent dye and post-staining with a sensitive nucleic acid dye like Oxazole Gold.
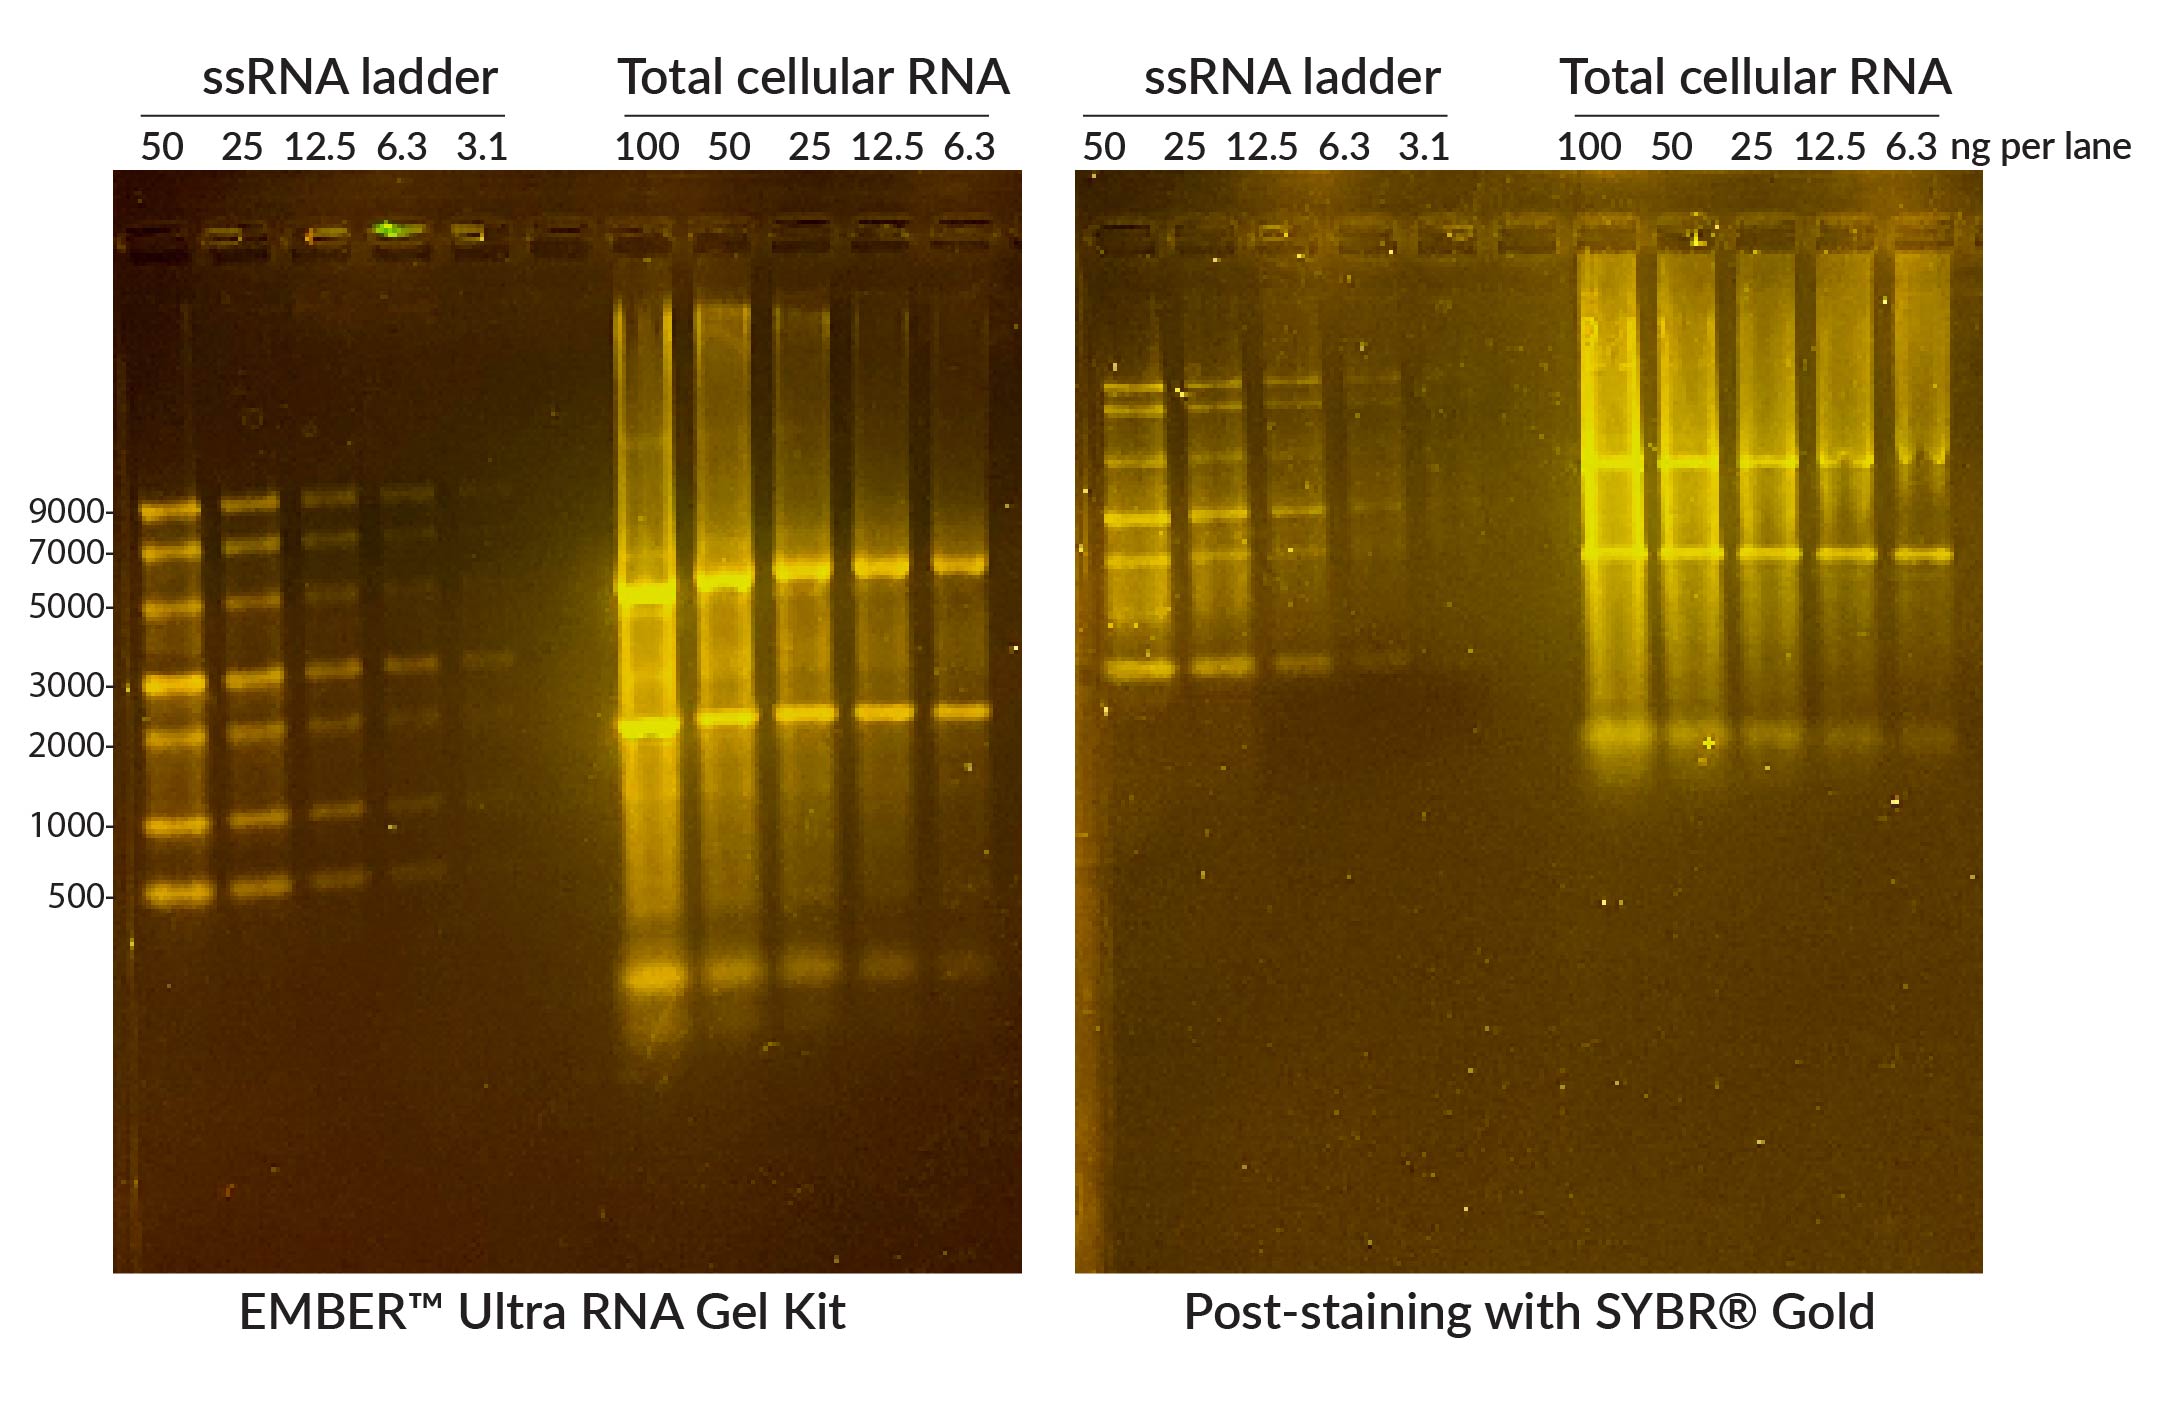
Figure 5. Comparison of EMBERTM Ultra RNA Gel (left) with 1% agarose gel post-stained with SYBR® Gold. NEB ssRNA Ladder or total Jurkat cell RNA were denatured at 70°C for 10 minutes in EMBERTM Ultra RNA Loading Dye (for EMBERTM gel) or NEB RNA Loading Dye (for SYBR® Gel) and run on 1% agarose/1X TBE gels. EMBER® Ultra Gel was imaged immediately after electrophoresis, while the other gel was post-stained in 1X SYBR® Gold/1X TBE for 30 minutes. Gels were imaged on Biotium's Gel-BrightTM Laser Diode Gel Illuminator. The EMBER Ultra® RNA Gel Kit offers comparable or superior sensitivity and resolution compared to SYBR® Gold, without a time-consuming post-staining step.
Membrane and cell surface stains are useful for visualizing cell borders and morphology in multicolor staining of live or fixed cells. Biotium offers several options for cell surface imaging, including the original CellBrite® Cytoplasmic Membrane Stains, which are specialized formulations of classic lipophilic carbocyanine dyes for membrane labeling. Since their release, Biotium scientists have designed a range of novel specialty membrane and cell surface stains for various applications:
To get the most out of our wide selection of membrane stains, check out these five tips for success:
1. Choose the right stain for live or fixed cells
Original CellBrite® Cytoplasmic Membrane Stains can be used to stain live or formaldehyde (PFA)-fixed cells. CellBrite® Fix, MemBrite® Fix, and CellBrite® Steady should only be used on live cells. If they are used on cells after they are fixed, these dyes will mainly stain the cytoplasm or intracellular structures. CellBrite® Fix and MemBrite® Fix were created specifically to stain live cells immediately before fixation. CellBrite® Steady has been designed to image cell surface membranes of live cells for up to several days in culture. Cells stained with CellBrite® Steady retain both surface and intracellular staining over time. However, intracellular staining can be reduced or eliminated with the use of CellBrite® Steady Enhancer.
CytoLinerTM Fixed Cell Membrane Dyes were specifically developed for selective plasma membrane staining in PFA-fixed cells for microscopy. These dyes are engineered for robust and consistent staining of formaldehyde-fixed cells and are suitable for downstream immunofluorescence staining protocols.
For more help choosing a dye (plus information on using these dyes in bacteria or yeast), see our Tech Tip: Cell Surface Stains for Live & Fixed Cells
, or download our Membrane & Surface Stains Selection Guide
.
| Sample | CellBrite® Steady Membrane Stains | CellBrite® Fix Membrane Stains | MemBrite® Fix Cell Surface Staining Kits | CytoLiner™ Fixed Cell Membrane Stains | CellBrite® Cytoplasmic Membrane Dyes |
|---|---|---|---|---|---|
| Live cells | Yes | Yes | Yes | No2 | Yes |
| Fixed cells (PFA only)1 | No | No | No | Yes | Yes |
2. Understand the workflow before you begin
Each of our specialized membrane and cell surface staining products uses a different labeling protocol and has different requirements for downstream processing, such as fixation and permeabilization. Being familiar with the labeling protocol before you begin is a key step for getting good staining.
In general, we highly recommend making the dye solution immediately before staining for all membrane and cell surface staining protocols. Allowing the membrane dye solution to sit after diluting it may increase the occurrence of aggregates. Staining in complete medium may also decrease aggregation when using CellBrite® Cytoplasmic Membrane Dyes, regardless of whether you're using fixed or live cells, as complete medium helps to solubilize the dye.
| Workflow | CellBrite® Steady Membrane Stains (live cells) | CellBrite® Fix Membrane Stains (live cells) | MemBrite® Fix Cell Surface Staining Kits (live cells) | CytoLiner™ Fixed Cell Membrane Stains (fixed cells) | CellBrite® Cytoplasmic Membrane Dyes (live or fixed cells2) |
|---|---|---|---|---|---|
| Step 1 | Dilute dye in cell culture medium | Dilute dye in buffer, add to live cells | Dilute pretreatment solution in buffer | Fix cells with 4% PFA | Dilute dye in medium or buffer, add to live or PFA fixed cells3 |
| Incubate 30 min or longer (up to several days) at 37°C | Stain 15 min. 37°C | Pretreat live cells 5 min. RT | Permeabilize cells in PBS with 0.1% Triton® X-100 for 10 min. RT | Stain 20 min. 37°C | |
| Step 2 | Washing is optional for confocal imaging | Rinse cells1 | Dilute dye in buffer, add to live cells | Dilute dye in 1X CytoLiner Staining Buffer, add to fixed cells | Wash 3x |
| Step 3 | Image (endpoint or real-time) | Fix1 | Stain 5 min. 37°C | Incubate 10 min. RT | Image |
| Step 4 | Permeabilize1 | Rinse cells | Rinse cells with PBS 3x | ||
| Step 5 | Image | Fix1 | Image | ||
| Step 6 | Permeabilize1 | ||||
| Step 7 | Image |
To get complete, step-by-step protocols, download the Product Information sheets:
CellBrite® Green, Orange, & Red Protocol
CytoLinerTM Fixed Cell Membrane Stains
3. Use the right buffer for staining
Original CellBrite® Cytoplasmic Membrane Dyes and CellBrite® Steady Dyes can be added to cell culture medium with serum or buffers like PBS. However, CellBrite® Fix and MemBrite® Fix are chemically reactive compounds, so they have stricter buffer requirements. Make sure you're using a compatible buffer to avoid interference with staining.
| Compatible buffer | CellBrite® Steady Membrane Stains (live cells only) | CellBrite® Fix Membrane Stains (live cells only) | MemBrite® Fix Cell Surface Staining Kits (live cells only) | CytoLiner™ Fixed Cell Membrane Stains (fixed cells) | CellBrite® Cytoplasmic Membrane Dyes (live or fixed cells2) |
|---|---|---|---|---|---|
| Washing/staining | Culture medium (complete or serum-free), PBS, HBSS, or similar buffer | PBS, HBSS, or similar NO Tris, amino acids, BSA, proteins, or serum | PBS, HBSS, Tris, or similar NO amino acids, BSA, proteins, or serum1 | 1X CytoLiner™ Staining Buffer Other buffers may result in less specific staining | Culture medium (complete or serum-free), PBS, HBSS, or similar buffer |
4. Use the right fixative and mounting medium
Original CellBrite®, CellBrite® Steady, and CytoLinerTM Dyes are compatible with formaldehyde (PFA) fixation. However, they can't be used with solvents like methanol, detergents, or mounting medium with glycerol. In contrast CellBrite® Fix and MemBrite® Fix can be fixed, permeabilized, and mounted with any standard protocol. See below for guidelines on fixation, permeabilization, and mounting.
| Compatible reagent | CellBrite® Steady Membrane Stains1 | CellBrite® Fix Membrane Stains | MemBrite® Fix Surface Staining Kits | CytoLiner™ Fixed Cell Membrane Stains | CellBrite® Cytoplasmic Membrane Dyes |
|---|---|---|---|---|---|
| Fixative | PFA after staining1 NO Methanol or other solvents | Formaldehyde or methanol after staining | Formaldehyde or methanol after staining | PFA before staining NO Methanol or other solvents | PFA before or after staining NO Methanol or other solvents |
| Permeabilization buffer | Not recommended to permeabilize after staining | Any detergent or methanol after staining | Any detergent or methanol after staining | PBS with 0.1% Triton® X-100, 10 minutes at RT before staining | Not recommended to permeabilize after staining3 |
| Mounting medium | Buffer only NO glycerol or solvent-based mounting medium | Buffer or antifade mounting medium2 | Buffer or antifade mounting medium2 | Buffer only NO glycerol or solvent-based mounting medium | Buffer only NO glycerol or solvent-based mounting medium |
5. Know what to expect when imaging
Confocal vs. epifluorescence microscopy
If you have access to a confocal microscope, we recommend using it to image membrane staining for the best results. Confocal imaging screens out fluorescence from above and below the plane of focus, allowing very crisp imaging of cell boundaries. Compared to regular epifluorescence imaging, confocal is more sensitive and gives you more control over excitation power to limit photobleaching. Membrane dyes can be imaged with a regular epifluorescence microscope, but the images will be more diffuse because fluorescence from membranes above and below the cell borders will be captured.
Changes in dye localization over time in live cells
Original CellBrite® Cytoplasmic Membrane Dyes are very stable and have been reported to stain live cells for weeks in culture. However, dye localization in live cells changes over time. If live cells are cultured after staining, the labeled membrane will be internalized, so staining will gradually change from cell surface to intracellular vesicles, usually becoming mostly intracellular after about 24 hours.
CellBrite® Steady Dyes equilibrate between intracellular compartments and the plasma membrane. This allows the cells to retain surface staining as well as intracellular staining for several days. These kits also include CellBrite® Steady Enhancer as an optional reagent that can be used to mask intracellular fluorescence of CellBrite® Steady Dyes, providing more selective visualization of cell boundaries.
CellBrite® Fix and MemBrite® Fix localization in live cells will also change from cell surface to intracellular as membranes turn over, like original CellBrite®. Because they react with membrane proteins, staining with CellBrite® Fix and MemBrite® Fix is less stable in live cells than original CellBrite®. For this reason, we recommend fixing the cells immediately after staining with CellBrite® Fix or MemBrite® Fix stains.
Staining of dead cells
CellBrite® Fix, MemBrite® Fix, and CellBrite® Steady react irreversibly with cellular proteins. In live cells, this occurs on the cell surface because the dyes can't penetrate the membrane. But they do get inside dead cells, where there are many more targets for reaction. As a consequence, the dyes stain dead cells much more brightly than live cells. For applications in which the cells will be stained after fixation, we strongly recommend using CytoLinerTM Fixed Cell Membrane Stains, which do not strongly stain dead cells. For protocols in which live cells will be stained and then fixed, our CellBrite® Cytoplasmic Membrane Dyes may be the best fit as they also do not brightly stain dead cells.
When imaging these stains, do not focus on very bright, rounded-up, or shrunken dead cells. Instead, imaging settings should be adjusted to detect cell membrane staining. The dead cell signal will likely be saturated under these settings. If the dead cell staining interferes with your imaging, try using high magnification and confocal imaging to exclude dead cells from the field of view. Or, try using one of our original CellBrite® Cytoplasmic Membrane Dyes, which do not show such dramatic differences in signal between live and dead cells.
Staining of fixed cells
CytoLinerTM Fixed Cell Membrane Dyes are optimized to stain plasma membranes in formaldehyde-fixed cells. The dyes will also stain tissue cryosections, but because plasma membranes are compromised by freezing and sectioning, the staining is not selective for the plasma membrane but will also stain intracellular structures. This stain cannot tolerate mounting medium or clearing agents, so cells should be imaged in PBS. CytoLinerTM signal is stable, so stained cells may be stored in PBS at 4°C, protected from light, for several days or longer prior to imaging. This stain is compatible with poly-L-lysine coated culture surfaces and Transwell® permeable supports. For best results, confocal microscopy is recommended for imaging fluorescent staining of Transwell® supports to avoid background from the filter material.
Original CellBrite® Cytoplasmic Membrane Dyes also may be used to stain formaldehyde-fixed cells. The staining can withstand permeabilization, but this can alter the dye localization and result in increased intracellular staining. Alternatively, we have seen good preservation of plasma membrane staining when cells are fixed with formaldehyde and then permeabilized before staining with the original CellBrite® Dyes. However, we strongly recommend using CytoLinerTM Fixed Cell Membrane Stains for staining formaldehyde-fixed cells because they offer more robust and consistent results over the CellBrite® Cytoplasmic Membrane Dyes.
Find out more
See our Tech Tip: Cell Surface Stains for Live & Fixed Cells
Visit our page on Membrane & Cell Surface Stains
See
Triton is a registered trademark of The Dow Chemical Company. VECTASHIELD is a registered trademark of Vector Laboratories.
Membrane staining is useful in defining cell boundaries in multicolor imaging studies, but finding dyes compatible with the various viability, fixation, and experimental staining conditions dictated by a particular workflow or application can be challenging. In order to solve this issue, Biotium has created a versatile selection of highly fluorescent and photostable stains to visualize cell boundaries under a wide variety of conditions.
To select the cell surface stain that is right for you, read about the different types of stains in Table 1 and consult the selection table at the end of the page
| Sample/Workflow | CytoLiner™ Fixed Cell Membrane Stains | CellBrite® Steady Membrane Stains | CellBrite® Fix Membrane Stains | MemBrite® Fix Membrane Stains | CellBrite® Cytoplasmic Membrane Dyes | CF® Dye Lectin Conjugates |
|---|---|---|---|---|---|---|
| Stain live | No1 | Yes | Yes | Yes | Yes | Yes |
| Stain for real time live cell imaging | No | Yes | No | No | Yes3 | No3,7 |
| Stain live, then fix with PFA | No1 | No | Yes | Yes | Yes | Yes |
| Stain live, then fix with methanol | No | No | Yes | Yes | No | Yes |
| Stain live, fix with PFA, & then permeabilize | No | No | Yes | Yes | No | Yes |
| Fix (PFA), then stain | Yes | No | No | No | Yes | Yes |
| Fix (methanol), then stain | No | No | No | No | No | Yes |
| Stain bacterial cells | ND* | No | Yes | Yes2 | No | Yes4 |
| Stain yeast | ND* | No | Yes | Yes | No | Yes5,6 |
| Dye transfer between cells | Yes | Yes | Minimal | Minimal | Minimal | Possible |
| Non-toxic, stable | Yes | Yes | Yes | Yes | Yes | Possibly toxic7 |
| Compatible with Poly-lysine or collagen-coated culture ware | Yes | Yes | No | No | No | Yes |
CytoLinerTM Fixed Cell Membrane Stains are a new generation of membrane stains developed to address the limitations of traditional lipophilic dyes in fixed cells; they offer robust signal and unparalleled reliability for plasma membrane staining of formaldehyde-fixed cells for imaging applications.
While traditional lipophilic membrane stains, like DiO and DiI, often produce highly variable staining in formaldehyde-fixed cells due to their poor water solubility, CytoLinerTM stains reliably stain the plasma membrane in formaldehyde-fixed cells. These stains are not compatible with cells fixed using solvents like methanol, ethanol, or acetone or with paraffin-embedded samples (such as FFPE tissues) because these treatments will remove the lipids required for CytoLinerTM staining.
CytoLinerTM stains may be combined with downstream staining with antibodies or other probes after mild permeabilization for intracellular immunofluorescence co-staining protocols. The stains are also compatible with poly-L-lysine coated cultureware and Transwell® membranes and are available in a wide range of five colors from blue to near-IR for flexible panel design.
Designed for long-term live cell staining, cells labeled with CellBrite® Steady Membrane Stains retain both surface and intracellular staining over time and can be imaged for 48 hours or longer in live cells. This contrasts with the CellBrite® Cytoplasmic Membrane Stains or other lipophilic membrane dyes that are eliminated from the cell surface by endocytosis.
Intracellular staining with CellBrite® Steady Membrane Stains can become more prominent with longer incubation times. CellBrite® Steady Enhancer, an optional reagent provided in the kit, can be applied to reduce intracellular staining and improve selective imaging of cell outlines and boundaries over several hours or days.
Membrane staining with CellBrite® Steady Dyes is retained immediately after fixation with formaldehyde but does not tolerate methanol or detergent. If cells are stored after formaldehyde fixation, the dyes will redistribute to stain cytoplasmic structures relatively quickly. CellBrite® Steady Enhancer cannot be used in a workflow that includes cell fixation.
CellBrite® Steady Dyes readily transfer between cells and are not recommended for cell tracking, co-culture, or transplantation studies. Our stable, non-toxic ViaFluor® SE Cell Proliferation Kits can be used to covalently label the cell cytoplasm for long-term tracking by microscopy or flow cytometry. See our Tech Tip: Using ViaFluor® SE Stains for Cell Tracing and Co-Culture, to learn more.
CellBrite® Fix and MemBrite® Fix are covalent stains compatible with downstream fixation and permeabilization for multicolor IF staining. While staining is non-toxic and homogenous, these dyes cannot be used on pre-fixed cells and the intracellular labeling of cells with compromised cell membranes is intense. If live cells are cultured after staining, the dyes will be internalized over time by endocytosis, so we recommend fixing shortly after labeling. For cells already fixed with formaldehyde, we recommend CytolinerTM Fixed Cell Membrane Stains. CellBrite® Fix and MemBrite® Fix Stains work by covalently labeling cell surface proteins and, therefore, also react with other proteins like those used in cell culture surface coatings. Please see Table 2 for details on the different workflows of our stains.
CellBrite® Fix Membrane Stains require only a single step, allowing researchers to stain their cells rapidly in only 15 minutes. They are reactive membrane dyes that associate with the membrane and then covalently bind to membrane proteins so that the cells can be fixed and permeabilized without loss of fluorescence. CellBrite® Fix can be used to stain mammalian cells, yeast, and bacteria.
MemBrite® Fix Cell Surface Stains require a two-step procedure, but this stain is offered in a more extensive choice of dye colors, including STORM-compatible MemBrite® Fix-ST dyes. MemBrite® Fix does not have an affinity for the membrane but will react with extracellular membrane protein domains. MemBrite® Fix also can be used to stain gram-positive bacteria and yeast.
CellBrite® Cytoplasmic Membrane Dyes are ready-to-use dye delivery solutions for lipophilic carbocyanine dyes (DiO, DiI, DiD, and DiR) that label membranes in live or fixed cells. The dyes are available with colors ranging from blue to near-IR and can be added directly to standard culture media of suspension or adherent cell cultures. Staining is non-toxic and stable, with very little dye transfer between cells, making them suitable for cell labeling, tracking mixed cell populations, and cell fusion studies. The CellBrite NIR dyes and near-infrared DiR are suitable for small animal imaging. These dyes do not stain bacteria or yeast.
While labeling with lipophilic carbocyanine dyes is very stable, the cellular localization of staining changes over time in live cells. Immediately after staining, the dyes primarily label the plasma membrane but become internalized by endocytosis over the course of hours to a day, so staining becomes localized to intracellular vesicles and lysosomes.
Cells can be fixed with formaldehyde (PFA) before or after CellBrite® staining. However, the staining will have poor tolerance for permeabilization or methanol fixation and cannot be used on FFPE sections, as membrane lipids are extracted during the dewaxing and rehydration process. Therefore, it is not compatible with some immunofluorescence (IF) protocols. Good results can be obtained when cells are PFA-fixed and permeabilized with detergent prior to staining; see our Tech Tip: Combining Lipophilic Membrane Dyes with Immunofluorescence.
For staining formaldehyde-fixed cells, we strongly recommend using CytoLinerTM Fixed Cell Membrane Stains, which offer more robust and consistent results over the CellBrite® Cytoplasmic Membrane Dyes. Biotium also offers a selection of stand-alone lipophilic carbocyanine dyes such as Neuro-DiO, Neuro-DiI, and dilinoleyl dyes which have structural features designed to make the probes diffuse faster in cell membranes. Our ViaFluor® SE Dyes, which stain the cytoplasm, may be a more suitable option for long-term imaging of cell morphology. See our Tech Tip: Using ViaFluor® SE Dyes for Cell Tracing and Co-Culture.
Conjugated to our bright and photostable CF® Dyes, lectins label glycoproteins on the surface of live or fixed cells. Lectin staining is compatible with PFA, solvent fixation, and permeabilization. In pre-fixed and permeabilized cells, lectins stain both the cell surface and organelles in the secretory pathway. Lectins, such as the CF® Dye WGA Conjugates or CF® Dye Concanavalin A Conjugates, can be used to label the cell surface or plasma membrane in FFPE or frozen sections. However, this staining is tissue-specific and may also be sample-specific, as lectin conjugates can stain intracellular structures if the cell membrane is compromised. Immunostaining using cell surface-specific antibodies is also an excellent option for FFPE tissue.
WGA and Con A lectin conjugates are widely used for cell surface staining in mammalian cells and are also useful for bacterial Gram stains and yeast stains. While WGA and Con A broadly stain commonly cultured cell types, other lectins may be better suited for staining different cell or tissue types. All of Biotium's lectin conjugates can be viewed on our website.
Because lectin staining may be cell-type or tissue-dependent, we recommend considering our CellBrite®, MemBrite®, or CytolinerTM stains as you search for the most suitable stain.
Biotium offers a variety of stains for different organelles and cellular structures. For researchers interested in staining extracellular vesicles (EVs), we developed the ExoBriteTM stains and antibodies, which offer higher coverage and signal-to-noise over membrane dyes commonly used for EV staining. Check out our Extracellular Vesicle Research page for more information. For microbiologists, we have a wide range of fluorescent dyes and assay kits to stain bacteria, yeast, and fungi, including dyes to assess cell viability and bacterial gram stain type. An overview of these products can be viewed on our Microbiology Stains & Kits technology page. We also offer a selection of voltage sensitive membrane potential dyes and nerve terminal dyes for tracking synaptic vesicle trafficking.
Transwell is a registered trademark of Corning Incorporated.
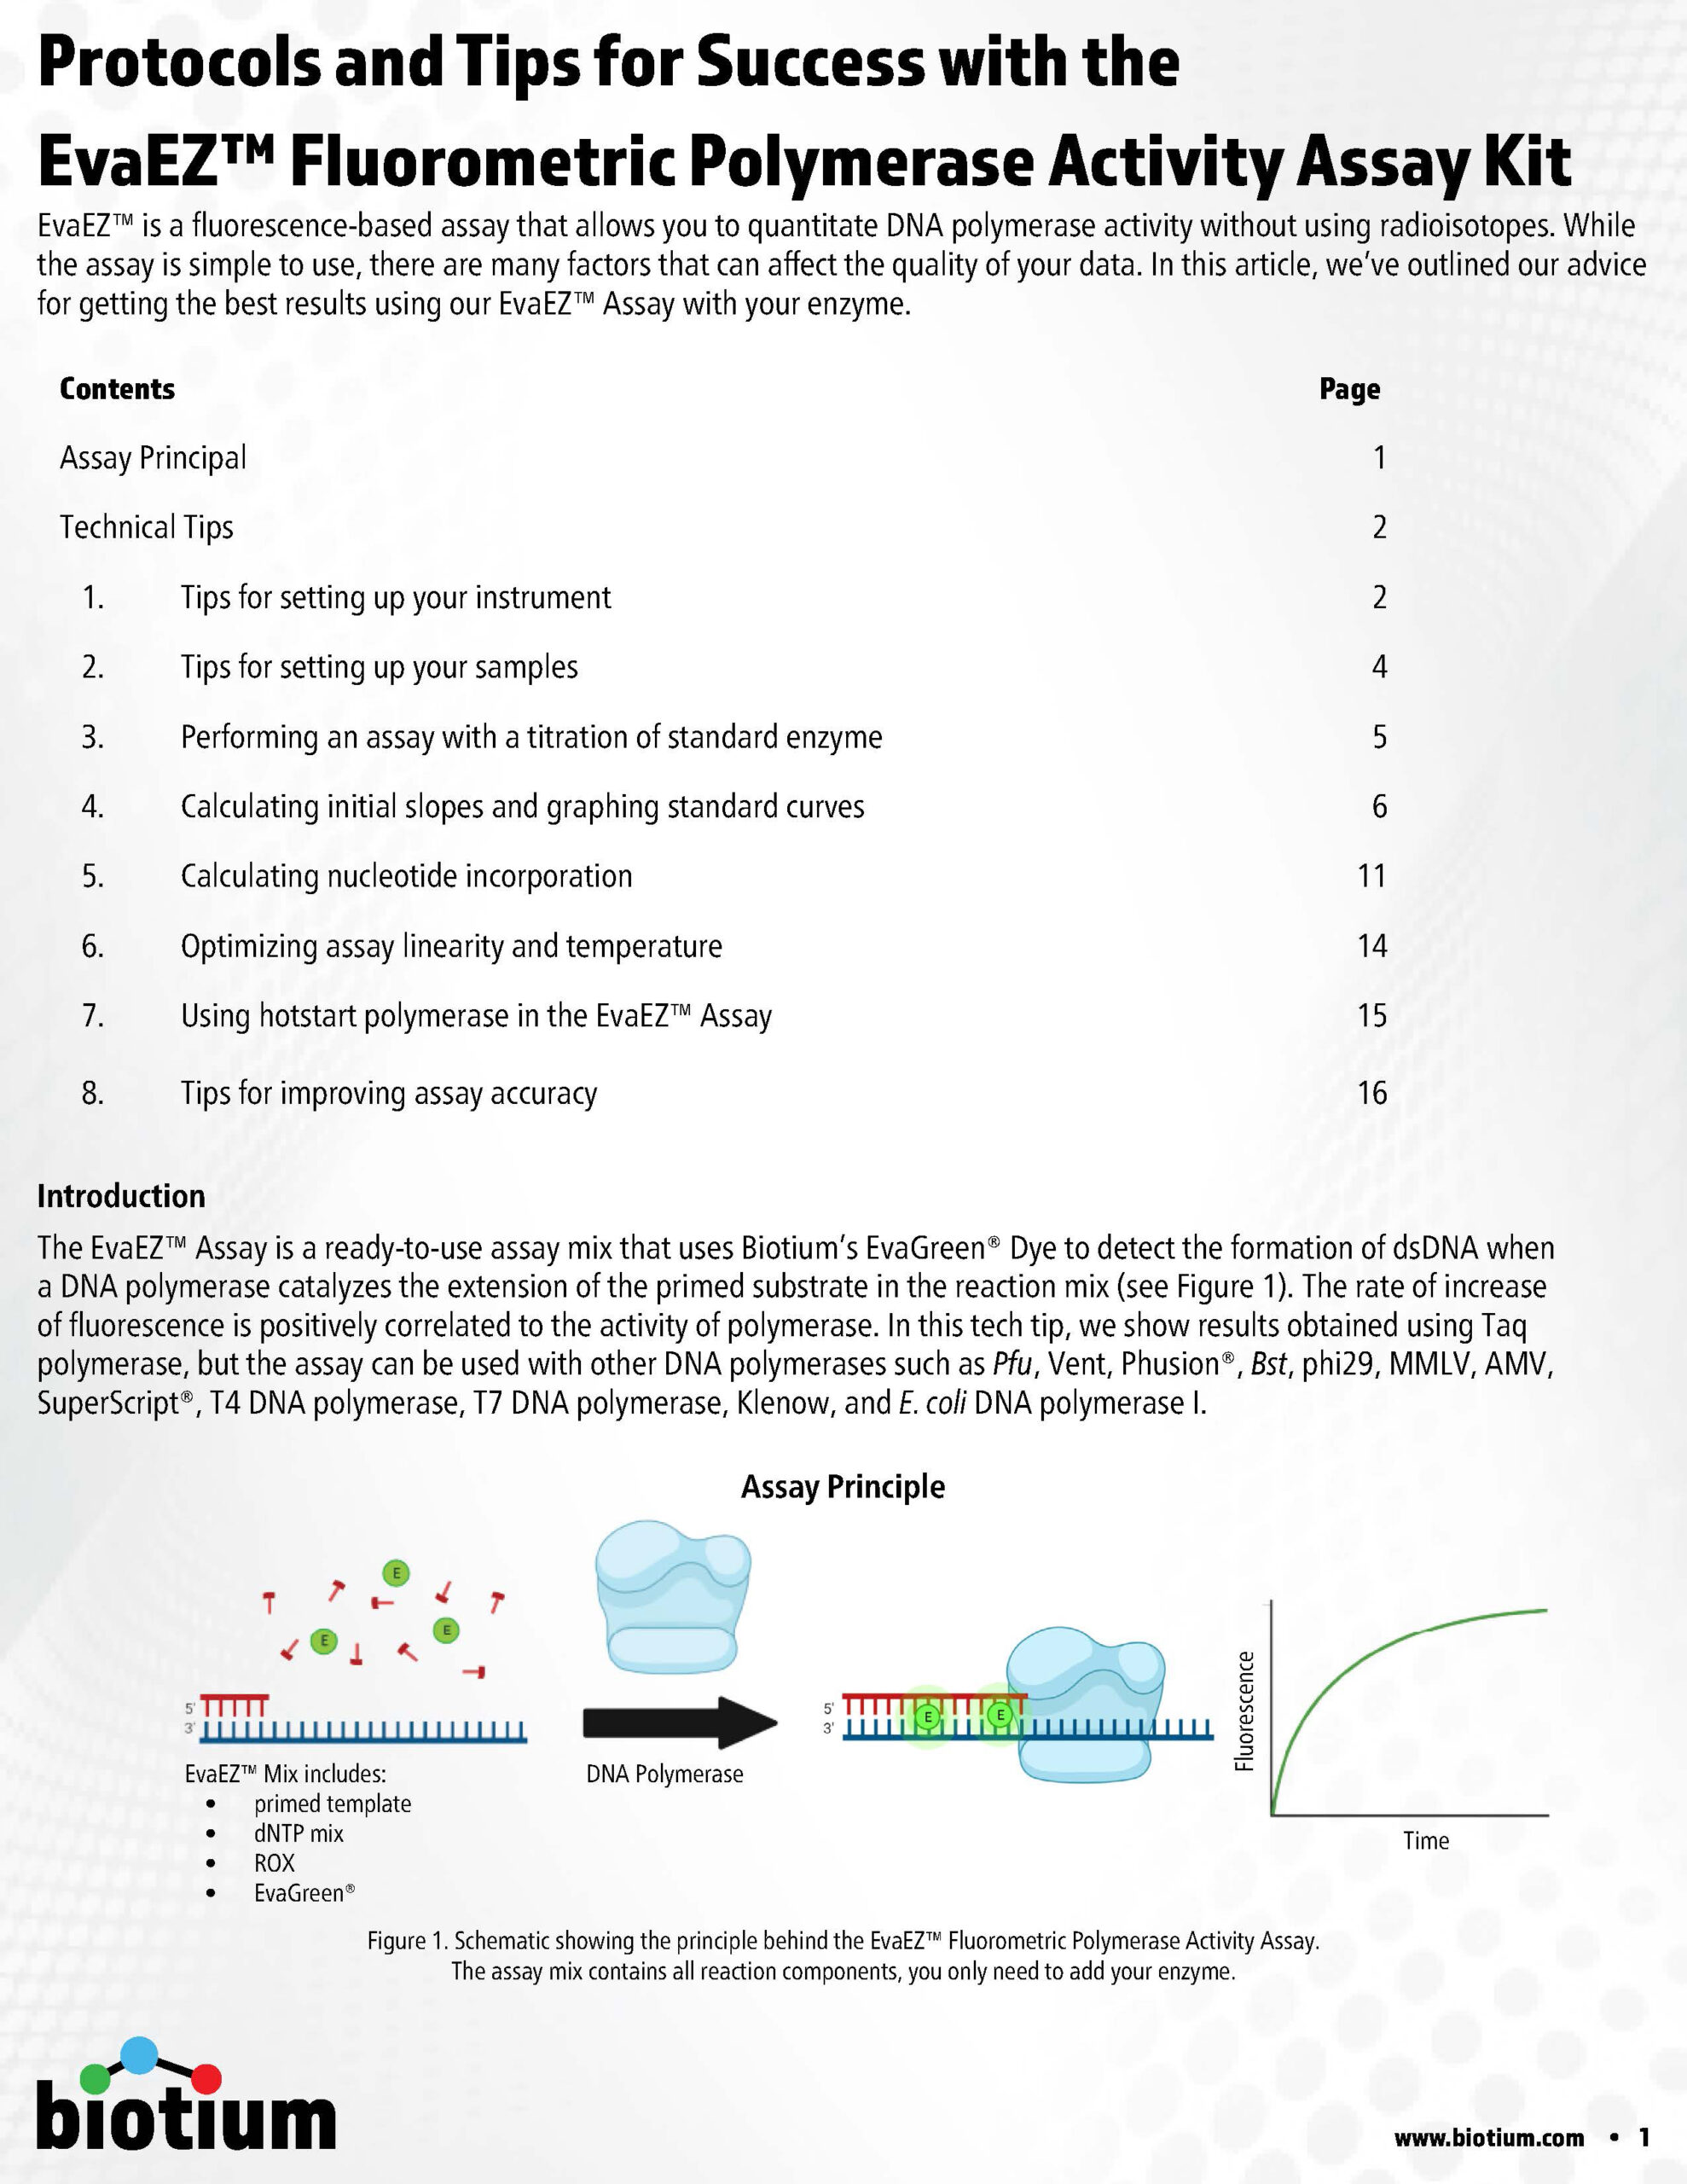
EvaEZ™ is a fluorescence-based assay that allows you to quantitate DNA polymerase activity without using radioisotopes. While the assay is simple to use, there are many factors that can affect the quality of your data. In this article, we've outlined our advice for getting the best results using our EvaEZ™ Assay with your enzyme.
Extracellular vesicles (EVs) are small, membrane-bound particles secreted from cells and thought to function as cellular messengers, carrying cargo from one cell to another. In biomedical research, EVs and their cargo are used as diagnostic biomarkers for cancer and other diseases. However, the isolation and detection of EVs can be extremely challenging due to their small size (~30-200 nm in diameter, similar to most viruses). New methods and tools are constantly being developed but it can be difficult to know which to use.
In this tech tip, Biotium scientists share their expertise for optimal fluorescent staining and detection of EVs by flow cytometry. To learn about EVs and EV biology, see our recent blog post on the subject.
![]()

Jump to a section:
Hoechst & DAPI Everything You Need to Know
How to Stain Live Cells
How to Stain Fixed Cells or Tissue Sections
DAPI and Hoechst Technical Information
Interested in Ordering?
Hoechst and DAPI are popular blue fluorescent, nuclear-specific dyes that can be used to stain live or fixed cells. Both DAPI and Hoechst are minor-groove binding dyes with a preference for A/T-rich regions of DNA over G/C-rich DNA. The dyes have minimal fluorescence in solution, but become brightly fluorescent upon binding to DNA. Therefore, they can be used to stain cells without a wash step. The staining is very stable and the dyes have low toxicity in most cell types. Hoechst and DAPI are extremely stable in water at 10 mg/mL, and can be stored at 4°C for years as long as they are protected from light. However, there are some notable differences between DAPI and Hoechst that are important to highlight.
Hoechst dyes are generally preferred for live cell staining over DAPI because they are less toxic and more cell permeant. Biotium sells both Hoechst 33342 and Hoechst 33258, structurally similar dyes that are widely used in cell cycle studies and as nuclear counterstains for live or fixed cells. Hoechst 33528 is slightly more water soluble and less cell permeant than Hoechst 33342. There have been some reports that Hoechst 33342 induces apoptosis or shows more toxicity in some cell types (see for example Zhang et al., 1997 or Zhang et al., 1999). There are also some reports that note differences in their quantitative staining in some cell types. Both Hoechst dyes are typically used for staining at 1 ug/mL. When working with Hoechst, it is not recommended to store dilute solutions of Hoechst dye, because the dye will be lost to precipitation or adsorption to the container over time. Biotium offers stable concentrated stock solutions of Hoechst in water at 10 mg/mL.
DAPI is somewhat less cell membrane permeant and more toxic than Hoechst dyes, and is therefore preferred for fixed cell staining over live cell staining. As a fixed cell stain we recommend a DAPI concentration at 1 ug/mL, though live cell staining with DAPI can be performed at higher concentrations (usually 10 ug/mL). DAPI is stable in dilute solutions, and can be added directly to antifade mounting medium for long-term use. Biotium offers DAPI dilactate, a more soluble DAPI salt, which is useful for making stock solutions for cell staining. We also offer a ready-to-use stock solution of DAPI in water, and antifade EverBriteTM Mounting Medium with DAPI (see ordering information).
Hoechst and DAPI stain bacteria more dimly than mammalian cells. Live or killed bacteria (gram-negative or gram-positive) can be stained with 12-15 ug/mL Hoechst or DAPI in PBS or 150 mM NaCl for 30 minutes at room temperature. Dead cells tend to stain more brightly than live cells. In S. cerevisiae, DAPI and Hoechst preferentially stain dead cells with nuclear and cytoplasmic localization. In live yeast, Hoechst shows dim nuclear and cytoplasmic staining, while DAPI shows dim mitochondrial staining. The dyes can be used to stain yeast at 12-15 ug/mL in PBS.
A less familiar issue with DAPI and Hoechst is photoconversion by UV light, which causes the dyes to fluoresce in other channels. Some strategies to avoid this include imaging green fluorescence before switching to the DAPI channel, or moving to an unexposed field of view before imaging the green channel after UV exposure of the sample (Roberts, 2019). Using hardset mounting medium like EverBriteTM Hardset instead of glycerol-based wet-set medium can reduce photoconversion.
Biotium also offers NucSpot® Nuclear Stains which resolves the issue of photoconversion by offering bright and specific nuclear staining in 7 colors from green to near-IR. Learn more about how to avoid issues with UV photoconversion of DAPI and Hoechst.
Be sure to also check out our protocols for IF staining of cells and other helpful tech tips.
For live cell staining, morphology or viability of some cell types may be affected by medium exchange. In addition, floating dead cells may be lost during medium removal, and suspension cells must be collected by centrifugation to exchange the medium. Direct addition of 10X dye solution is a convenient staining method that doesn't require medium exchange, but care must be taken to mix immediately yet gently to avoid high transient dye concentration or disruption of cells by pipetting. Note that we do not recommend adding highly concentrated dye directly to cells in culture, as this will result in local areas of high dye exposure. Biotium also offers low-toxicity NucSpot® Live Stains stains for long-term live cell imaging, available in green and far-red fluorescence. For short-term imaging, Biotium offers RedDotTM1 far-red stain, which serves as an alternative to Draq5TM and may also be used for cell cycle analysis by flow cytometry.
Live cell staining by medium exchange
Live cell staining by direct addition of 10X probe
DAPI, dihydrochloride salt
Hoechst 33258, pentahydrate
Hoechst 33342, trihydrochloride trihydrate
| Product | Unit Size | Catalog Number |
|---|---|---|
| Hoechst 33258, 10 mg/mL in H2O | 10 mL | 40044 |
| Hoechst 33258, pentahydrate | 100 mg | 40045 |
| Hoechst 33342, 10 mg/mL in H2O | 10 mL | 40046 |
| Hoechst 33342, trihydrochloride trihydrate | 100 mg | 40047 |
| DAPI in H2O, 10 mg/mL | 1 mL | 40043 |
| DAPI, dilactate | 10 mg | 40009 |
| DAPI, dihydrochloride | 10 mg | 40011 |
| EverBrite™ Mounting Medium with DAPI | 10 mL | 23002 |
| Drop-n-Stain EverBrite™ Mounting Medium with DAPI | 10 mL | 23009 |
| EverBrite™ Hardset Mounting Medium with DAPI | 10 mL | 23004 |
Cross-talk between fluorescence channels is an important concern for multi-color imaging experiments. The detection of fluorescence from one dye in multiple detection channels can result in artifactual co-localization of signals. Cross-talk usually occurs because of the overlap of dye excitation and emission spectra, and can be managed by careful matching of dye selections to instrument filters, titration of probes to prevent overly bright signal, and imaging each channel individually to prevent cross-excitation by different laser lines. In any multi-color imaging experiment, single stain controls (separate samples stained with each probe by itself) are crucial for ensuring that cross-talk is minimized.
Another source of cross-talk that researchers may be less familiar with is dye photoconversion. This is a change in the spectral properties of a fluorophore that results from its exposure to light. The commonly used blue fluorescent nuclear dyes DAPI and Hoechst undergo UV-induced photoconversion to form green- and red-emitting fluorophores (Zurek-Biesiada et al. 2013, Karg and Golic 2017). Many microscopists are accustomed to using epifluorescence with UV excitation to view and focus on Hoechst- or DAPI-stained nuclei before viewing fluorescence in other channels. This practice can cause DAPI and Hoechst to fluoresce in both the DAPI channel and the FITC or Cy®3 channels. While it is much less bright than the original blue dye fluorescence, the green nuclear signal from the photoconversion product could interfere with imaging of other fluorescent probes or labeled antibodies, especially for low abundance targets, appearing as spurious nuclear localization. Glycerol-based mounting medium, which often includes DAPI as a counterstain, enhances UV-induced photoconversion.
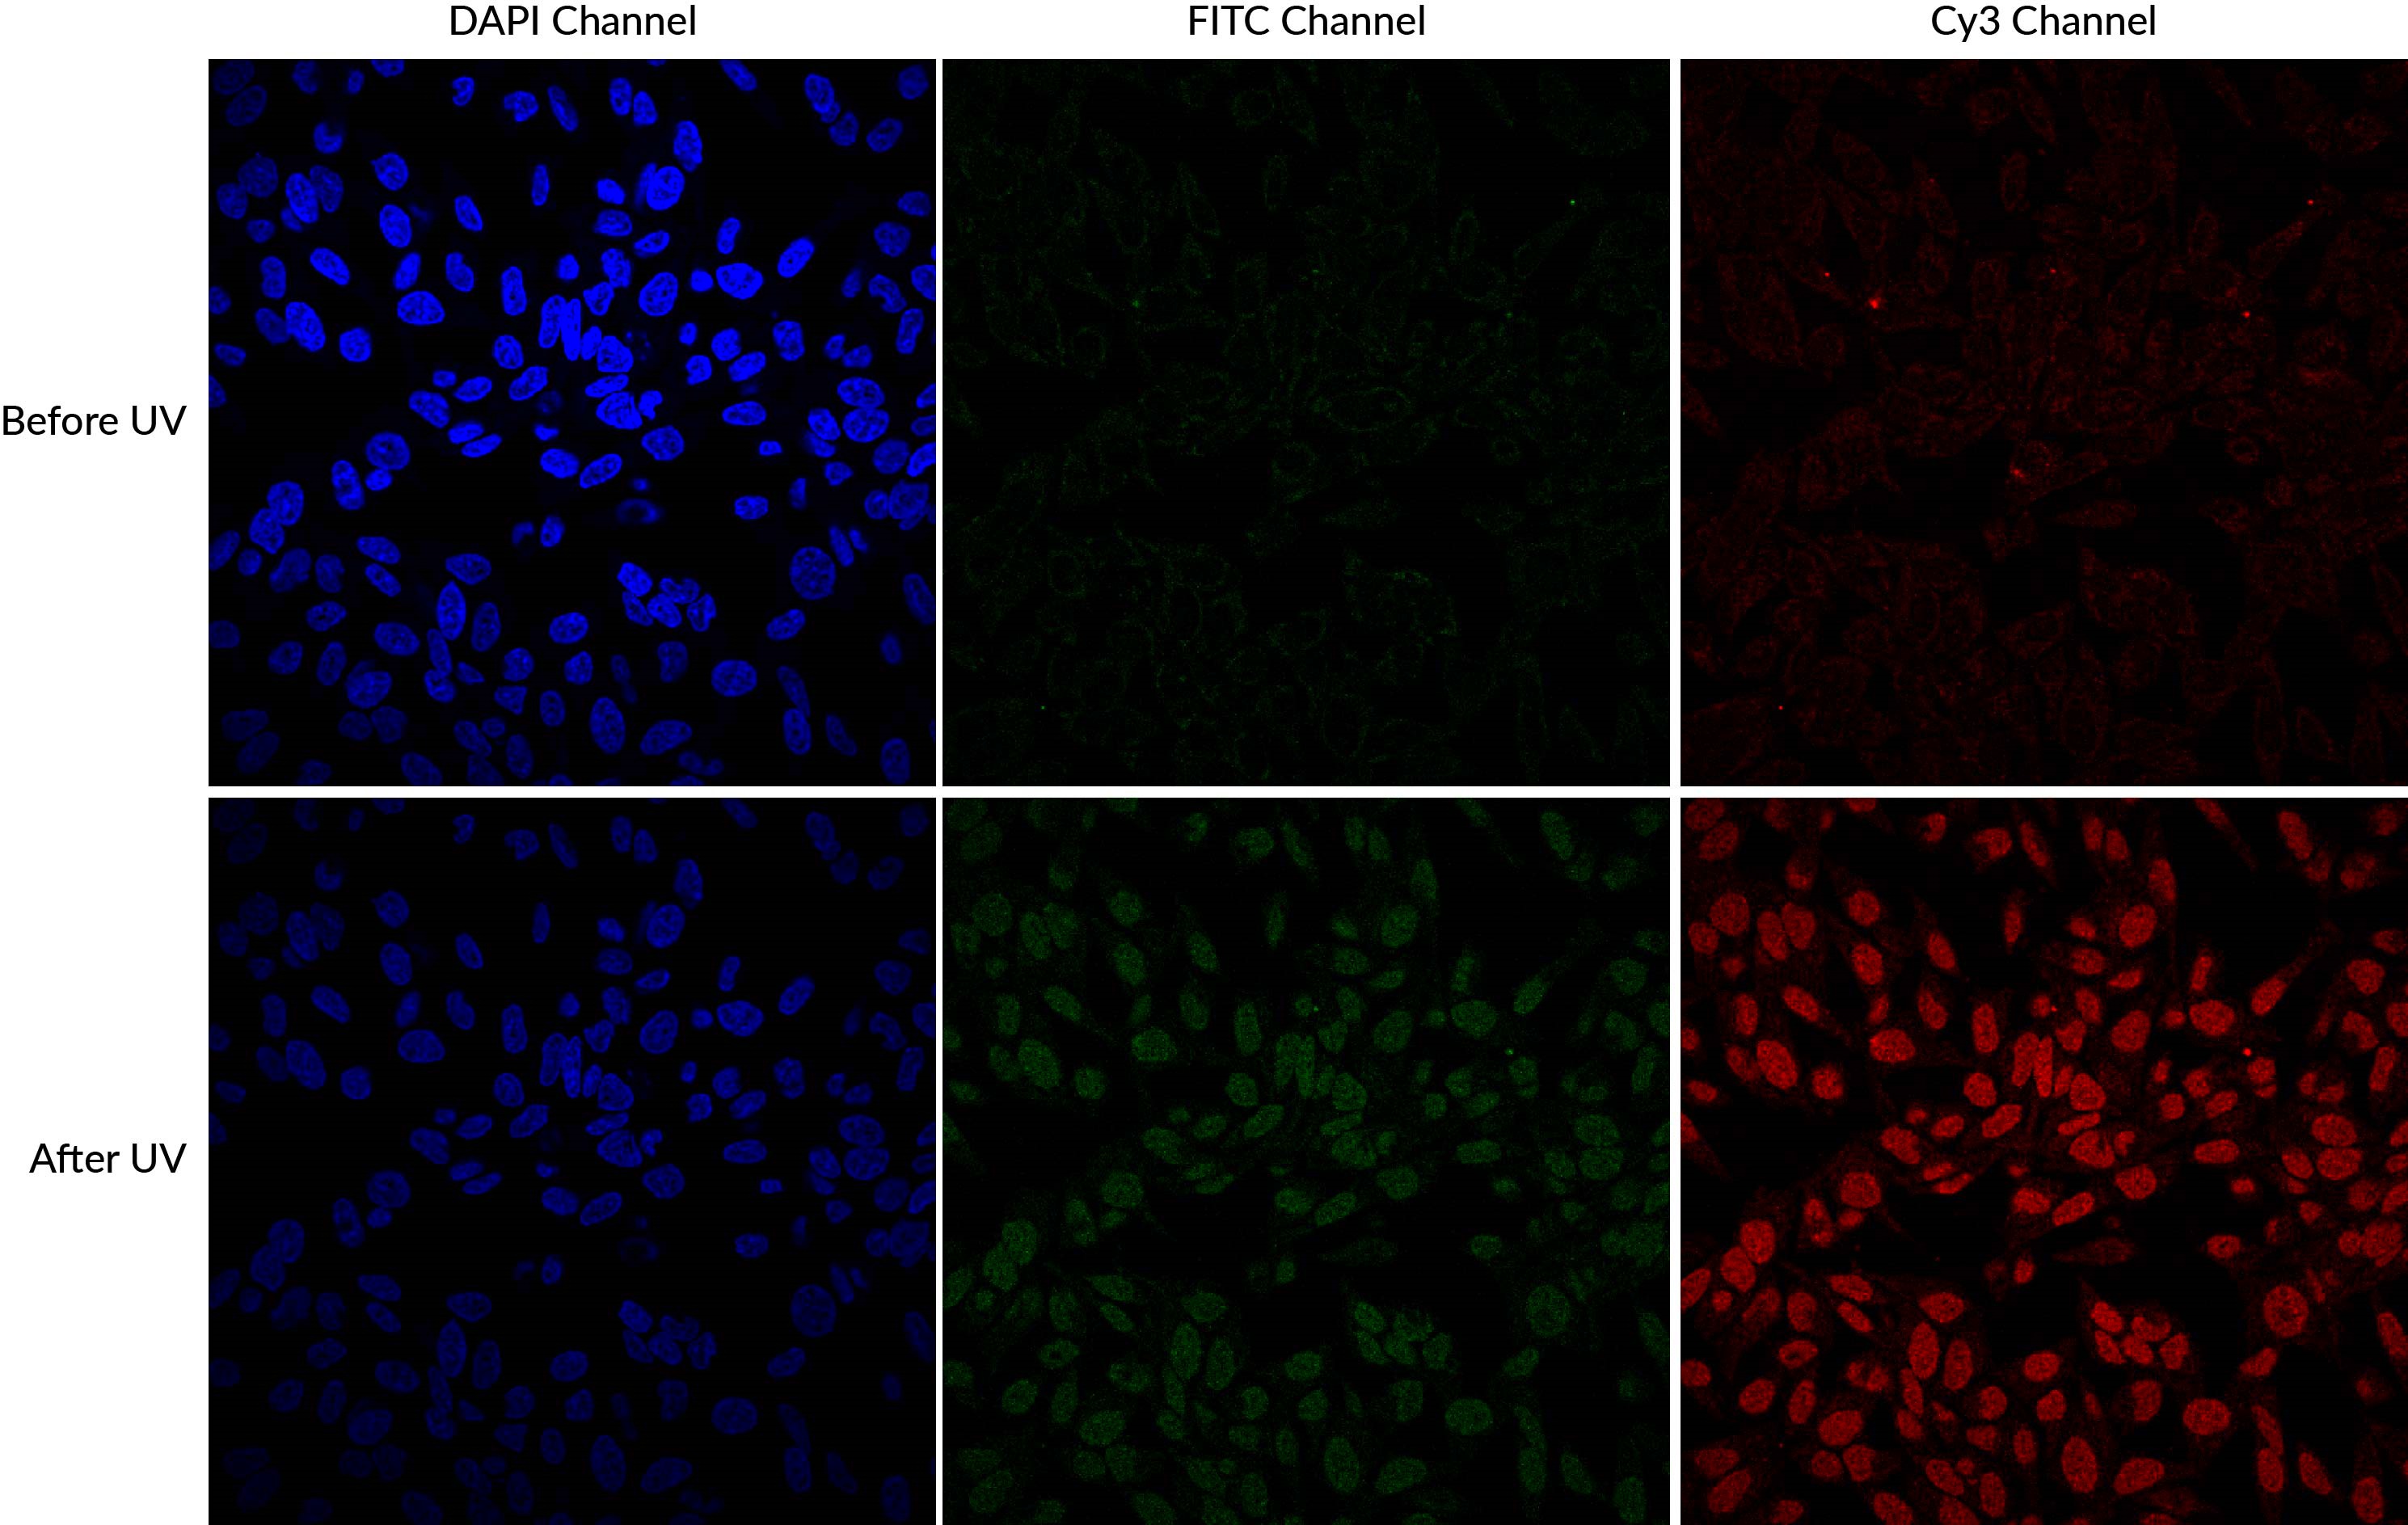
DAPI and Hoechst undergo photoconversion after exposure to UV wavelengths, but not longer excitation wavelengths such as FITC filter cubes or the 405 nm laser line. Once aware of the potential for photoconversion to green fluorescence, it is possible to avoid artifacts through careful imaging practices. One can image green fluorescence before switching to the DAPI channel, or move to an unexposed field of view before imaging the green channel after UV exposure of the sample. Using hardset mounting medium like EverBriteTM Hardset instead of glycerol-based wet-set medium can reduce photoconversion (Roberts et al. 2019). If confocal imaging using the 405 laser line is an option, it is possible to avoid the use of epifluorescence to detect DAPI or Hoechst altogether, which unfortunately sacrifices their utility as aids for finding and focusing on cells. Finally, it is important to include single stain controls for blue nuclear counterstains, especially when detecting low abundance or nuclear targets in other channels.
If photoconversion issues or your experimental design is leading you to avoid using DAPI or Hoechst altogether, Biotium's NucSpot® Nuclear Stains may be a convenient option. These cell-membrane impermeant stains are designed for nuclear specific staining in fixed cells, or selectively staining dead cells in live culture. The stains are available in 7 different colors from green to near-IR for flexible multiplexing. In addition, unlike other green or far-red nucleic acid dyes such as propidium iodide (PI), TOTO®, TO-PRO®, and similar dyes that stain both the nucleus and cytoplasm, NucSpot® Nuclear Stains selectively stain the nucleus in fixed and permeabilized cells without the need for RNase treatment. Biotium also offers NucSpot® Live Cell Nuclear Stains designed for low-toxicity staining for real-time imaging. NucSpot® Live Cell Nuclear Stains are also nuclear specific, compatible with no-wash staining, and include options for FITC or Cy®5 channels.
Alternative far-red nuclear counterstains, such as Biotium's RedDotTM1 and RedDotTM2, avoid the problem of UV photoconversion of DAPI and Hoechst. RedDotTM1 is cell-membrane permeant, and can be used a nuclear stain for live cells, while RedDotTM2 is a counterstain for fixed and permeabilized cells. RedDotTM2 is cell-membrane impermeant, and also can be used for selective staining of dead cells. One disadvantage of RedDotTM1 is that it is more cytotoxic than the commonly used Hoechst 33342 (also available from Biotium), which remains the better choice for nuclear staining of cells that will be cultured for more than a few hours. Like all far-red dyes, RedDotTM1 and RedDotTM2 fluorescence is not visible to the human eye, and must be imaged using a CCD camera or confocal microscope in the Cy5 channel. On the plus side, RedDotTM1 and RedDotTM2 emission spectra are very well separated from green fluorescent dyes and probes, further reducing the potential for artifacts arising from fluorescence cross-talk. In addition, they leave the visible blue fluorescence channel free for detection of other targets.
Learn more about Biotium's selection of novel nuclear stains for microscopy or flow cytometry.
Karg, T.J. and Golic, K.G. (2018). Photoconversion of DAPI and Hoechst dyes to green and red-emitting forms after exposure to UV excitation. Chromosoma 127 (2): 235245.
Roberts, L. (2019). Roberts et al. 2019 Microscopy Today, 27(5), 18-24. doi:10.1017/S1551929519000804
Żurek-Biesiadaurek, D., Kędracka-Krok, S. and Dobrucki, J. W. (2013). UV-activated conversion of Hoechst 33258, DAPI, and Vybrant DyeCycle fluorescent dyes into blue-excited, green-emitting protonated forms. Cytometry, 83A: 441451. doi:10.1002/cyto.a.22260
Download the RedDotTM1 and RedDotTM2 flyer
TOTO and TO-PRO are trademarks or registered trademarks of Thermo Fisher Scientific; Cy Dye is a registered trademark of Cytiva.